Click 'Admin Panel' > 'Manage' > 'Charging'
Overview
Charging plans let you define hourly rates for work on specific assets (printers, routers, MySQL etc), or work of a specific type (remote, on-site, telephone). Once created, you can add a charging plan to a customer contract.
Each charging plan lets you define:
1. Default hourly rate (mandatory). This rate is charged for any work not covered by a variable rate.
2. Variable rates (optional). A variable rate is one that you charge for specific types of work.
You can set up variable rates for work that is:
- A certain duration ('Longer than 20 minutes', 'Greater than an hour' etc)
- Of a specific support type ('Telephone', 'Remote', 'On-site')
- On a particular type of asset (printers, servers, workstations etc)
You define a variable rate by creating a rule which states the price of a certain type of work. You can add multiple rules to a single charging plan, allowing you to set up different charges for different types of work.
Service Desk then checks your support tickets and charges the default rate or the variable rate as appropriate.
Default charging plan
If you don’t create a custom plan for a customer, then you can use the default charging plan if required. The default plan is simply a list of rates that you will charge for work on certain assets. The rates in the default plan are called ‘Global rates’.
- Click 'Admin Panel' > 'Manage' > 'Charging' > ‘Default Charging’ to view and modify the global rates.
- The global rates are charged if:
- The customer does not have a contract
OR
- Their contract doesn’t include a custom charging plan
Notes:
- You can assign a plan to a contract when creating a *new* contract ('Staff Panel' > 'Contracts' > 'Add Contract')
- You cannot edit a contract to add/replace a charging plan. You must go through the 'Charging' interface to assign a plan to an existing contract ('Admin Panel' > 'Manage' > 'Charging').
The charging plans interface
- Login to ITarian
- Click 'Applications' > 'Service Desk'
- Open the admin panel (see the last link on the left)
- Click 'Manage' > 'Charging'
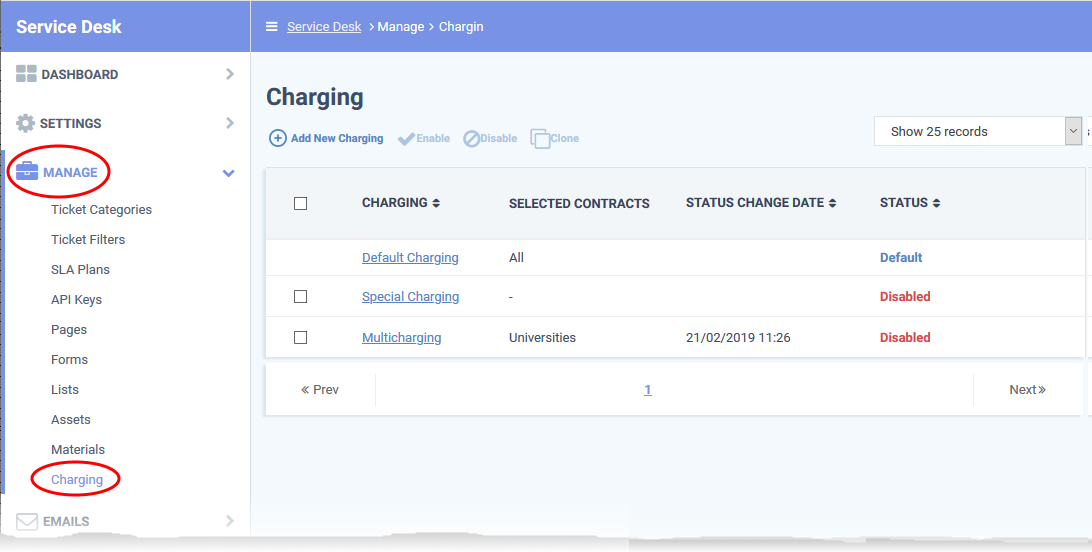
The charging area lets you add new plans, edit existing plans, and assign plans to contracts.
- Charging - Name of the charging plan. The plan name to view and edit its details.
- Selected Contracts - Contracts which are using this plan.
- Status Change - Date and time the plan was last updated.
- Status - Whether or not the plan is active. Possible values = Enabled or Disabled.
See the following links if you need help on any area:
Default charging plan
Click 'Admin Panel' > 'Manage' > 'Charging' > ‘Default Charging’
The default charging plan is a list of prices you will charge for work on specific assets. The rates in the default plan are called the ‘Global Asset Rates’.
- You can edit the default charging plan to set/change the global asset rates at anytime
- Rates for new assets:
- You must first add the new asset to ‘Admin Panel’ > 'Manage' > 'Assets'.
- You can then specify a rate for the asset in the default charging plan ('Admin Panel' > 'Manage' > 'Charging' > ‘Default Charging’).
- See this page if you need help to view, add and manage asset types.
- The default charging plan is only used if the customer does not have a contract, or if their contract doesn’t include a custom charge plan.
View and edit the default charging plan
- Click 'Admin Panel' (see the last link on the left)
- Click 'Manage' > 'Charging'
- Click 'Default Charging' from the list of plans
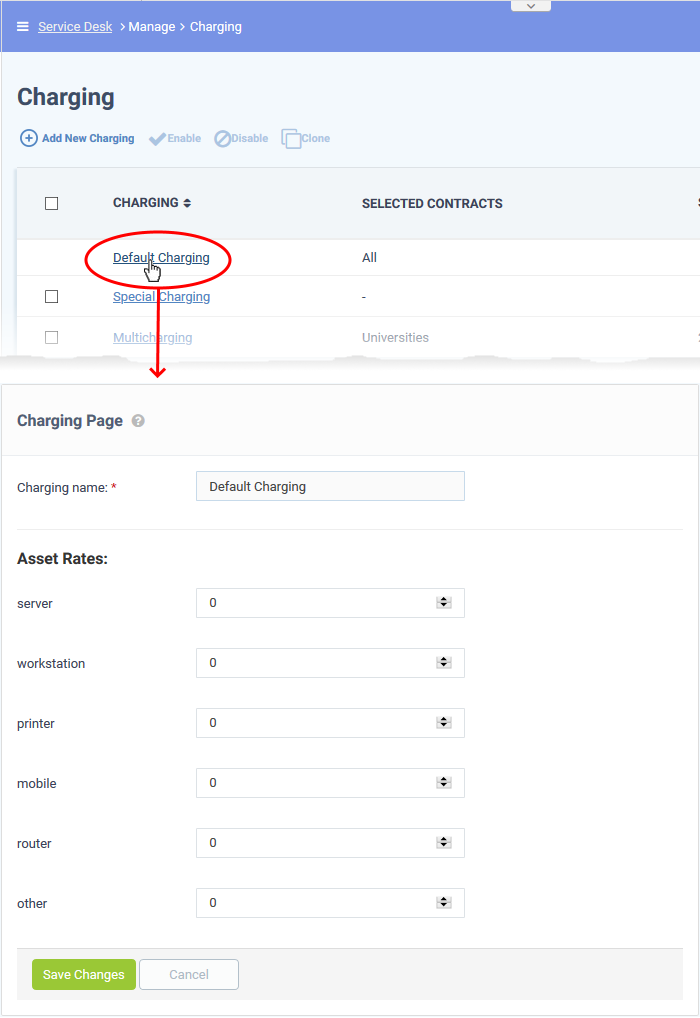
- Charging Name - The label of the default charging plan. You cannot edit the label.
- Asset Rates - The list of assets added to 'Manage' > 'Assets’.
Set the hourly rate for each asset as required. The rate should be in the default currency of your account at 'Admin Panel' > 'Settings' > 'System'.
Create a new charging plan and assign it to contracts
There are two ways to add new charging plans:
Manually create a charging plan
- Open the 'Admin Panel' (see the last link on the left)
- Click 'Manage' then 'Charging'
- Click 'Add New Charging' at the top of the 'Charging' interface:
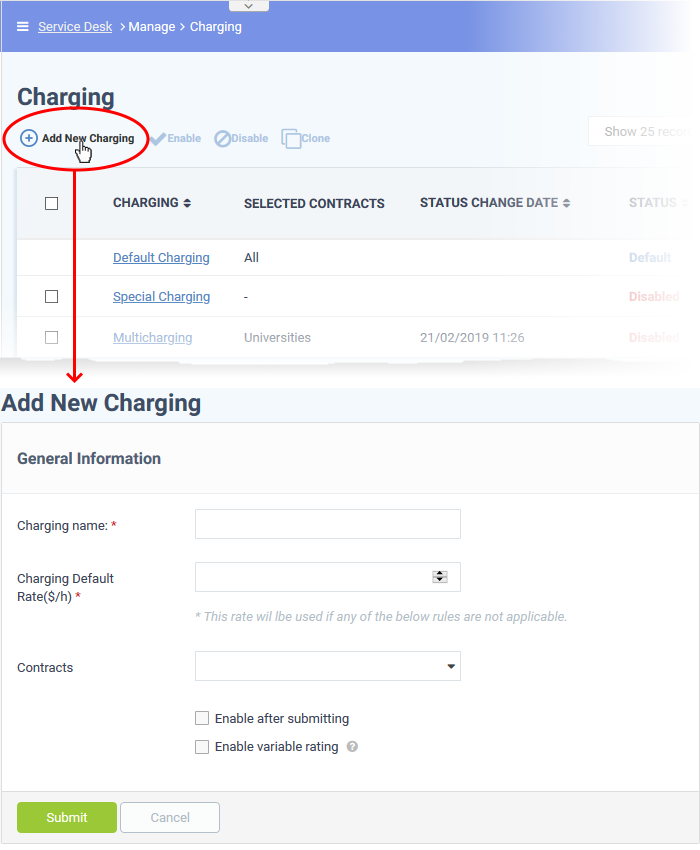
- Charging Name - Create a short label for the plan. The plan name will appear in the details page of all contracts to which it is applied.
- Charging Default Rate - The 'regular' per-hour rate that you will charge under this plan. The default rate is applied to all work that is not covered by any 'variable' rates you create.
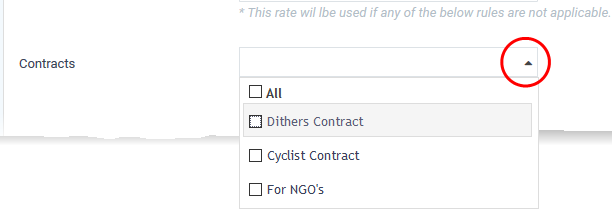
- Contracts - Select the customer contracts to which the charging plan should apply.
- A contract is applied to a specific customer.
- Click 'Staff Panel' > 'Contracts' to create and manage contracts. See this wiki to read more about contracts.
- Enable after submitting - The charging plan becomes active immediately after saving. By enabling a plan, you activate it on all contracts to which it is added. Leave this deselected if you want to enable the plan later. See 'Enable / Disable a Charging Plan' for more details.
- Enable variable rating - Create custom hourly rates for specific types of service. For example, you might want to charge a different rate for on-site visits, or for work on a particular type of asset.
- Variable rates are defined by creating a rule with specific conditions. If the conditions are met then the variable rate kicks in.
- You can add multiple rules to a charging plan.
- The 'default' rate is applied to sessions which do not meet the criteria of any rules.
Once saved and enabled:
- You can return to 'Admin Panel' > 'Manage' > 'Charging' to edit the plan if required.
- You can assign a plan to a contract when creating a *new* contract ('Staff Panel' > 'Contracts' > 'Add Contract')
- You cannot edit an existing contract to change/replace a charging plan. You must go through 'Admin Panel' > 'Manage' > 'Charging' to assign a plan to an existing contract.
Create a variable rate rule
- Select 'Enable variable rating'
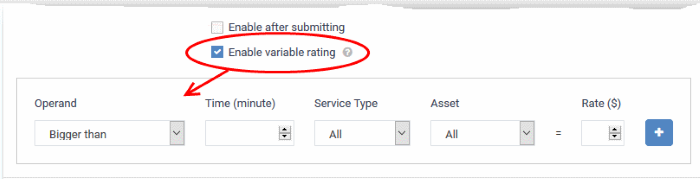
The options for creating a rule are as follows:
- Operand and Time - The condition for the duration of the service session. Select the relationship operator from the operand drop-down and enter the duration (in minutes) in the 'Time' combo box. For example, you can set the duration as 'Bigger than 120 minutes, Smaller than 60 minutes' and so on.
- Service Type - Choose the service type offered during the session. The available options are:
Remote
Telephone
On-site
All (work of any type will be covered by the rule)
- Asset - The type of item that is worked on. The drop-down contains the default assets and custom assets added to your Service Desk account.
- Rate - Specify the per-hour rate to be charged if the above conditions are met.
- Click the '+' button to add more rules
- Click 'Save Changes' to save the plan. If enabled, it will be automatically applied to any contracts that you specified.
Clone an existing charging plan to create a new plan
- Open the 'Admin Panel' (see the last link on the left)
- Click 'Manage' then 'Charging'
- Select a charging plan which you want to use as a template and click 'Clone'

- Enter a name for the new charging plan and click 'Yes, Do it!'
The 'Copy Charging' interface opens with values from the original plan. You can edit these as required for your new plan.
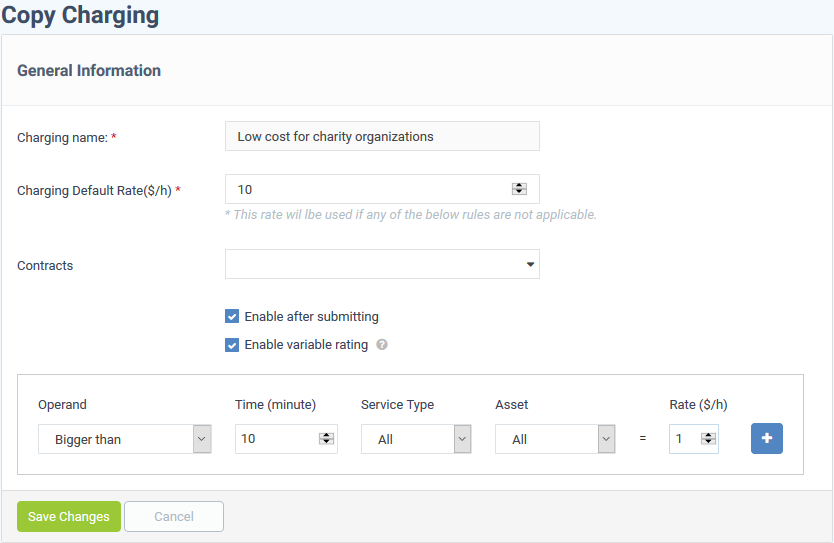
- Edit the default and variable rates as required. See Manually create a charging plan for more details on the options in this interface.
- The 'Contracts' field shows the contracts to which the source charging plan is applied. Modify the contracts to which new plan will apply as required.
- Variable rating. Configure any variable pricing you wish to implement on your new plan.
- Click 'Save Changes' to add the plan.
Edit a charging plan
You can edit a custom charging plan to change the default rate, variable rates, and the contracts to which it is assigned.
- Open the admin panel (see the last link on the left)
- Click 'Manage' > 'Charging'
- Click the name of the charging plan you want to edit
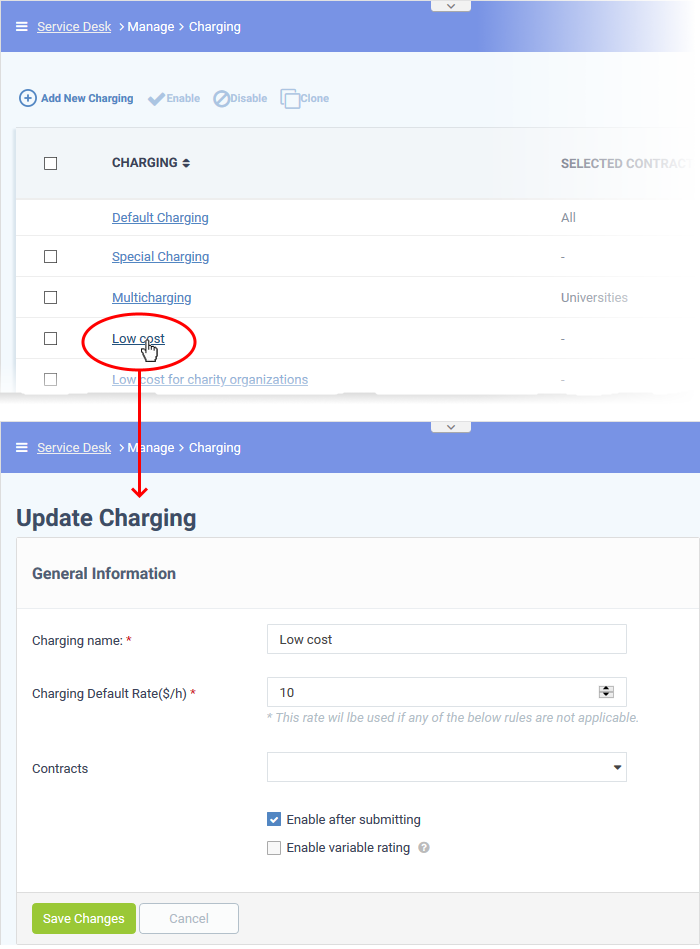
- Edit the default and variable rates as required. See Manually create a charging plan for more details on the options in this interface.
- The 'Contracts' field shows the contract(s) to which the charging plan is currently applied. Modify the contracts to which the plan will apply as required.
- Variable rating. Configure any variable pricing you wish to implement on your new plan.
- Click 'Save Changes' to save the plan.
The changes are applied to the contracts from the time of saving.
Enable / Disable a charging plan
- Click 'Admin Panel' > 'Manage' > 'Charging' > select a plan > click the 'Enable' or 'Disable' button above the table.
- A plan must be enabled before it will apply to a contract.
- If a charging plan is disabled, it will be removed from all contracts to which it was applied. The contracts will revert to the default charging plan (global asset rates).
- You cannot just re-enable the plan to re-associate it with a contract. You must go into the plan details page and re-select the contracts you require. See Edit a Charging Plan for help with this.
Enable or disable a charging plan
- Open the 'Admin Panel' (see the last link on the left)
- Click 'Manage' then 'Charging'
- Select a charging plan with 'Disabled' status and click 'Enable' at the top to enable it
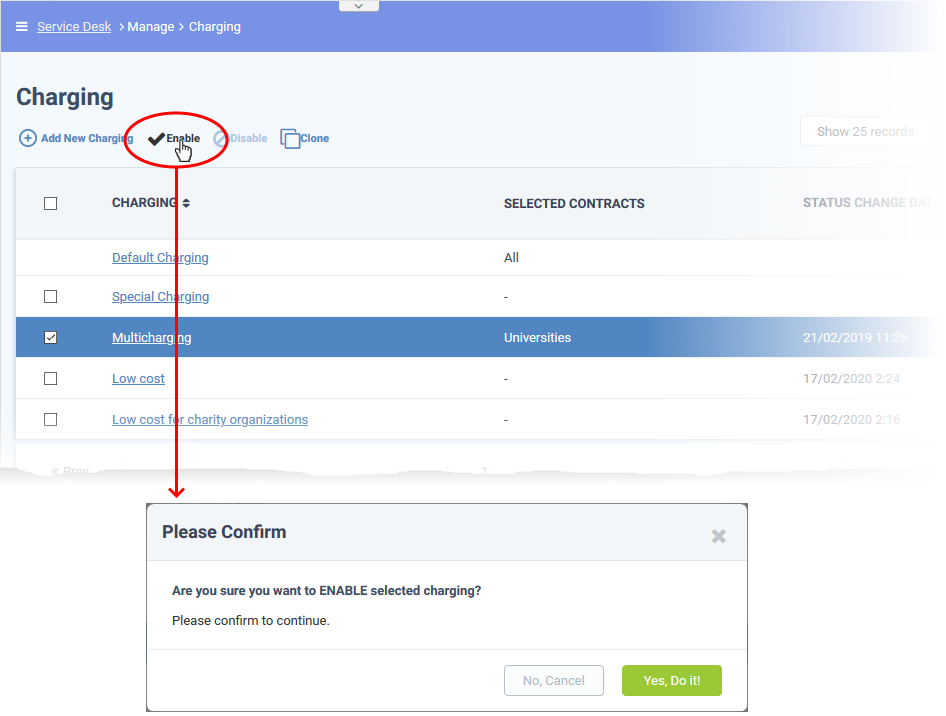
- Click 'Yes, Do it! In the confirmation dialogue
- Select a charging plan with 'Enabled' status and click 'Disable' at the top to disable it.
Further reading