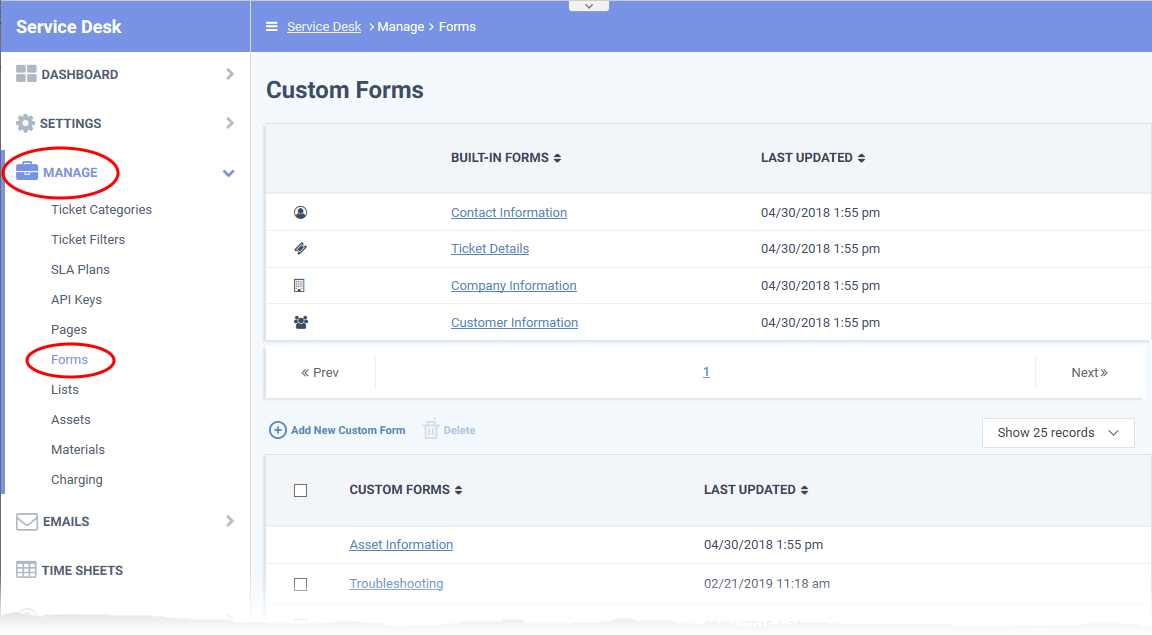
Click 'Admin Panel' > 'Manage' > 'Forms'
What are forms?
Forms are used in various Service Desk interfaces to collect information from end-users, customers and your company. For example, the contact form collects a new user’s name, email address and phone number.
You can manage forms at 'Admin Panel' > 'Manage' > 'Forms'
- Built-in forms - Service Desk includes the following standard forms which you can edit as required:
- Contact Information - Collect the email / phone / address details of new users. This form is published on your support portal.
- Ticket Details - Collect details about the nature of an issue from a user. This can include a description of the issue, the asset affected, the priority level, and more. This form is published on your support portal.
- Company Information - Collect and store details about your company (name, address, website etc). This information is inserted into the system emails sent by Service Desk. You can view and populate this form at 'Admin Panel' > 'Settings' > 'Company' > ‘Basic Information’.
- Customer Information - Collect details about a customer organization. Staff can add new customers with this form at 'Staff Panel' > 'Users' > 'Customers' > 'Add New Customer'.
- Custom forms – You can create custom forms to collect specific pieces of data, usually from end-users.
For example, you may have a ticket category on your support website called ‘Laptop Issues’. You can show a custom form to users that choose this category. The form could ask relevant questions like the laptop model/brand, the operating system and the nature of the problem(‘Windows won’t boot’, ‘VPN connection’, ‘Problem with an application’, etc).
- Custom lists - Lists are used to populate the menus in your forms. For example, you may have a drop-down menu on one of your forms which asks ‘What is your laptop’s operating system?’. The custom list for this menu would include items like ‘Windows 10’, ‘Windows 8/8.1’, ‘Ubuntu’, Debian’, ‘Chrome OS’ etc.
Add a new custom form
- Login to ITarian
- Click 'Applications' > 'Service Desk'
- Open the admin panel (see the last link on the left)
- Click 'Manage' > 'Forms'
- Click 'Add New Custom Form'
You can now construct your custom form:

Title: Enter a label for the form page. For example, ‘Tell us about your problem ’. The title is shown at the top of the page.
Instructions: Enter short guidance for the user. For example, 'Please answer the following questions to help us get started on your issue'.
Form Fields
- Sort: Drag and drop the fields to your preferred order. The questions are shown in this order on your form.
- Label: Enter the name of the field. This should relate to or introduce the item you select in the ‘Type’ column.
- Type: Select the type of input expected from the user.
- Basic fields - Form elements for the user to complete. If you select one of these then your label should tell the user what information is expected of them.
- For example, ‘Short answer’ and ‘Long answer’ are blank spaces. Your label should tell the user what to type - ‘Name’, ‘Address’, etc.
- Similarly, ‘Checkbox’ means the form will show a checkbox to the user to tick as appropriate. Your label should provoke a simple ‘Yes’ or ‘No’ response. For example, ‘I have read and agree to the terms and conditions’, or ‘Save this payment type’.
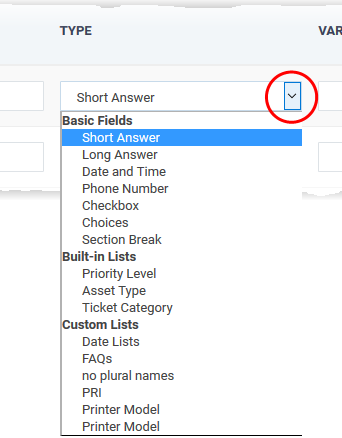
- Built-in / Custom lists - These allow users to select their answer from a preset list. For example, the ‘Priority Level’ list is a drop-down menu with ‘Low’, ‘Normal’, ‘High’ and ‘Critical’.

- Built-in lists cannot be edited but can be made public or kept internal.
- You can create your own custom lists as required. Click here for help to create custom lists for drop-down menus.
- Internal: Select this if the fields are intended for admins and staff to complete. If left unchecked, the fields can be used in both staff forms and customer facing forms.
- Required: Will mark the field as mandatory. Respondents must complete the field in order to submit the form.
- Variable: Specify a label for the field variable that you can call in your email templates.
- Variables can be used in both built-in and custom forms.
- You can insert these variables in the body of your email templates. The variables dynamically fetch the respective field data.
- To add a variable, simply paste a string with the following format to the body of the mail:
%{identifier.variable}
- For example, the ‘User Details’ form has a field called ‘name’. The string to call the user’s name is ‘%{ticket.user.name}’. You then enter ‘Hi %{ticket.user.name}’ in your auto-responder mail. A user called ‘Bob’ creates a ticket. The mail to him would read ‘Hi Bob’.
- Custom forms can be added to the following interfaces:
1. Ticket Categories - 'Admin Panel' > 'Manage' > 'Ticket Category' > 'Add New Category' or click on a ticket category > ''New ticket options' > 'Custom form'
2. User details - 'Staff Panel' > 'Users' > 'User Directory' > click on a user > 'More' > 'Manage forms'
3. Customer details - 'Staff Panel' > 'Users' > 'Customers' > click on a customer > 'More' > 'Manage forms'
4. Ticket details - 'Staff Panel' > 'Tickets' > select a ticket category > click a ticket number to open it > 'More' > 'Manage forms'
- The identifier depends on the type of interface to which the custom form is added. The following table shows the identifiers for the interfaces in which forms are used
|
Interface
|
Variable format
|
|
Ticket categories and Ticket details
|
%{ticket.variable}
|
|
User details
|
%{ticket.user.variable}
|
|
Customer details
|
%{customer.variable}
|
Let’s say you added a new field called ‘Salutation’ to a form, entered ‘salutation’ in the variable column and apply the form to the user details interface ('Staff Panel' > 'Users' > 'User Directory' > click a user > User page). You could reference the user’s actual salutation in an email template with the variable %{ticket.user.salutation}.
- See this wiki if you need help to use variables in email templates.
- Delete: Use this checkbox to remove a field.
- Internal notes: Add any remarks about the form. Only admins and staff can see these comments.
Click 'Add Form' to save the form
- Saving the form enables the field configuration option:
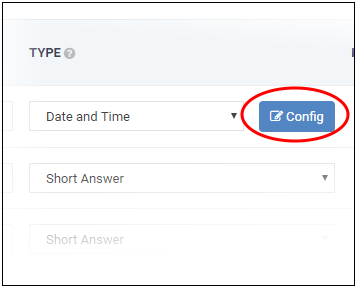
- Click the 'Config' button to view and edit field properties. The field properties depend on the form parameter. For example, the 'Date' properties are shown below:
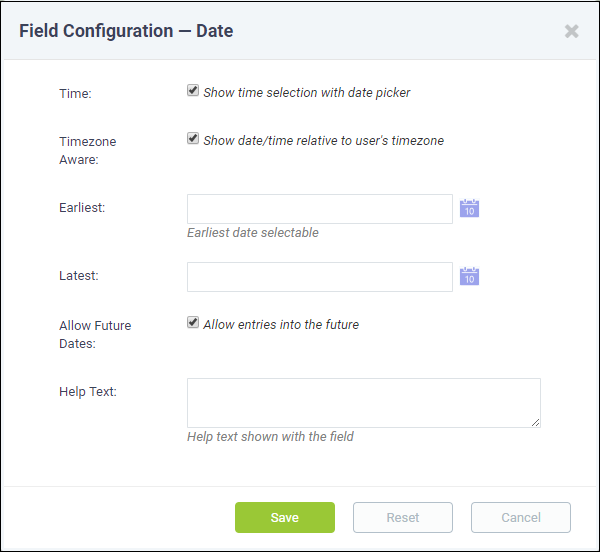
- Update the fields as required. Click 'Save' for your settings to take effect.
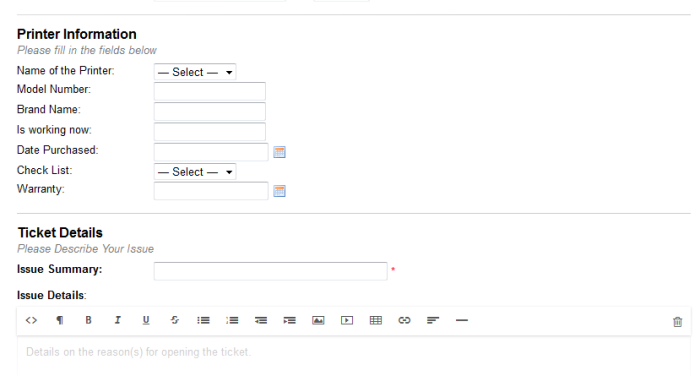
An example custom form is shown below:
Edit a built-in or custom form
- Open the admin panel (see the last link on the left)
- Click 'Manage' > 'Forms'
- Click the name of the built-in form or custom form
The 'Contact Information' built-in form is shown below as an example:
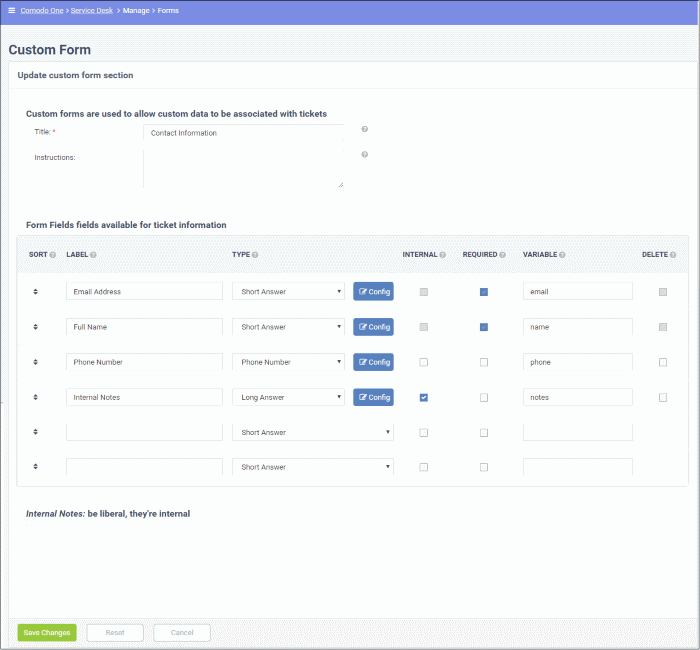
- Update the editable fields as required. The update procedure is similar to adding a new custom form. See above for help with this.
- Click ‘Save changes’
- The updates will appear in all interfaces that use the form.
Add a custom list
Click 'Admin Panel' > 'Manage' > 'Lists'
- This area lets you manage lists of items which populate the drop-down menus on your forms.
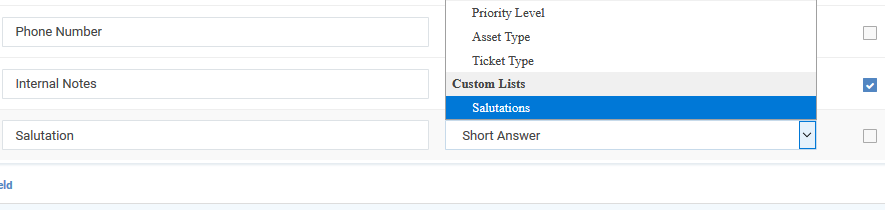
- For example, if you add a custom field called ‘Salutation’ to the new user (contact information) form, then your list would include items like ‘Mr’, ‘Mrs’, ‘Ms’, ‘Senor’, ‘Senora’, etc.
- Once saved, you can select your new list in the ‘Type’ column of the form edit screen. For example:
- Click ‘Admin Panel’ > ‘Manage’ > ‘Forms’
- Click on the ‘Contact Information’ from
- Click ‘Add new field’. Type ‘Salutation’ as the label
- You can select your custom list from the ‘Type’ drop-down:
- You can also set up multi-level lists with a 'parent-child' structure. The contents of the child list dynamically change depending on the item chosen in the parent list.
Create a new custom list
- Open the admin panel (see the last link on the left)
- Click 'Manage' > 'Lists'
- Click 'Add New Custom List':
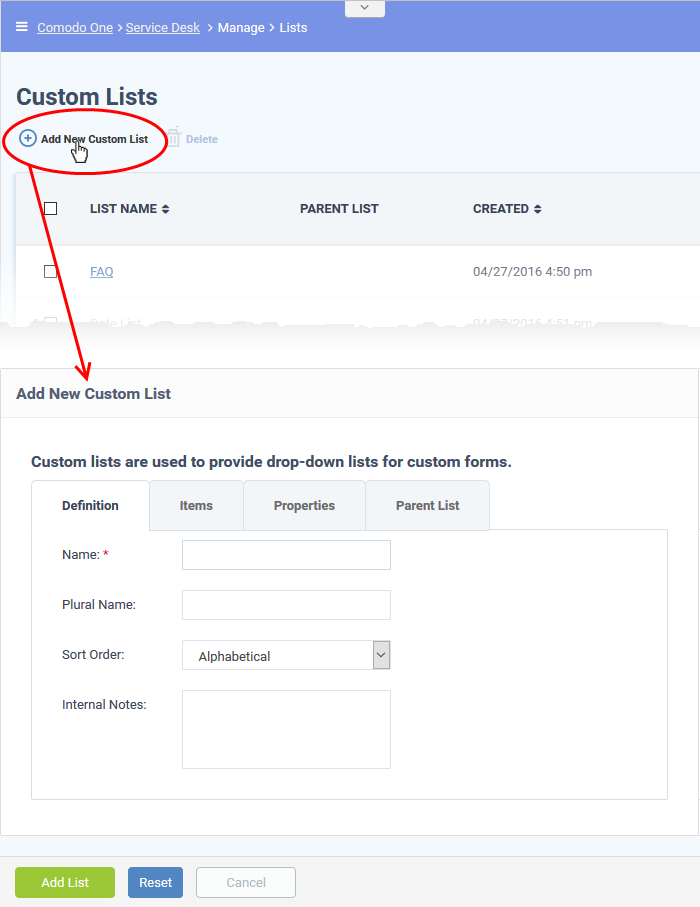
Follow these steps to create your list:
Step 1 - General settings
Open the 'Definition' tab in the new list screen:
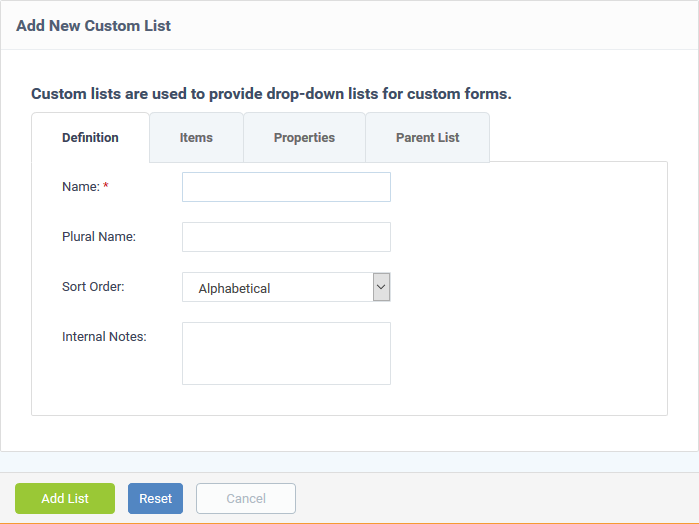
- Name: Create a label for the list. This should describe the items in the list itself. For example, if you add a field called ‘Operating System’ to your new ticket form, then you could enter ‘OS’ as the name of the list.
- Plural Name: Enter the term to describe multiple instances of the list. For example, if your list is called ‘Country’, then the plural is ‘Countries’. The plural form is shown in the 'Type' column of the field at ‘Admin Panel’ > ‘Manage’ > ‘Forms’. If you leave this field blank, Service Desk will simply add an ‘s’ on the end of the name.
- Sort Order: Choose how list items should be shown in the list (alphabetical, reverse alphabetical, or sorted manually). The options selected here will be applied to the items in the 'Items' tab.
- Internal Notes: Add any comments about the list. The comment are only visible to staff and admins.
Click 'Add List' to save the list
Step 2 - Add items to the list
- Click the 'Items' tab.
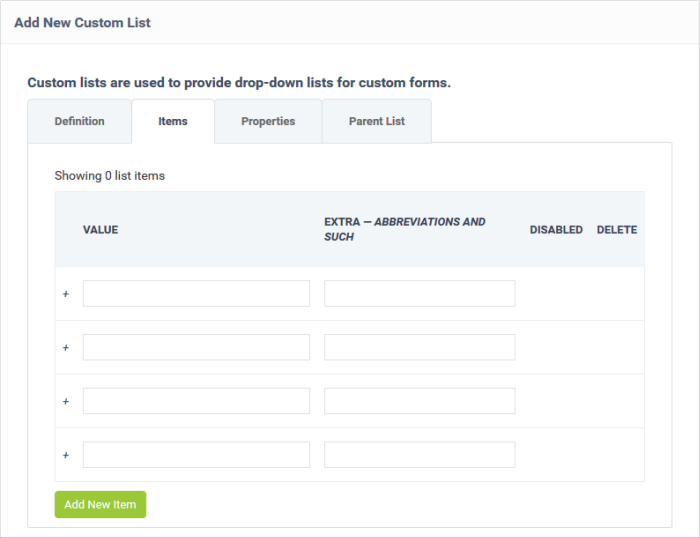
Type each item you want in the list on a separate row. These are the options you will present in the drop-down menu.
For example, if your list is called ‘Operating System’, then your items could be ‘Windows 10’, ‘Windows 8/8.1’, ‘Ubuntu’, ‘Debian’, ‘iOS’, ‘Android’ etc.
- Value - Enter the label of the item. This is what the user sees in the list.
- Extra - Abbreviations and such.
- Disabled - Enable or disable the item. Disabled items are not shown in the drop-down, but can be quickly re-enabled later.
- Delete - Remove the item.
- Click 'Add New Item' if you want more than four items in the list.
- Click 'Save Changes'. The 'Disabled' and 'Delete' check-boxes become active after you save the list.
You can finish at this point if required.
The custom list is available for selection in the ‘Type’ column of the forms available at ‘Admin Panel’ > ‘Manage’ > ‘Forms’.
Steps 3 – 5 are optional, allowing you to add tool-tips to your custom list and to create child lists.
Step 3 - Define item properties (optional)
- The 'Properties' tab lets you add more details about the items in your list. Staff and users can see this information when they place their mouse over the item.
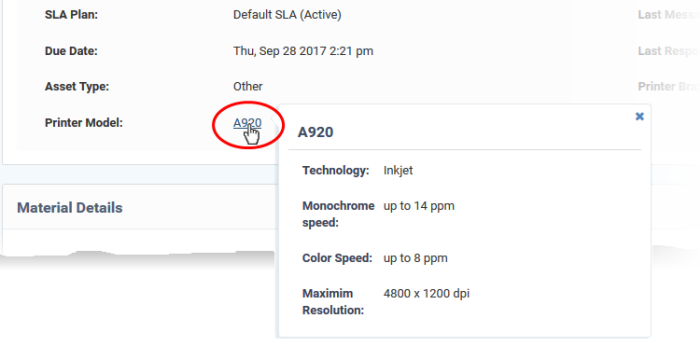
- For example, say you added a custom field, ‘Printer Model’, to your ‘Ticket Details’ form. You then created a custom list which consists of various printer models.
- You could add 4 items in the ‘Properties’ tab - 'Technology', 'Monochrome Speed', 'Color Speed' and 'Maximum Resolution'. You can then define values for the 4 properties for each printer model.
- Users select the model they are having problems with when they create their ticket. Staff and users can then see the additional model info in the ticket details screen:
Example process:
- Populate the ‘Definition’ and ‘Items’ tabs as explained in steps 1 and 2
- Click the ‘Properties’ tab.
- Create your properties. In our example, 'Technology', 'Monochrome Speed', 'Color Speed' and 'Maximum Resolution'.
- Leave the ‘Type’ as ‘Short Answer’ for now.
- Click ‘Save Changes’
- Go back to the ‘Items’ tab
- Click the ‘Properties’ link in the row of your first item
- Type the specs of the item concerned for each property then ‘Save’.
- Repeat for all items in the list
- Click ‘Save Changes’ to save the entire list.
- The additional properties will be visible to staff and users in the ticket details screen.
Add properties to a list
- Click the 'Properties' tab
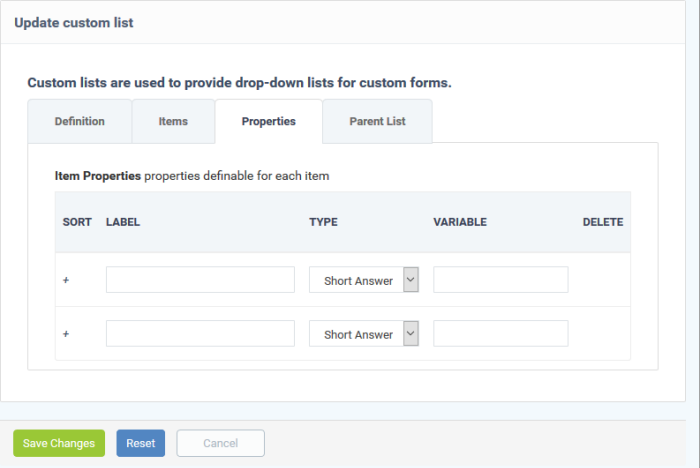
- Label: Type the name of the property. For example, ‘Maximum Resolution’.
- Type: Choose how you want to present the information. ‘Short Answer’ means you can type a short definition into a text-box.
Tip: If required, you can create a custom list of parameters. You can then select that as drop-down for entering the values for the property.
- Variable - Enter a variable name for the field data. The variables can be used in email templates for sending automated messages.
- For example if you use the variable name ‘resolution' for the 'Maximum Resolution' property, then you can use ‘%{identifier.resolution} in email templates to fetch the actual value. The identifier depends on the interface in which you use the form. See above for explanation of using variables in the email templates.
- Delete - Lets you remove the parameter while editing the list.
Note: The 'Variable' and 'Delete' options will be active after you save the list.
- Click 'Save Changes' to save the list
- Reopen the 'Properties' tab after saving the list.
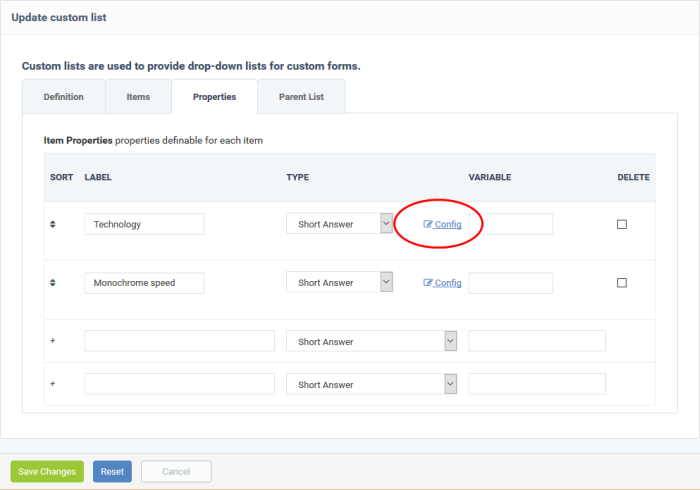
- Config: Click the 'Config' button for a property to set up how the property field is shown for entering the value in the 'Item Properties' dialog (next step). You can also set the limits, specify help text shown for the field, lead text shown inside the field and more. The example below shows the configuration screen for the 'Short Answer' type field
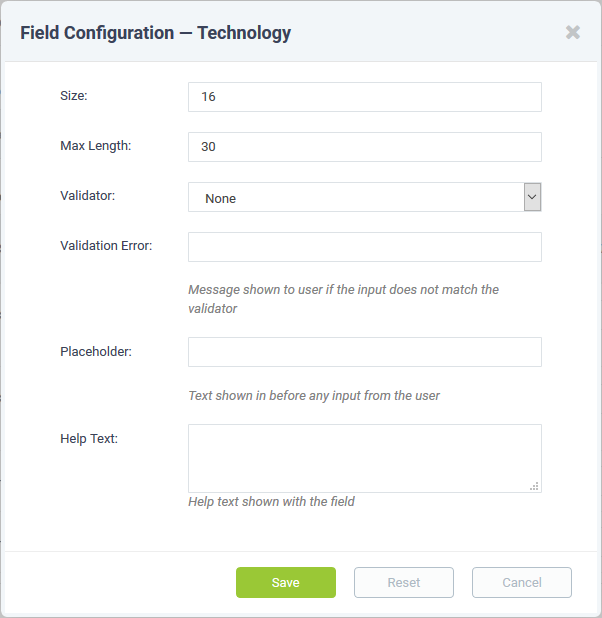
- Configure the field and click 'Save'
- Repeat the process for configuring other properties
Tip: You can add more properties using the new blank items appearing in the interface and repeating the process. Also, you can manually sort the items to the order in which they have to appear in the 'Properties' tool tip, by dragging the icon in the 'Sort' column to required position.
- Click the 'Save Changes' to save the properties list.
Step 4 - Enter values for the properties (optional)
- Click the 'Items' tab after saving the properties list
- Click the 'Properties' link of an item
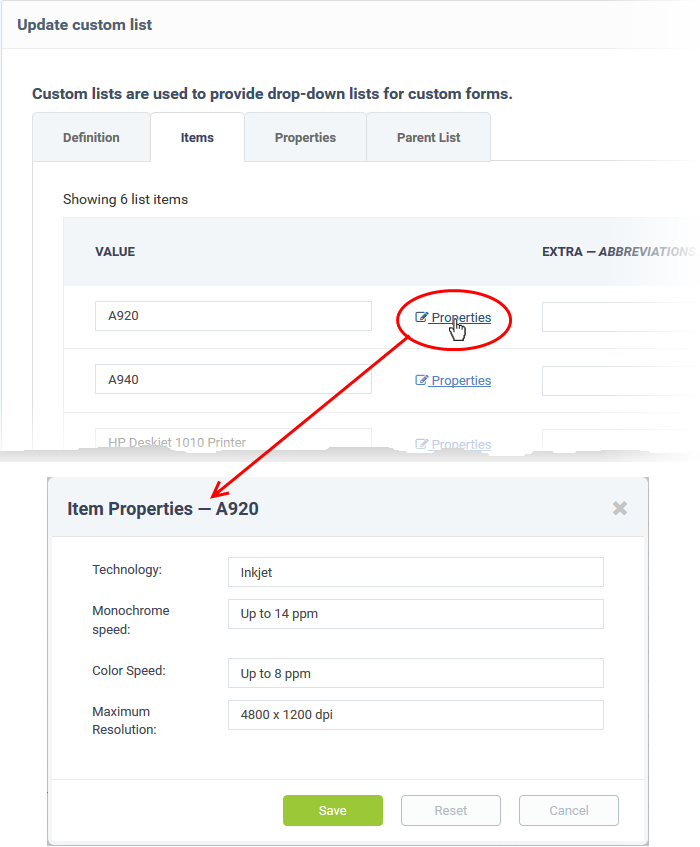
The fields added under the 'Properties' tab in the previous step appear in this dialog.
- Enter the values for the properties and click 'Save'
- Repeat the process to specify properties for all items
- Click 'Save Changes' to save the entered properties for the items
Step 5 - Map list items to parent list (optional)
- Custom lists can be constructed to have a multi-level 'parent-child' structure. When the parent and child lists are selected for successive fields in a custom form, the contents of a child list dynamically change depending on the item selected in the parent list.
- The 'Parent List' tab lets you choose a parent list, if the currently configured list is a child list.
- Once a parent list is chosen, options for selecting the parent item for each item in the currently configured list appears
- The parent and child lists can be added for successive fields in a custom form
- When an item is chosen from the parent field drop-down in the interface where the form is used, the successive child field drop-down shows only the corresponding child items and so on
Configure patent items for currently configured list
- Click the 'Parent List' tab
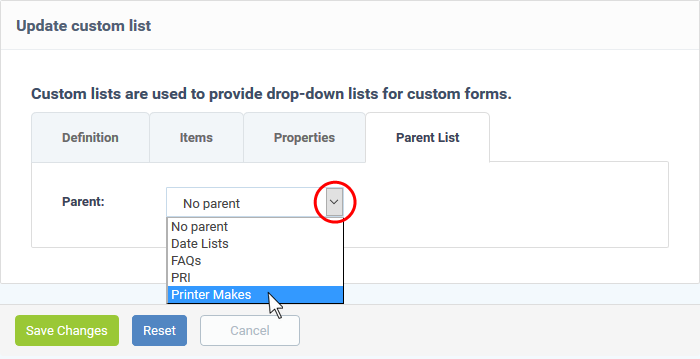
- Choose the parent list for the currently configured list from the drop-down
After selecting the parent list, the list of items in the currently configured list will appear with a drop-down menu beside each (under 'Parent Item'). Each drop-down contains the list of all items included in the chosen parent list.
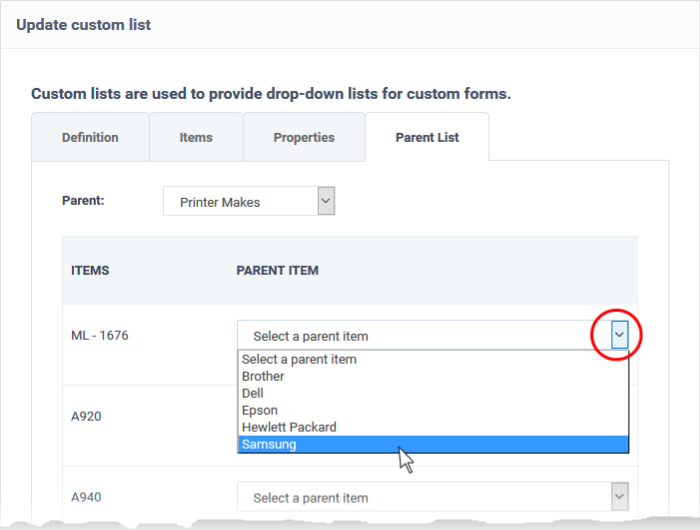
- Choose the respective parent item or each item in the currently configured child list one by one, from the 'Parent Item',
- Click 'Save Changes'
The custom list is added and will be available for adding to custom field drop-downs in custom forms.
Field Types in Custom Forms and Custom Lists
|
Field Type
|
How the field will be displayed in the target form
|
|
Short Answer
|
Single line text box
|
|
Long Answer
|
Multi line text box
|
|
Date and Time
|
Shows the date field with calendar icon to choose a date. If configured for time, displays a drop-down that shows time at intervals of 15 minutes, for the user to choose the time.
|
|
Phone number
|
Shows single line text field for entering phone number. If configured, shows an additional box for 'Extension' number
|
|
Check box
|
Displays a checkbox for the field.
|
|
Choices
|
Displays a drop-down for the user to choose an option. The options to be shown are to be configured from the 'Forms' interface.
Example:
Field Label = Mode of Service
Options = Site Visit, Remote Access
'Choices' is an alternative to ' Custom Lists'. Choices can be used to create an ad-hoc drop-down for a form, rather than creating a custom list under the 'Lists' interface and choosing it for the field in a custom form.
|
|
Section Break
|
Lets you to insert a break in the form between sections in a single form.
|
|
Built-in lists
|
Shows a drop-down menu with options defined in the selected built-in list
|
|
Custom Lists
|
Shows a drop-down menu with options defined in the custom list
|