This article explains how to configure the master (golden) image so that each clone spawned from this image is auto-enrolled to Endpoint Manager.
Step 2 - Create the communication client installation package
Step 4 - Install the communication client and the security client (XCS) on the master image
Step 1 - Create a device group in EM for the clone machines
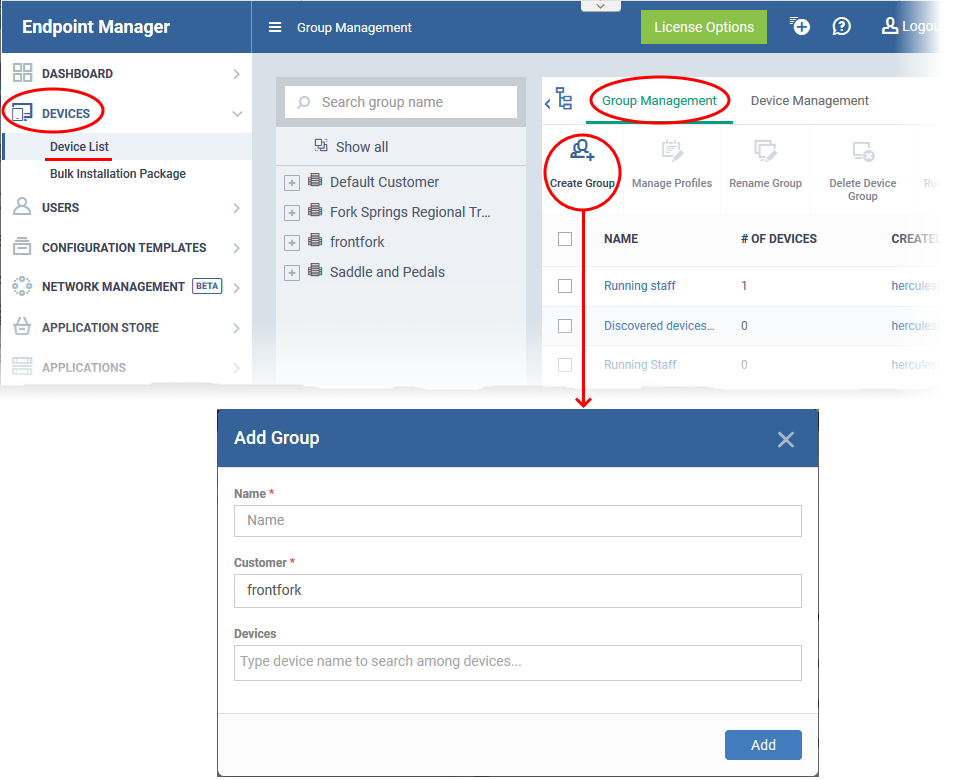
Open Endpoint Manager > Create a device group for the clone machines > Associate a profile with the device group:
Open Endpoint Manager
Click ‘Applications’ > ‘Devices’ > ‘Device List’
Choose a target company if you are using the MSP version
Click the ‘Group Management’ tab
Click the ‘Create Group’ button:
Enter a label for the new group
Click 'Add'. The new group is created.
Next, associate the profile you want to use on the clones with your new group:
Click ‘Devices’ > ‘Device List’
Click the ‘Group Management’ tab
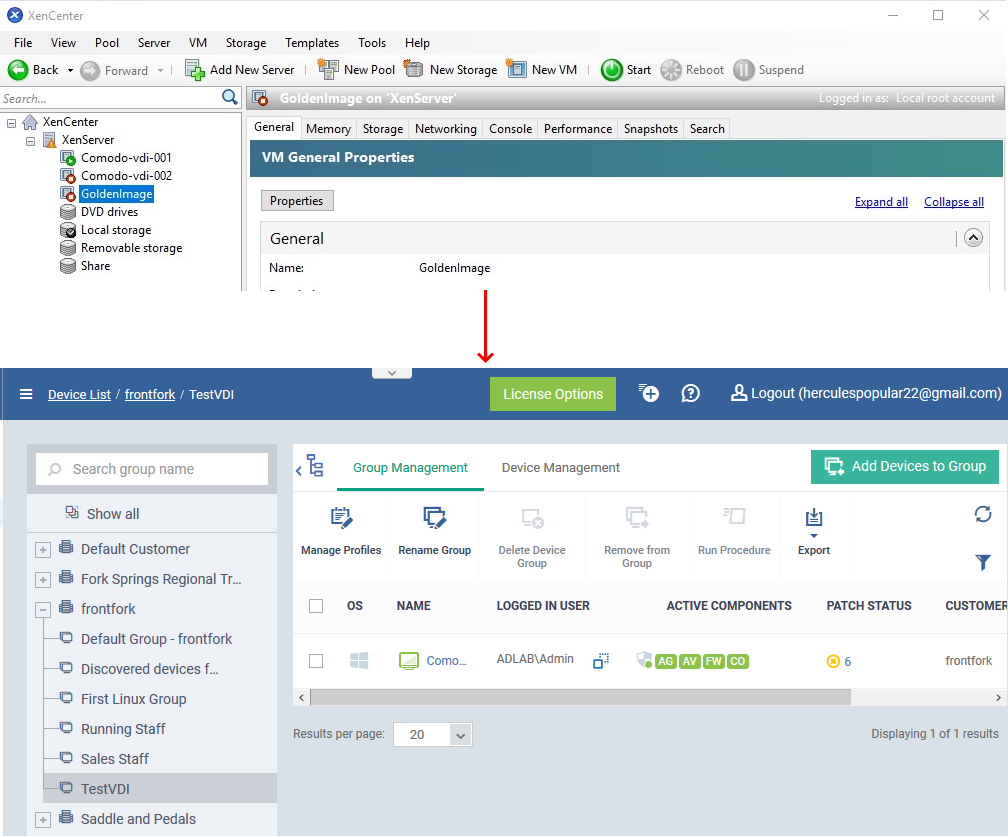
Click on the name of the group you just created. In our example, ‘TestVDI’
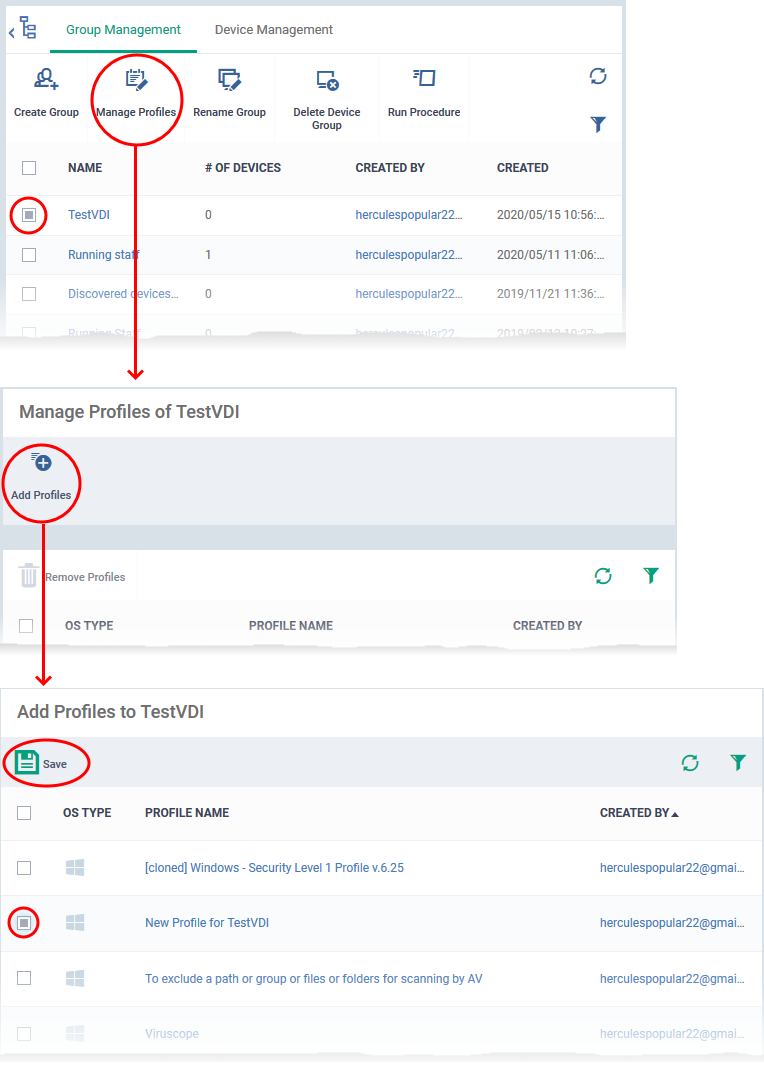
Click the ‘Manage Profiles’ button then ‘Add Profiles’
Select the profile that you want to use on the clone machines
Need to learn more about profiles? See How to clone and customize a profile then apply it to devices.
Click ‘Save’ to apply the profile to the group.
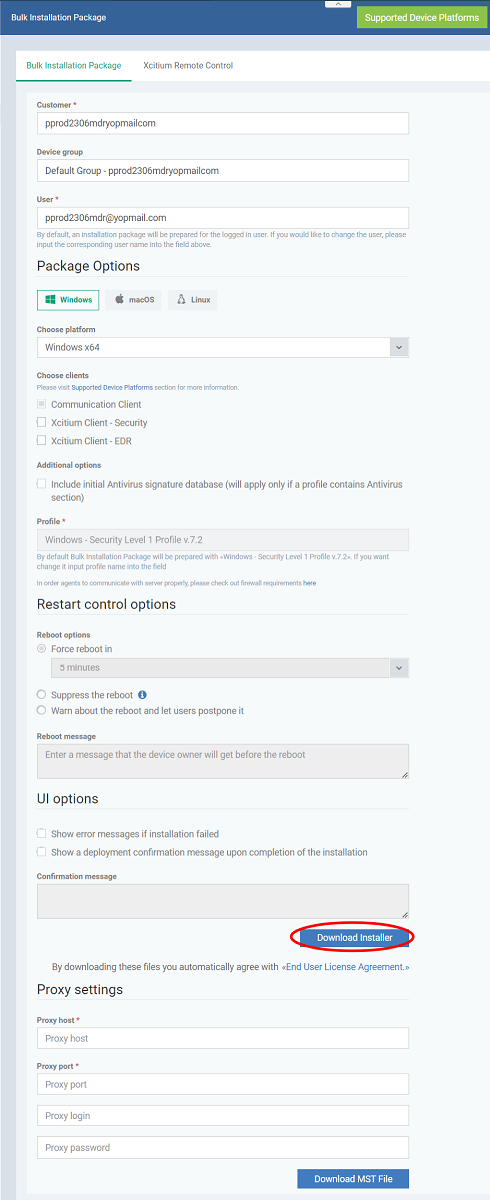
Step 2 - Create the Client Communication (CC) Installation Package
This means the clones will receive the configuration profile you associated with the group in step 1.
Each installer package is uniquely generated for your environment. Do not change the filename of the package as it is vital for enrolling the clone devices to the correct group.
Create a CCC installation package:
Click ‘Devices’ > ‘Device List’ > ‘Bulk Installation Package’
This opens the installer config Screen:
Complete the details as follows:
Choose client - Use default Communication Client version
Additional options - AV Database - Choose whether to include the latest virus database with the installation package. This increases the size of the package.
If disabled, the client will download the latest database anyway when you run the first virus scan.
Scroll down and click the ‘Download Installer’ button.
Save the file to your local machine
Reminder: Do NOT rename the .msi in any way. Doing so will mean the clones won’t get added to the correct group. You may ignore/close the ‘Auto Discovery and Deployment Tool’ pop-up
Creating the .msi also creates a user token which binds the installer to the chosen user (Default – the currently logged-in admin). This ensures new clones get enrolled to the correct user. Please make a note of this token as we will need it later in the process.
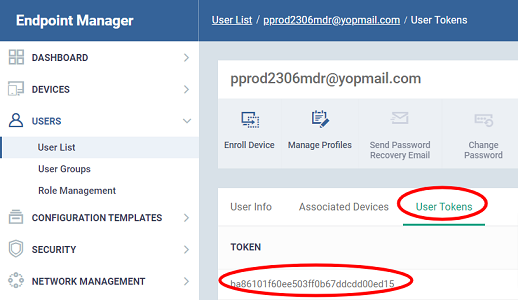
Click ‘Users’ > ‘User List’
Click the name of the user you entered in the package configuration step earlier
Click the funnel icon on the right if you need to search for a user
Click the ‘User Tokens’ tab:
The most recently created token is listed in the top-row. Make a note of the token string as you will need it later.
Step 3 - Get the hostname of EM
Next, you need to obtain the host name of your Endpoint Manager instance. You will need this in step 5 later.
Click ‘Devices’ > ‘Device List’ > ‘Device Management’ tab
Click the ‘Enroll Device’ button above the table:
This starts the device enrollment wizard:
Step 1 – Device options
Select Device – Choose 'Other device'
Specify User – Start typing the username of the user you chose in step 2 and select the user from the suggestions.
Click 'Next'
Step 2 - Enrollment options – Leave all default options and click 'Next'
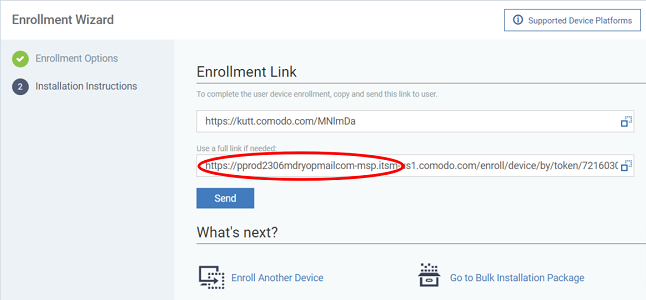
Step 3 - Installation Instructions - The enrollment link is shown:
Make a note of the full hostname for later use.
Step 4 - Install the communication client and the security client (XCS) on the master image
This will add your master image as a device to your new (in our example, ‘TestVDI’) device group.
Confirm the operation was a success in Endpoint Manager as follows:
Click ‘Devices’ > ‘Device List’ > ‘Group Management’ tab
Click on the name of the group (‘TestVDI’ in our example)
Click the ‘Device Management’ tab
Your master image should be listed as a device there
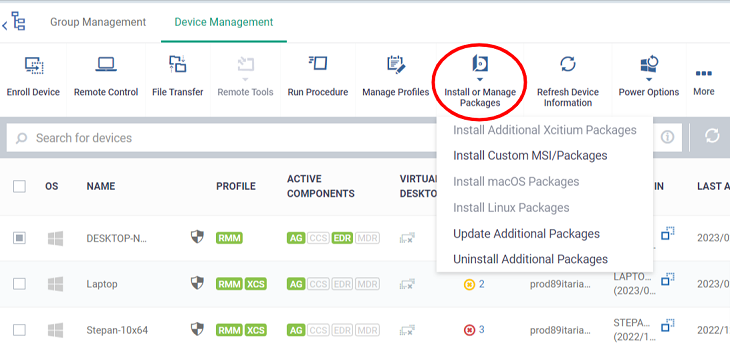
Install Xcitium Client – Security (XCS)
Stay on the ‘Device Management’ screen.
Use the checkbox on the left to select your master image device
Click the ‘Install or update packages’ button > ‘Install Additional Xcititum Packages’:
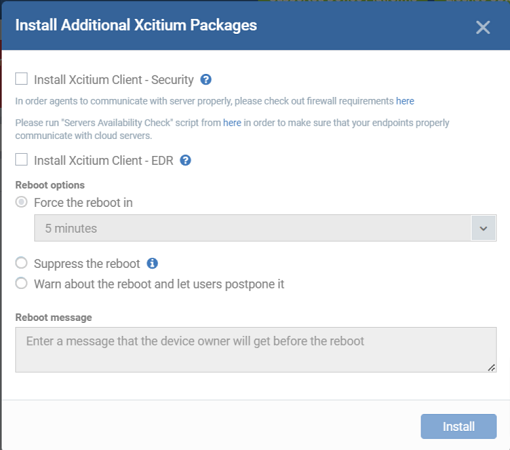
This will open the XCS install config. Screen:
Make sure ‘Install XcitiumClient – Security’ is selected and select the version of XCS to be installed (if enabled).
'Install xcitium client-EDR' is selected and able to buy new license (if enabled)
XCS requires the master image to be started for the installation to take effect. Choose reboot options as per your preference.
Click ‘Install’ to deploy XCS to your master image.
After the restart, you will have installed both CC and XCS on your master image. The image is listed as a device in your device group and has the correct profile associated with it.
Step 5 – Configure the master image to automatically enroll and unenroll during every startup / shutdown
Your master image needs to enroll itself to the device group in EM, every time you start it up and de-enroll every time you shut-down it.
The enrollment process requires an enrollment configuration file placed in the installation folder of communication client, every time.
EM places an enrollment configuration file during the initial enrollment of the image, but file is consumed during the first enrollment process.
In order to enroll the image every time the image is started, you can create a configuration file and save it in a backup folder created the installation folder of the communication client
You can download a sample configuration file, enter the host name, port and user token parameters to create the configuration file
You can also configure a .bat file to load the enrollment configuration file from the backup to the installation folder of the client every time the image is shutdown, so the image will be ready for enrollment during its next startup
If you are using a proxy, you should also place a proxy configuration file in the backup folder
Enroll and proxy requirements:
Download the sample 'enrollment_config.ini' from the location:
https://script-downloads.itarian.com\Deploy_ITarian_Clients_on_VDI_environment\enrollment_config.ini
The file contains the following:
|
[General] host = companydomain.cmdm.Itarian.com port = 443 remove_third_party = false suite = 4 token = xxxxxxxxxxxxxxxxxxxxxxxxxxxxx |
Edit the file to add the host and user token parameters and save the file.
Host – the host name noted in step 3
Token – The user enrollment token noted in step 2.
If you have configured your profile with a 'Clients Proxy' section that instructs the master image to use a proxy to connect to EM, then you need a proxy configuration file loaded, during each enrollment.
Download the sample proxy configuration file 'proxy_settings.ini' from the following location
https://script-downloads.itarian.com\Deploy_ITarian_Clients_on_VDI_environment\proxy_settings.ini
The file contains the following:
|
[General] proxy_use = "true" proxy_host = proxy_port = proxy_use_auth = "false" proxy_user = proxy_password = |
Edit the file to specify the hostname and connection port of the proxy server
If the proxy requires authentication, change the 'proxy_use_auth' to “true” and enter the username and password to access the proxy
Save the file.
Save the configuration file(s) in a backup folder
Create a backup folder in the following path:
32 bit OS - C:\Program Files\ITARIAN\Endpoint Manager\Backup
64 bit OS - C:\Program Files (x86)\ITARIAN\Endpoint Manager\Backup
Save the 'enrollment_config.ini' and 'proxy_settings.ini' (if you have created one) to the backup folder.
Unenroll requirements:
The device needs to be unenrolled from Endpoint Manager every time you shut down the master image.
Every time you shutdown the image, the 'enrollment_configuration.ini' (and 'proxy_settings.ini' if used) need to be loaded to the Endpoint Manager folder from the backup. This ensures the machine will be correctly enrolled, next time you start the machine
You can automate both these processes by creating a .bat file and running it during every shutdown, using a local group policy.
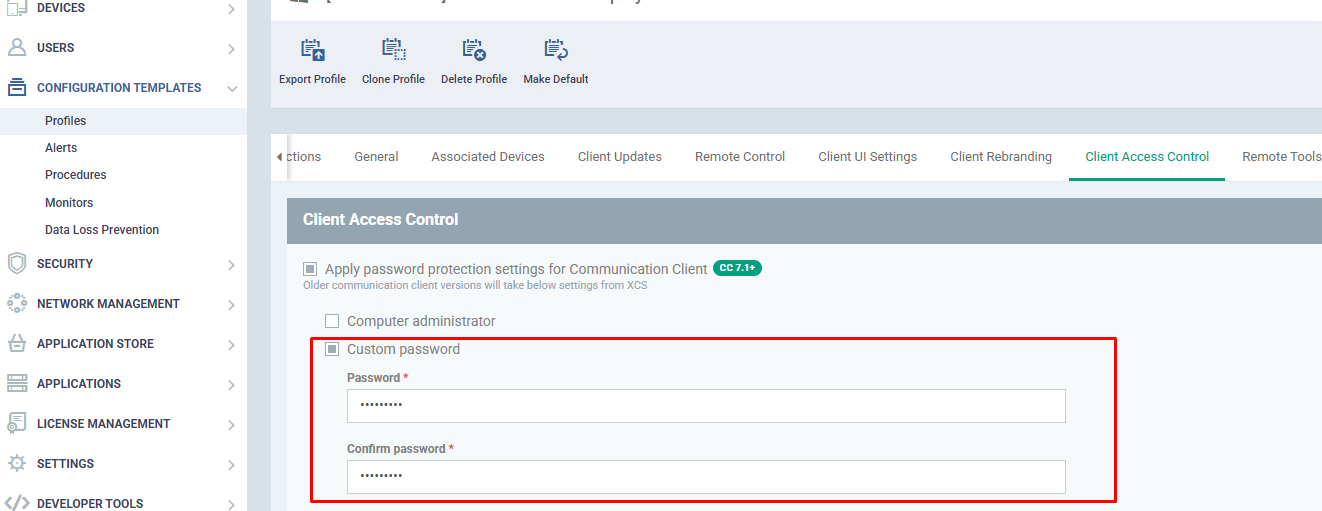
If password is specified in the profile, create a file in "C:\ProgramData\ITarian\Endpoint Manager\unenroll.txt and save your password.
Make sure you have created a backup folder as explained above then follow these steps:
Create the batch file:
Download a sample batch file ‘UnEnrolmentITSM_ITarian.bat' from the following location:
The file contains the following:
|
@ECHO OFF REM Please create a folder in the "Endpoint Manager" folder REM In this folder please copy "enrollment_config.ini" and "proxy_settings.ini" files REM This script will copy this two files on the "Endpoint Manager" folder after the enrollment command is run SET backupfolder=Backup REM If you are using proxy, please use Proxy = "yes" SET proxy=no
IF EXIST "%SystemDrive%\Program Files (x86)" ( cd "%ProgramFiles(x86)%\ITARIAN\Endpoint Manager" ITSMService.exe -c 2 timeout 10 IF EXIST "%ProgramFiles(x86)%\ITARIAN\Endpoint Manager\enrollment_config.ini" ( del "%ProgramFiles(x86)%\ITARIAN\Endpoint Manager\enrollment_config.ini" >nul 2>&1 ) IF "%proxy%" == "yes" ( IF EXIST "%ProgramFiles(x86)%\ITARIAN\Endpoint Manager\proxy_settings.ini" ( del "%ProgramFiles(x86)%\ITARIAN\Endpoint Manager\proxy_settings.ini" >nul 2>&1 ) ) IF NOT EXIST "%ProgramFiles(x86)%\ITARIAN\Endpoint Manager\enrollment_config.ini" ( xcopy "%ProgramFiles(x86)%\ITARIAN\Endpoint Manager\%backupfolder%\enrollment_config.ini" "%ProgramFiles(x86)%\ITARIAN\Endpoint manager\" /Y >nul 2>&1 ) IF "%proxy%" == "yes" ( IF NOT EXIST "%ProgramFiles(x86)%\ITARIAN\Endpoint Manager\proxy_settings.ini" ( xcopy "%ProgramFiles(x86)%\ITARIAN\Endpoint Manager\%backupfolder%\proxy_settings.ini" "%ProgramFiles(x86)%\ITARIAN\Endpoint manager\" /Y >nul 2>&1 ) ) ) ELSE ( cd "%ProgramFiles%\ITARIAN\Endpoint Manager" ITSMService.exe -c 2 timeout 10 IF EXIST "%ProgramFiles%\ITARIAN\Endpoint Manager\enrollment_config.ini" ( del "%ProgramFiles%\ITARIAN\Endpoint Manager\enrollment_config.ini" >nul 2>&1 ) IF "%proxy%" == "yes" ( IF EXIST "%ProgramFiles%\ITARIAN\Endpoint Manager\proxy_settings.ini" ( del "%ProgramFiles%\ITARIAN\Endpoint manager\proxy_settings.ini" >nul 2>&1 ) ) IF NOT EXIST "%ProgramFiles%\ITARIAN\Endpoint Manager\enrollment_config.ini" ( xcopy "%ProgramFiles%\ITARIAN\Endpoint Manager\%backupfolder%\enrollment_config.ini" "%ProgramFiles%\ITARIAN\Endpoint Manager\" /Y >nul 2>&1 ) IF "%proxy%" == "yes" ( IF NOT EXIST "%ProgramFiles%\ITARIAN\Endpoint Manager\proxy_settings.ini" ( xcopy "%ProgramFiles%\ITARIAN\Endpoint Manager\%backupfolder%\proxy_settings.ini" "%ProgramFiles%\ITARIAN\Endpoint Manager\" /Y >nul 2>&1 ) ) ) |
Edit the file to add the following parameters:
SET backupfolder= <the location of the backup folder, in which the configuration files are saved>
SET proxy=<whether or not the image uses a proxy to connect to EM server>
Place the 'UnEnrolmentITSM_ITarian.bat' file in a location that is not restricted by Windows.
For example, create a folder on the %SystemDrive% with the name temp and place the .bat file inside.
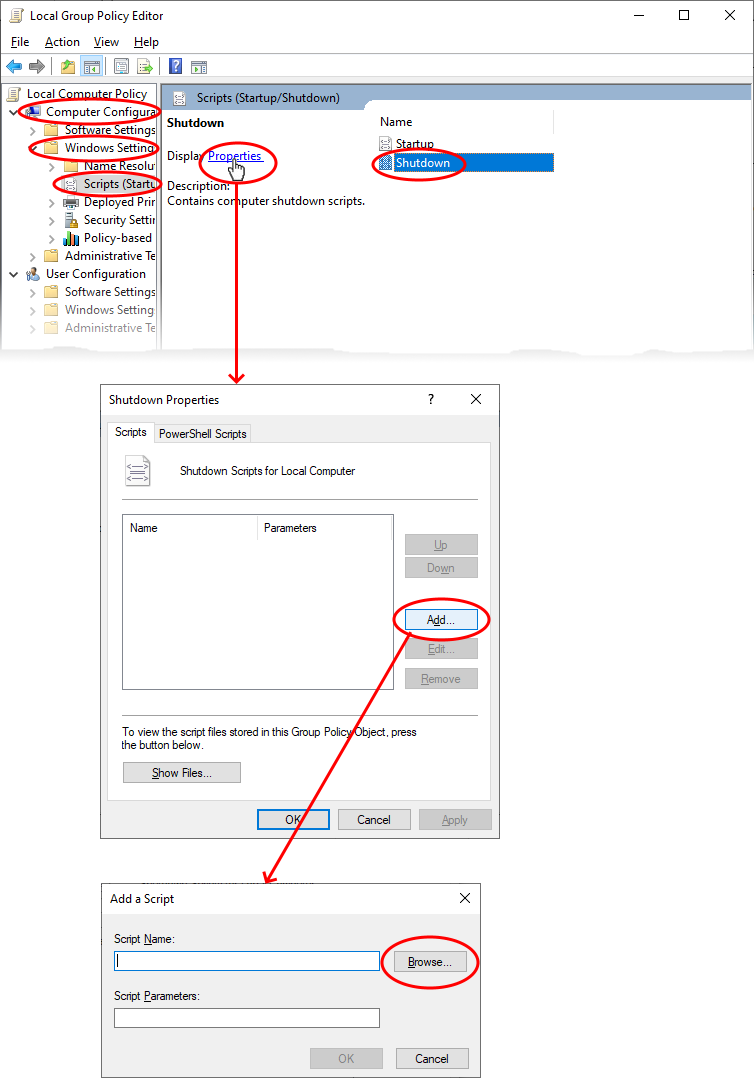
Create a local group policy to run the batch file during shutdown
Run gpedit.msc
Navigate to 'Computer Configuration' > 'Windows Settings' > 'Scripts (Startup/Shutdown)' > 'Shutdown'
Click 'Properties'
Click 'Add' in the 'Shutdown Properties' dialog
Click 'Browse' in the 'Add a script' dialog, navigate to and select the 'UnEnrolmentITSM_ITarian.bat' file
Click OK to add the file
Click 'OK' in the 'Shutdown Properties' dialog for your settings to take effect.
Step 6: Rate the .bat file as ‘Trusted’ on the master image machine
We want the 'UnEnrolmentITSM_ITarian.bat' file to run unimpeded, so we need to give it a ‘Trusted’ file rating in XcitiumClient Security (XCS). Doing so means XCS will not block the file regardless of the security level you are using.
1) Enable the file list
Open Endpoint Manager
Click ‘Configuration Templates’ > ‘Profiles’
Click on the name of the profile you applied to the master image
Open the ‘UI Settings’ tab
Click ‘Add Profile Section’ > ‘UI Settings’ if you have not yet added this section
Open the 'General Settings' tab (if it is not already open)
Enable ‘Show File List’ and save the profile
This will command XCS on the master image to make the file list available to you
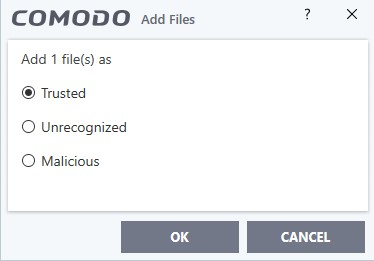
2) Give the .bat file a trusted rating
Open Xcitium Client Security on your master image
Click ‘Settings’ > ‘File Rating’ > ‘File List’
Click the ‘Add’ button > ‘Files’
Browse to the .bat file and click ‘Ok’.
Select ‘Trusted’ as the rating:
Click ‘OK’
Click ‘OK’ in the 'Advanced Settings' interface to apply the new rating.
The batch file is now trusted and will not be blocked by XCS.
Step 7: Confirm that XCS doesn’t need a reboot
Important:
At this step you should confirm that Xcitium Client Security doesn’t require a restart. For example, a restart is required If you add or remove AV, FW or Containment from a profile.
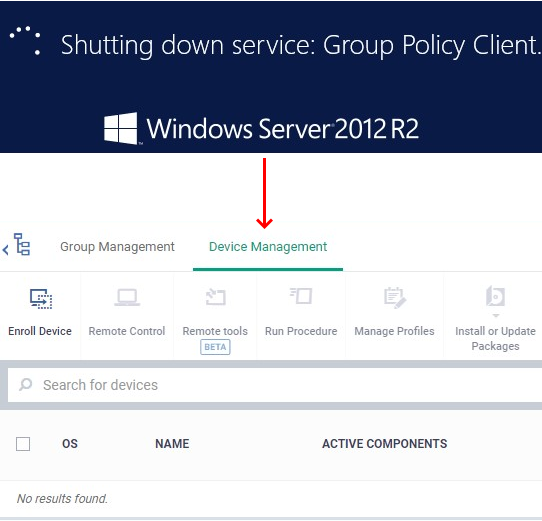
Step 8: Restart the master image
Restart the master image device to confirm the following:
The device is removed from Endpoint Manager when you shut it down
The device is re-enrolled when the reboot is complete
The device is correctly added to the correct device group (‘TestVDI’ in our example)
You can check the success or failure of all these steps in the Endpoint Manager interface:
Open Endpoint Manager > Click ‘Devices’ > ‘Device List’ > ‘Group Management’ tab > open the device group
Shutdown:
Restarting:
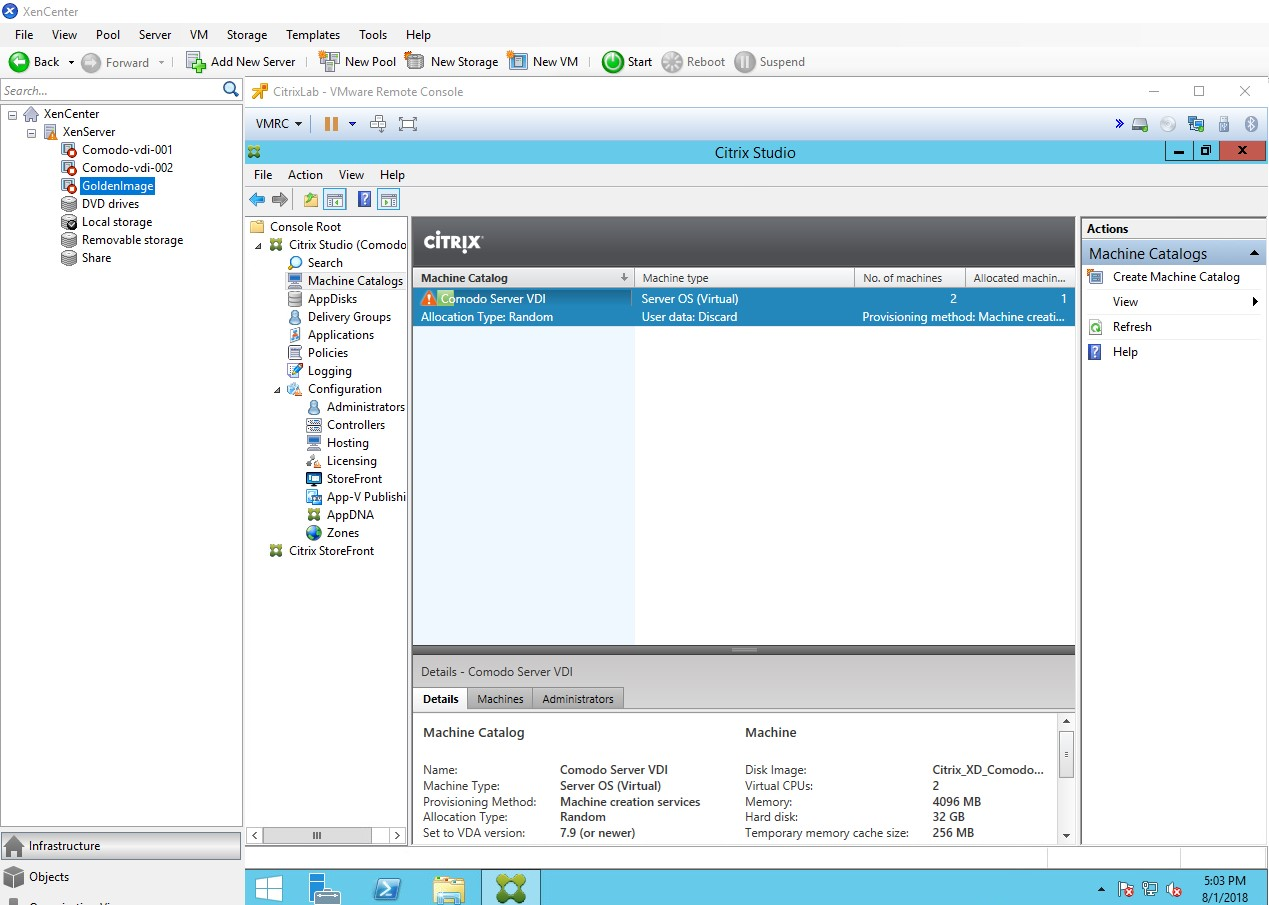
Step 9: Confirm that the clones are enrolled to Endpoint Manager
Update the machine catalog after confirming that the Golden Image is working correctly
See the screenshot below, for Citrix, as an example:
After the update, please test whether the clones are enrolled/removed from Endpoint Manager.
CLOUD BASED IT MANAGEMENT SOFTWARE FOR
MSPs and ENTERPRISE
Remote Monitoring and Management | Service Desk | Patch Management
Now Add Up To 50 Devices for Free
---