Background
Users:
Open Endpoint Manager > Click 'Users' > ‘User List'
- The 'User List' interface lets you add, view and manage users.
- Once you have added users, you can enroll the devices which belong to them. You can enroll iOS, Android, Windows, Mac OS and Linux devices.
- You can then remotely manage and apply security policies to your enrolled devices. You can also create user groups in order to apply policies to multiple devices.
- You can assign roles with different privilege levels to users. A role determines what areas a user can access, and what tasks they can perform.
User Groups:
Open Endpoint Manager > Click 'Users' > 'User Groups'
- Endpoint Manager lets you to create groups of users to simplify user management. For example, users could be grouped according to existing corporate units ('Sales Dept.', 'Accounts Dept.' etc) or by the type of device they own.
- Once created, you can apply dedicated configuration profiles to a group as required.
- You can also import users/user groups from Active Directory using LDAP. EM periodically synchronizes with Active Directory to ensure its user roster is correct.
Create user accounts
You can add new accounts using any of the following methods:
- Manually - Add individual users to EM
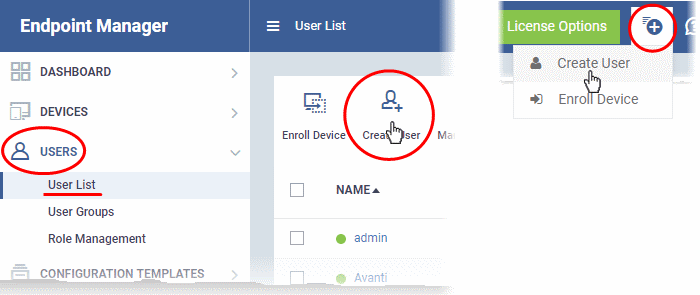
- Click 'Users' > 'User List' > 'Create User' to start this process.
- You need to specify their name, email address, the company they belong to, and their EM role.
- See Manually add users
- Import from .csv - Import a list of users from a comma-separated values file.
- Click 'Users' > 'User Import' to start this process
- The file should contain the following, separated values: 'Username' (mandatory), 'Email address' (mandatory) and 'Phone number' (optional).
- The file should not contain column headers and each line should contain a single user.
- Users are assigned the role you specify in the import dialog.
- See Import users from a CSV file
- Bulk enroll from Active Directory
- See this wiki page for help to enroll devices through AD group policy and import their users.
Manually add users
- Open Endpoint Manager
- Click 'Users' > 'User List'
- Click the 'Create User' button
OR
- Click the 'Add' button
 in the menu bar and choose 'Create User'
- Enter the user details and select a role:
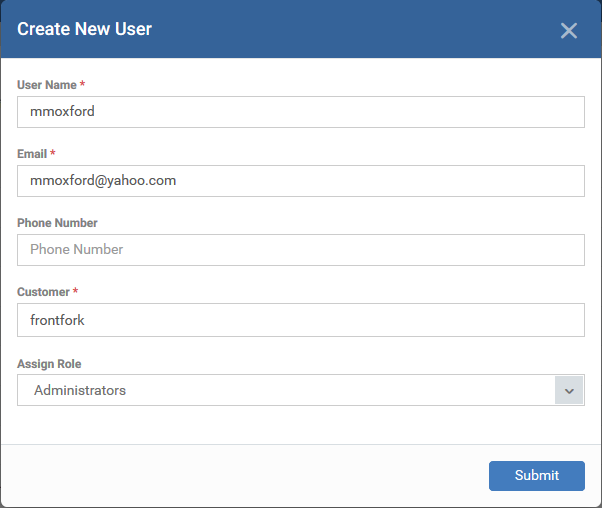
Username - The login name of the user.
Email - The email address of the user for registration in EM. Account and device enrollment emails are sent to this address. Users need to open the enrollment mail on the target device itself.
Phone Number (Optional) - The contact number of the user.
Company - Choose the company to which the user belongs.
- MSPs can add users from any company they have added to their account.
- Enterprise and stand-alone customers can only add users to the default company.
Assign role – Choose the new user’s role.
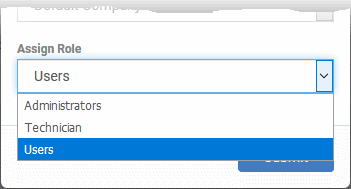
- Users - This role is typically used for owners of the devices you want to manage. ‘Users’ cannot log in to Endpoint Manager, but you can remove this restriction if required.
- Administrators - Can log in to EM and access all management interfaces. This role can be edited as required.
- Technician - Can log in to EM and access all management interfaces. The technician role has fewer privileges than the administrator role. This role can be edited as required.
- You can also create custom roles with specific privileges. All roles you create will appear in EM the 'Assign Role' drop-down.
- See this wiki page for help to create and manage custom roles.
- Click the 'Submit' button.
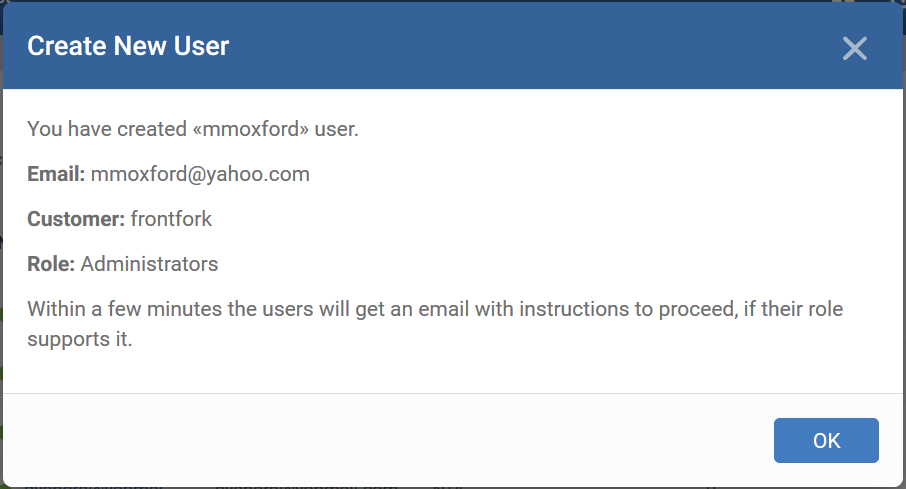
- Repeat the process to add more users.
You can now add the user's devices to EM.
Endpoint Manager sends account activation mail to new users with admin roles. They can activate their account and set their login password by clicking the link in the email:
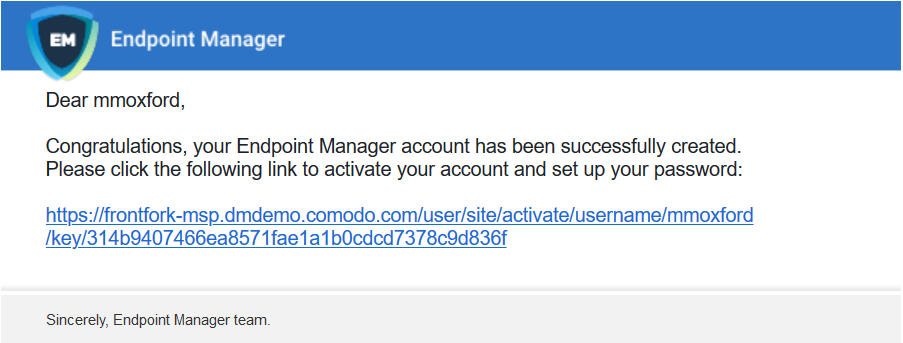
Note: By default, users with the role 'Users' do not receive an account activation mail and cannot log in to Endpoint Manager.
Import users from CSV
- Click 'Users' > 'User List' > 'Import User'
- You can load a list of new users by importing them from a comma-separated values (.csv) file
- You can also specify roles for all users in the list
- After adding a user, you can enroll Windows, Android, iOS, Mac OS and Linux devices for them
Process in brief
- Create a .csv file with your list of users in Excel or OpenOffice Calc.
- The file should contain the following, separated values: 'Username' (mandatory), 'Email address' (mandatory) and 'Phone number' (optional).
- The file should not contain column headers and each line should contain a single user.
- In the EM admin console, click 'Users' > 'User List' > 'Import User'
- Browse to and select the .csv file you want to import
- Select a company and a role for the imported users
- Upload the file
- The users are imported and enrolled to EM
Requirements for .csv file
- There are two mandatory fields and one optional field per user account:
- Username (mandatory)
- Email address (mandatory)
- Phone number (optional)
- Each line in the file should contain one user
- The file should not contain column headers
Example:
"james", "james@ditherscons.com", "9876543210"
Import users from a list
- Click 'Users' > 'User List'
- Click 'Import User' on the top
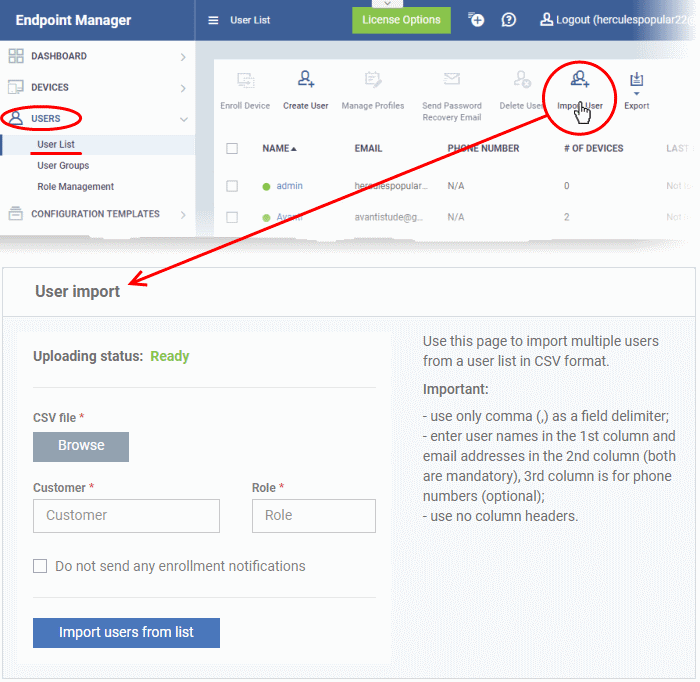
CSV File - Click 'Browse', navigate to the location of your .csv file
Customer - Choose the company to which the users belong.
- MSP customers can add users from any company they have added to their account.
- Enterprise and EM stand-alone customers can only add users to the default company.
Role - Choose the new user’s role.
See the explanation of the roles above for more details.
Do not send enrollment notifications - Select whether or not notification emails are sent to new users.
Note: Notification mails are only sent to those with ‘Admin’ and ‘Technician’ roles. They are not sent to users who have the ‘Users’ role.
Click 'Import users from List' when finished:
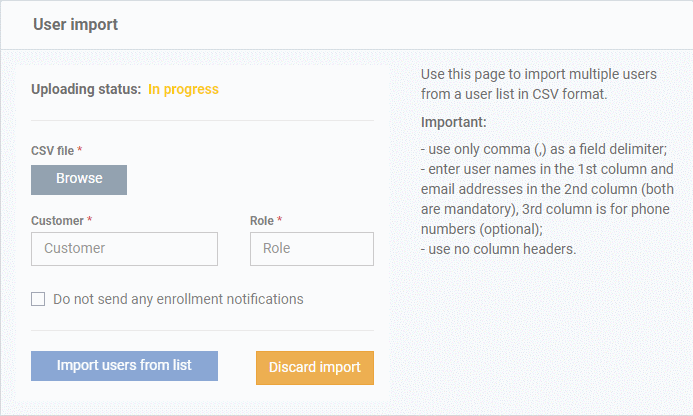
Endpoint Manager sends account activation mail to new users with admin/technician roles. They can activate their accounts and set their login password by clicking the link in the mail.
Note: By default, users with the role 'Users' do not receive an account activation mail and cannot log in to Endpoint Manager.
Create user groups
- Click 'Users' > 'User Groups'
- Click 'Create Group' above the table.
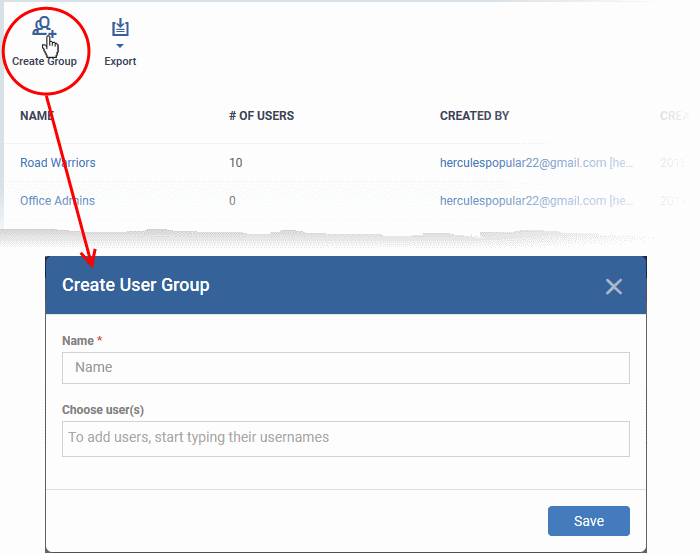
- Name - Type a label for the user group.
- Choose User(s) - Add users to the group.
- Type the first few letters of a username and select from the suggestions.
- Repeat the process to add more users.
- The group is saved and the group details screen appears:
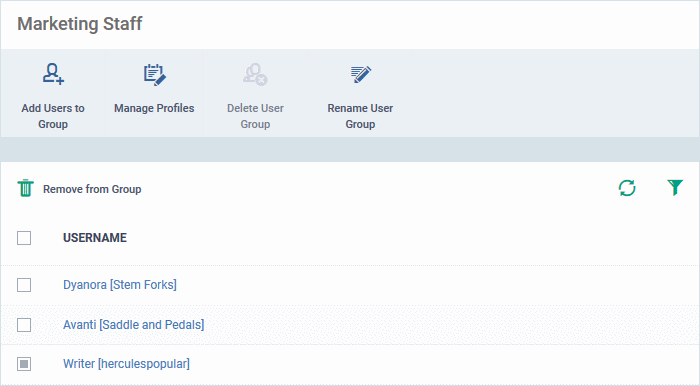
- Configuration profiles can now be applied to the group. See this help page for help to apply a profile to a user group.
Note: A single user can be a member of more than one group. Profiles from every group of which the user is a member are applied to the user's device. If the settings in one profile clash with another profile, EM implements the most restrictive setting. For example, if one profile allows the use of the camera but another profile blocks it, then the device is not able to use the camera.
Import user groups from Active Directory
You can configure the Endpoint Manager to access your AD server through the Lightweight Directory Access Protocol (LDAP). You can add multiple LDAP accounts.
Process in brief:
- Add an LDAP server by specifying its IP address, domain and the login credentials of the AD server:
- Click 'Settings' > 'Portal Set-Up' > select the 'Active Directory' tab > Click 'Add'
- Once added, users and user groups in the AD directory are visible in the 'Active Directory' interface:
- Click 'Settings' > 'Portal Set-Up' > select the 'Active Directory' tab > Click on an AD domain name > Click the 'User Groups' tab
- Select the users and groups you want to import
- Assign roles to users/user groups as required
- Synchronize LDAP with Endpoint Manager
- The selected users/user groups are imported and placed into corresponding groups in EM
- The 'User List' and 'User Groups' interfaces let you view/manage users and enroll user devices.
Notes:
- Endpoint Manager communicates with Comodo servers and managed devices in order to update data, deploy profiles, synchronize LDAP server via devices and so on.
- You need to configure your firewall accordingly to allow these connections. The details of IPs, hostnames and ports are provided in Appendix 1a and Appendix 1b of the online help guide.
Add an Active Directory and import users/user groups
- Click 'Settings' > 'Portal Set-Up'
- Click the 'Active Directory' tab

- Click 'Add' to start the 'Login to Active Directory' wizard:
Step 1 - Enter LDAP account details
- Enter the AD server details
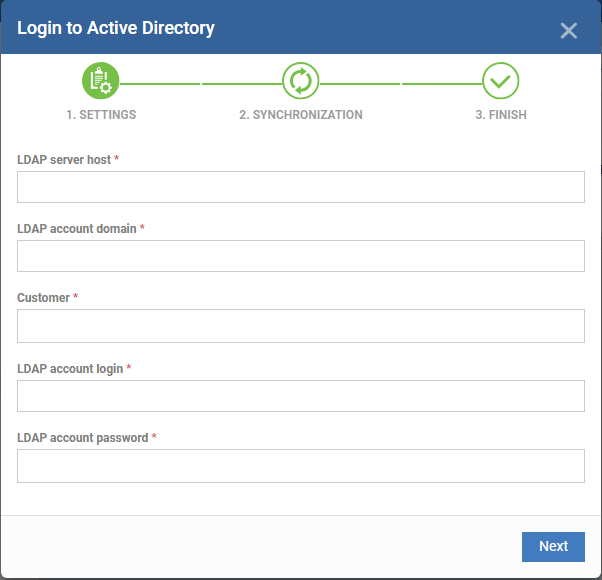
LDAP Server Host - The IP address or hostname of the Active Directory (AD) server
LDAP Account Domain - The Active Directory domain name.
Company - Choose the company to which the AD server belongs.
- ITarian MSP customers can add AD servers for multiple companies.
- ITarian Enterprise and EM stand-alone customers can only select the default company.
LDAP Account Login and LDAP Account Password - The admin username and password required to access the AD server.
Click 'Next'
Step 2 - Synchronization Settings
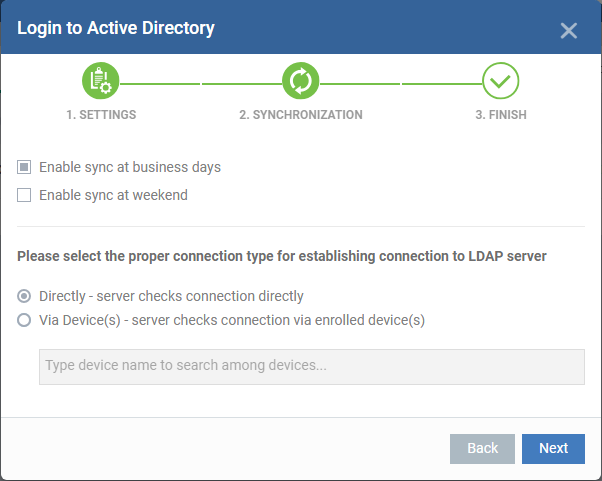
Enable Sync at Business Days – EM will check for and import new users from the AD server once per day, Monday through Friday.
Enable Sync At Weekend - EM will check for and import new users from the AD server on Saturdays and Sundays.
- Note - you can manually sync at any time by clicking the 'Sync with LDAP' button.
Connection Type - These determine how Endpoint Manager connects to the LDAP server. You can specify a direct connection from the EM server to the AD server, or connect via an enrolled device.
If you choose the second option, you should specify the names of enrolled Windows devices that are in the same network as the AD server.
Click 'Next'
Step 3 - Finish
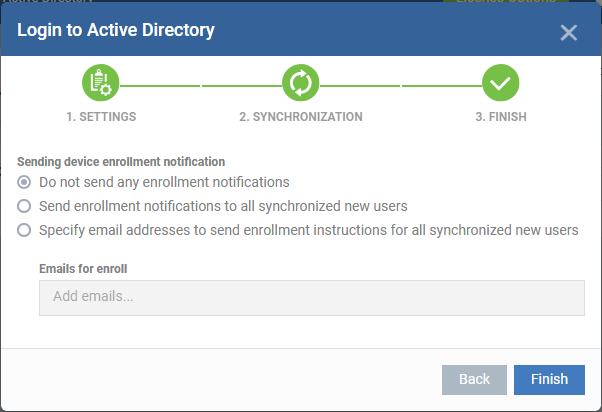
- Do not send any enrollment notifications - No notification mails are sent to imported users
- Send enrollment notifications to all synchronized new users - Device enrollment emails are sent to imported users. These mails include instructions that tell the user how to add their device to the Endpoint Manager.
- Specify email address to send enrollment notifications for all synchronized new users - Add specific recipients who should receive a notification mail when new users are added. Usually sent to an admin, the mail contains instructions on how to enroll devices for the new users. You can add multiple email addresses here.
- Click 'Finish'
Endpoint Manager connects to the LDAP server as per the configuration. A summary of account settings is shown if the connection is successful:
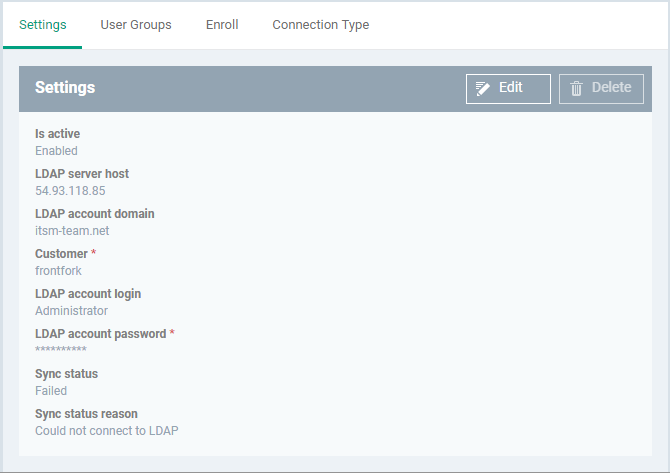
- Click 'Edit' if you want to change any details, edit the details and click 'Save' to save your settings.
- The synchronization task runs as scheduled in step - 2, and the user groups are added.
- Click 'Sync with LDAP' to instantly sync the user groups between the AD server and EM
- Repeat the process to add more AD servers to import user groups from.
The imported user groups and users are available shown in 'Users' > 'User Groups', and 'Users' > 'User List'.

 in the menu bar and choose 'Create User'


