Click 'Configuration Templates' > 'Data Loss Prevention'
- Data loss prevention (DLP) rules let you scan Windows devices for files that contain sensitive information.
- For example, the scan finds card numbers, social security numbers, bank account numbers, bank routing numbers, and more.
- You can also allow or block file transfers from the managed devices to external storage devices like USB drives
- There are two types of DLP rules:
- Discovery rules - Define the areas you want to scan, the type of information you want to search for, and the action you want to take on discovered files.
- Discovery rules are added to profiles, which are in turn applied to managed devices. You also have the option to run on-demand discovery scans on devices.
- You can review all files which contain sensitive data from the Endpoint Manager interface. You can then take actions to secure that data where required.
- Monitoring rules – Block users from copying files to external storage devices.
- EM monitors attempted data transfers to devices like USB drives and allow/blocks the transfer in real-time.
- Monitoring rules are added to profiles which are in-turn applied to managed devices for continuous monitoring.
Use the following links to jump to the task you need help with:
Overview
- You first create a discovery scan rule at ‘Configuration Templates' > 'Data Loss Prevention' > 'Create Discovery'.
- You then add the scan to the DLP section of a profile. The scan will run on all devices on which the profile is active.
- You can view scan results at 'Security Subsystems' > 'Data Loss Prevention' > 'Logs'.
- You can also manually run discovery scans on devices at ‘Security Sub-systems’ > ‘Data Loss Prevention’ > 'Device List'
Create a DLP scan rule
- Click 'Configuration Templates' > 'Data Loss Prevention' > 'Create' > 'Discovery Rule'
Scan rules tell the DLP scan exactly what type of data to search for. You will define the following items:
- Location - The folders or drives that you want to scan on target devices. For example, 'C:\Users\'.
- File types - The file extensions you want to inspect. For example, .doc, .xls, .txt.
- Search pattern - The type of data you want to search for. For example, card numbers, bank account numbers, social security numbers, dates-of-birth, etc.
- Action - The response Endpoint Manager should take when the rule conditions are met. The options are ‘ignore’ and ‘quarantine’.
You add the scan rule to a profile, which is in turn applied to target devices or users.
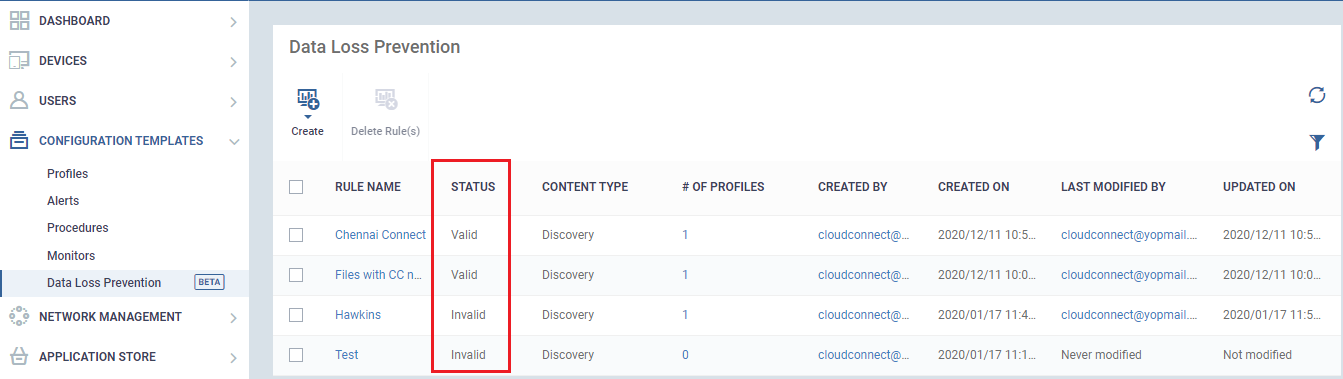
- Click 'Configuration Templates' > 'Data Loss Prevention'
- You can see the DLP rule with validity status here whether it is valid or invalid to use. If a rule does not have any of the following criteria, 'Targets',’ Exclusions’,’ Patterns’,’ Documents Types’ and ‘Profiles’ are empty the rule should be invalid, you cannot get expected results in scanning.
- To create a ‘Discovery Rule’, Click 'Create' > 'Discovery Rule'
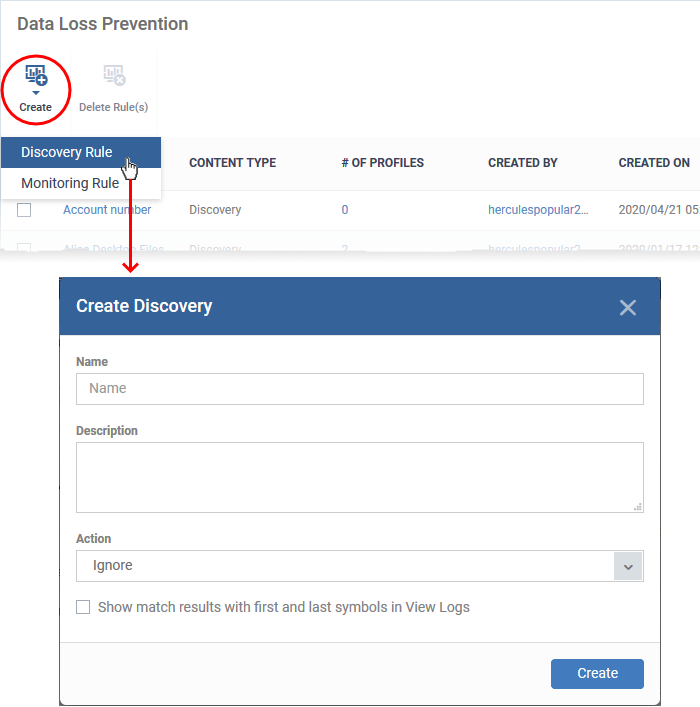
Complete the following fields:
Name - Enter a label for the rule
Description – Add a short note for your reference
Action - The response Endpoint Manager should take on files that meet the rule conditions. The options are:
- Ignore – Take no action on the file. You can still review the files at ‘Security Sub-systems’ > ‘Data Loss Prevention’ > ‘Logs’.
- Quarantine – The file is moved from its original location on the endpoint and placed in a secure holding area. Users cannot open quarantined files. You can review quarantined files as follows:
- Local Endpoint - Open Comodo Client Security > Click ‘Tasks’ > ‘DLP Tasks’ > ‘Data Loss Prevention Quarantine’. You can restore the files to the original location from here if required.
- Endpoint Manager - Click ‘Security Sub-Systems’ > ‘Data Loss Prevention’ > ‘Quarantined Files’. You can restore the files to the original location or delete the files on the local endpoint.
Show match results with first and last symbols in View Logs - If enabled, the log details of a file intercepted by the rule shows the actual data discovered in the file. Only the first and last characters of the record are shown. For example, a ten-digit social security number would be shown as 3 - - - - - - - 9. See View scan results for more on the viewing logs and details of files that created a DLP event.
- Click 'Create’ to move to the rule configuration screen:
- Click 'Edit' on the right.
- Use the following links for help with each tab
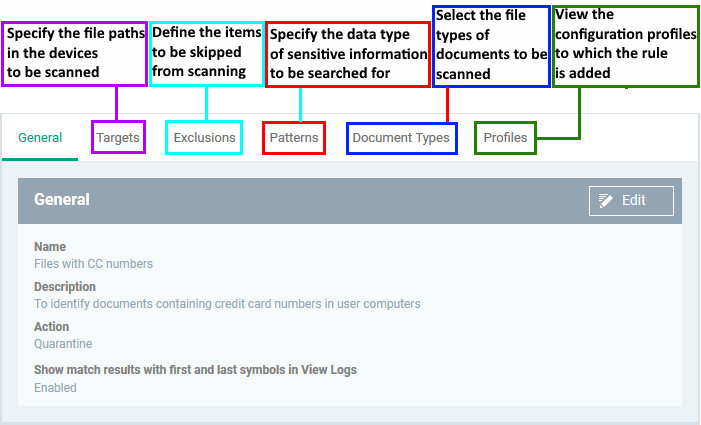
General
Targets
Exclusions
Patterns
Document Types
General
The general tab shows the name, description and action you chose for the rule in the previous step. The tab also lets you configure log options.
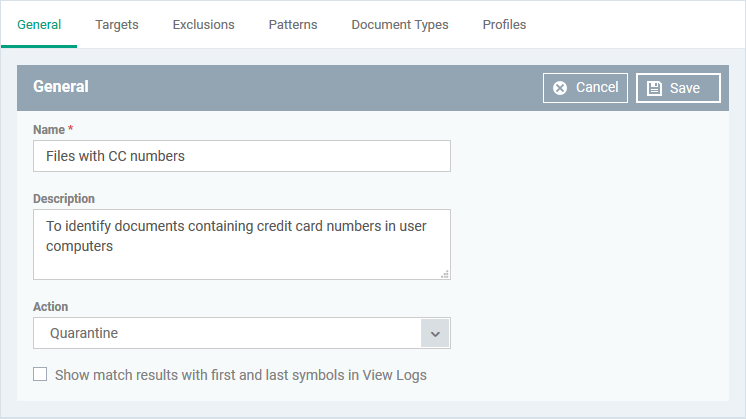
Name, Description, Action and log option – Your choices made while creating the rule. Change these if required.
Target/ Scan locations
Targets are the folders or drives that you want to scan on your managed devices.
- Click the 'Targets' tab > 'Edit'
- 'C:\Users' is included by default.
- Click 'Add' > 'File Path' to add a new scan location:
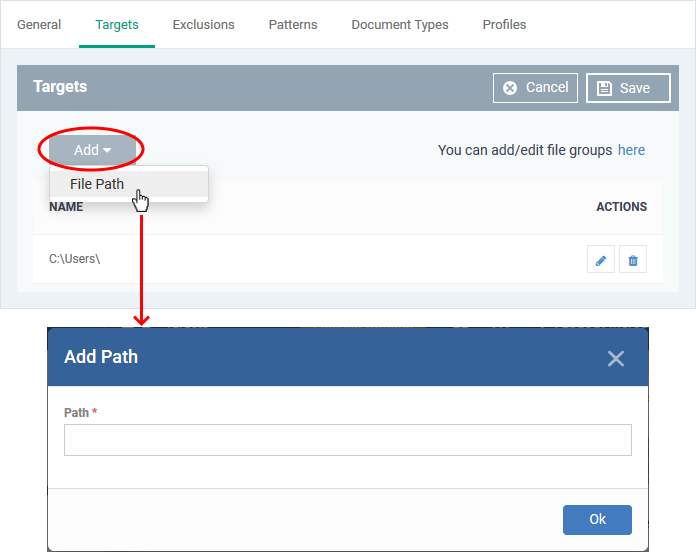
- Enter the location you want to scan then click 'Ok'
- Repeat the process to add more locations
- Click the pencil icon in the 'Action' column to edit a location
- Click 'Save'
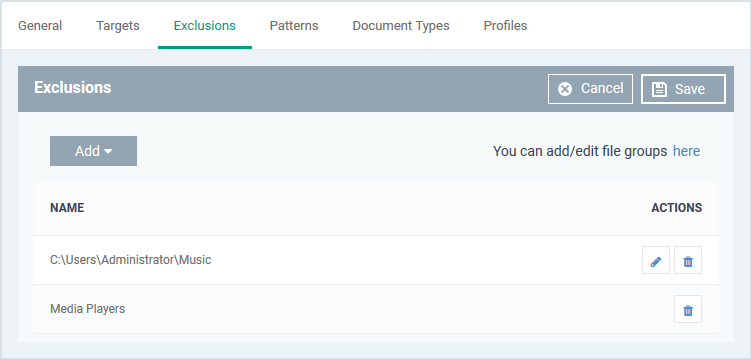
Exclusions
You can omit specific locations and/or file types from your discovery scan.
- Click the 'Exclusions' tab, followed by 'Edit'
- Click 'Add'
- File path - Exclude a folder or file
- File Groups - Exclude a specific set of file types:
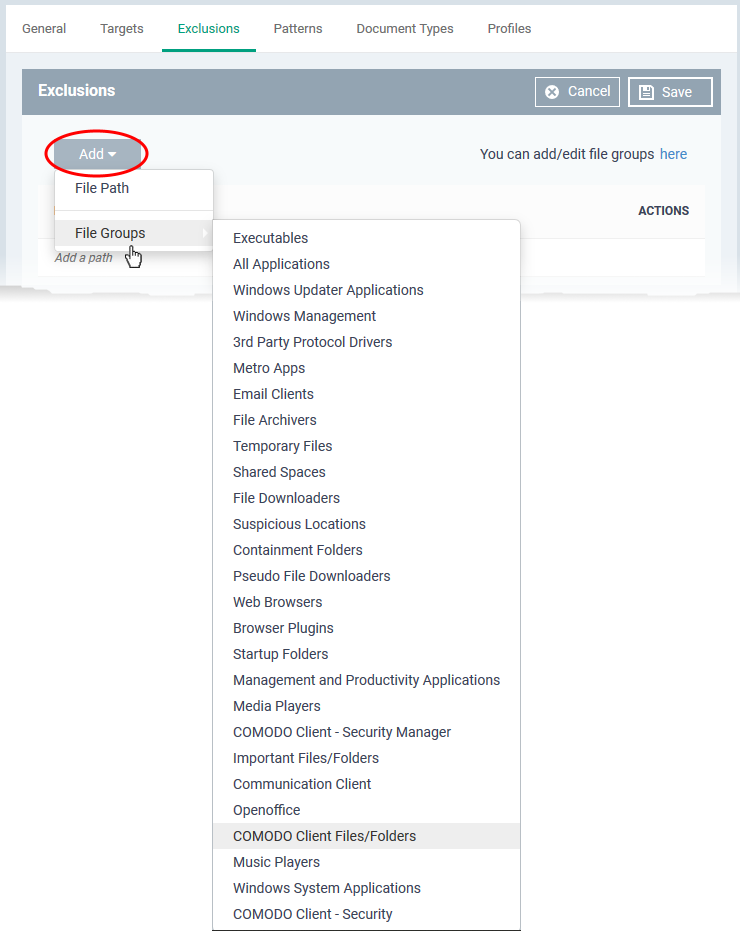
- Filegroups make it easy to exclude an entire class of file. Choose the group you want to exclude then click ‘Save’.
- Click 'Settings' > 'Data Protection Templates' > 'File Groups Variables' to view and manage file groups
- See this wiki if you need help to create and manage file groups.
Repeat the process to add more exclusions.
Patterns
The patterns tab is where you tell the scan what types of data you want to search for.
- A 'pattern' is the format used by the type of data you want to find. Each pattern is a combination of a keyword group and information format.
- For example, the ‘Name with SSN’ pattern consists of:
- Keyword group = ‘Names’ group.
- Information format = 9 digit number arranged in 3-2-4 formation, like '123-45-6789'.
- EM ships with a number of patterns which you can use to search for sensitive data.
- You can also create custom patterns as combinations of information formats and keyword groups. See Manage data patterns if you need help with creating custom patterns.
Add patterns
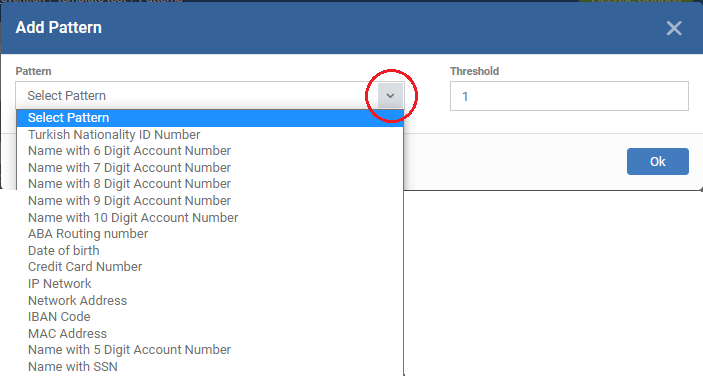
- Click the 'Patterns' tab then 'Edit'
- Click 'Add Pattern'
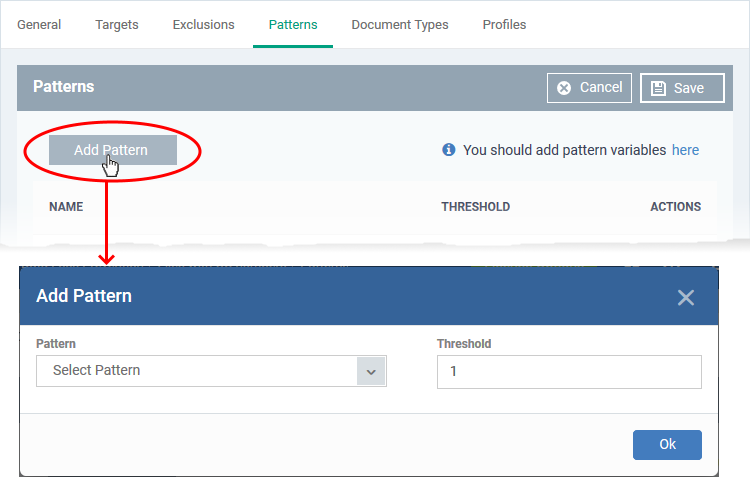
- Pattern - Choose the type of information that you want to search for in scanned locations.
- The drop-down shows the pre-defined patterns shipped with EM and the custom patterns added by you. For example, credit card numbers, social security numbers, bank routing numbers, etc.
- Each pattern can contain a single data format or can be a combination of specific data format(s) and keyword(s) or keyword group(s)
- You can view, create and manage available patterns in the 'Settings' > 'Data Protection Templates' > 'Patterns' interface.
- See Manage data patterns if you need help with this.
- You can customize the selected pattern to narrow down the search only for data containing specific values in certain fields. For example, only search for data containing names and 10 digit bank account number, starting with '4687'.
- Threshold - The number of times that data matching the pattern must be found in a document. Endpoint Manager will flag a document if it contains the threshold quantity of pattern examples.
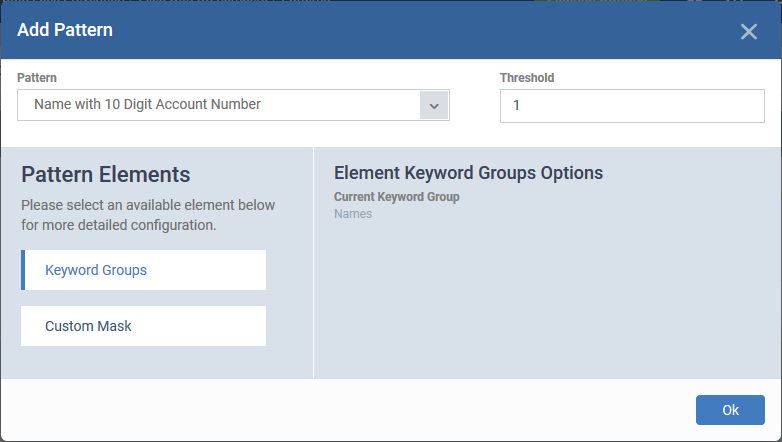
Once you select a pattern the components of the pattern are shown:
Narrow down the search (optional):
You can customize the pattern to search only for data containing specified values in certain positions in the sequence. This is optional.
The left pane shows the components in the pattern and the right pane shows an expanded view of the component chosen in left pane.
- Click a component to expand it on the right pane
- For keyword group, the right pane lets you select a keyword group
- For data format (Custom Mask), the right pane shows the arrangement of characters in it.
A = any character / symbol
D = number
L = alphabetical letter
S = special symbol
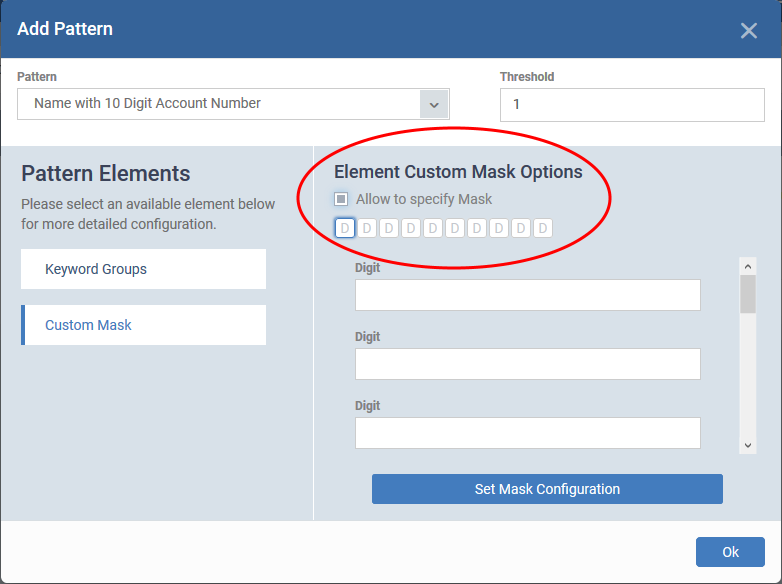
- Select 'Allow to specify Mask'
- Enter the specific/constant characters for which you want to limit your search, in the text fields of the respective positions
- Click 'Set Mask Configuration'
- Click 'OK'
Note - You cannot specify mask characters for pre-defined-standard information types like credit card numbers and social security number that ship with EM. If you want to use mask characters for any of those data types, create a similar custom information type with a different name, add it to a custom pattern and use the custom pattern in the rule. See Manage data patterns to know more about adding custom information types to a pattern.
Illustration:
For example you add 'Name with 10 digit account number' as search pattern but want to narrow down the search to only identify account numbers starting from '1234'.
- Choose 'Name with 10 Digit Account Number' as your pattern
- Click 'Custom Mask' to expand it on the right pane
- Select 'Allow to specify Mask'
- Enter '1', '2', '3' and '4' in the first four text fields
The values are automatically added to their positions in the data type.
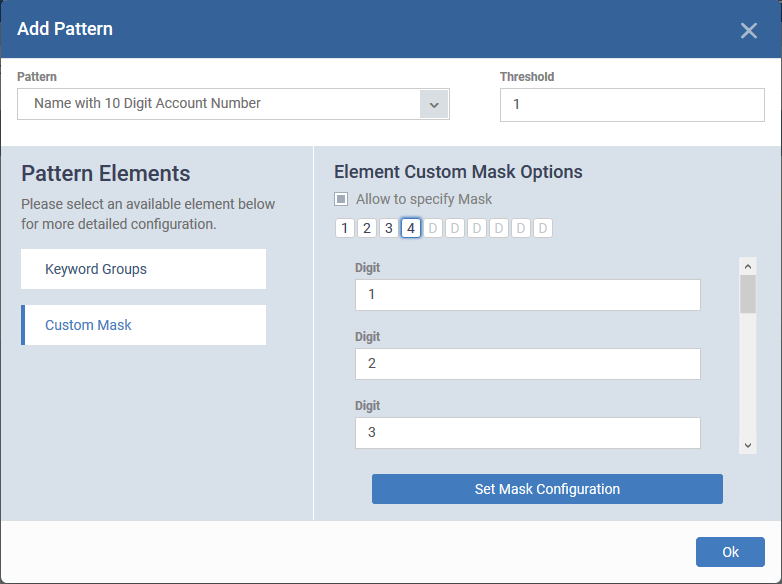
- Click 'Set Mask Configuration'
- Click 'Ok'
Repeat the process to add more patterns.
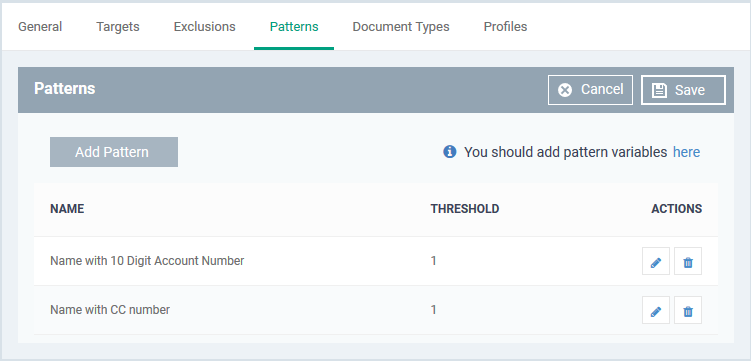
- Click the pencil icon on the left if you want to edit a pattern
- Click 'Save'.
Note – You MUST add keywords to the keyword group used in a pattern, or the search will not work. For example, you must add some names to the ‘Names’ group.
Document types
- This tab lets you choose which types of file you want to scan for sensitive data.
- You can choose PDFs, Word documents, HTML files, text files and/or ZIP files.
- The scan will search the content of all files which have a matching file extension in the locations you specified.
Click the 'Document Types' tab then 'Edit':
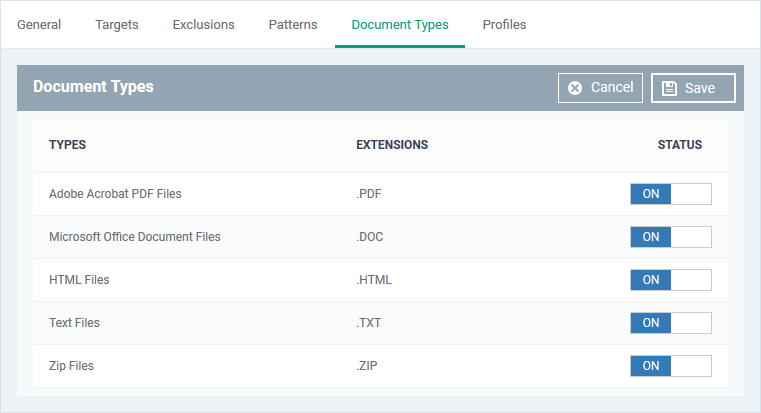
- Use the switches in the status column to choose which types of files you want to scan.
- Click 'Save'
- Repeat the process to add more rules.
You can now add the rule to a profile. If your pattern contains the ‘Name’ group, please make sure you have added keywords to the group.
Manage data patterns
You can view,create and manage available patterns in 'Settings' > 'Data Protection Templates' > 'Patterns'
- Patterns are used by DLP scans to identify sensitive data.
- A pattern can just be an ‘information format’ or be a combination of an ‘information format’ and keywords.
- An information format is the notation used by the type of data you want to find. For example, the information format of an SSN is a nine digit number in 3-2-4 formation, like '123-45-6789'.
- Keywords can be indivudual keywords or keyword groups. Each keyword group can contain a set of keywords that belong to a category, like names and network terms
- EM ships with a set of pre-defined patterns
- You can also create custom patterns to define custom information formats
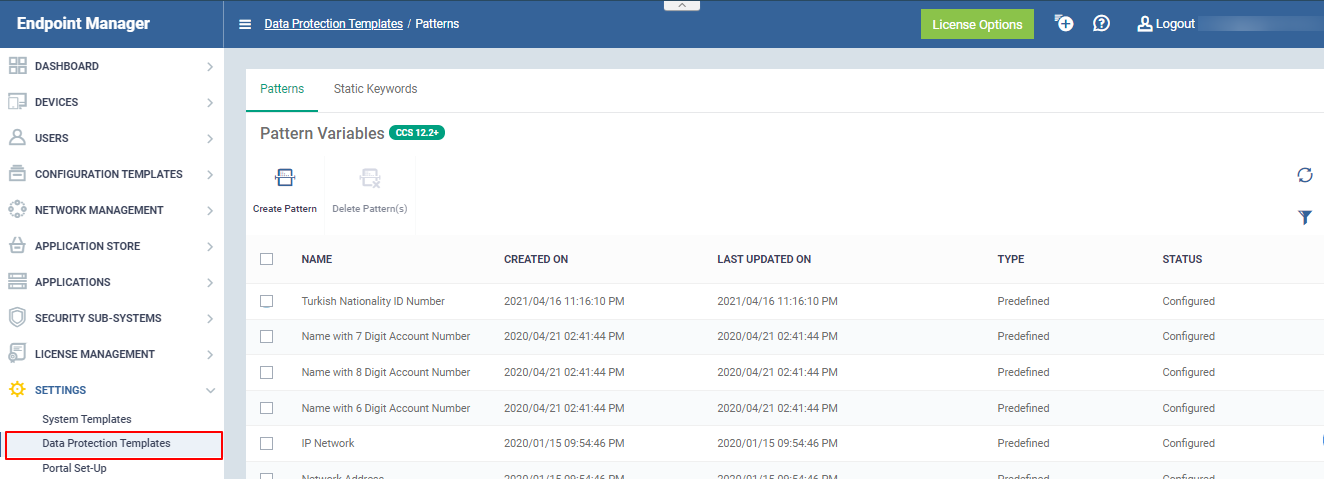
View data patterns
- Click 'Settings' > 'Data Protection Templates'
- Click the 'Patterns' tab
The pattern variables interface shows a list of pre-defined and custom patterns and lets you create new patterns:
The following table shows the information formats and keyword groups contained in each predefined pattern:
|
Pattern
|
Description
|
| Turkish Nationality ID Number |
Consists of citizen number in Turkey
|
|
Name with 5-8 Digit Account Number
|
Consists of Keyword Group 'Names' and a bank account number
|
|
Name with 9 Digit Account Number
|
Consists of Keyword Group 'Names' and 9 digit bank account number
|
|
Name with 10 Digit Account Number
|
Consists of Keyword Group 'Names' and 10 digit bank account number
|
|
Name with SSN
|
Consists of Social Security Number and Keyword Group 'Names'
|
|
ABA Routing number
|
Consists of American Bankers Association (ABA) routing number. This is the nine digit bank code printed in negotiable instruments in the US.
|
|
Date of birth
|
Consists of Birth Date
|
|
Credit Card Number
|
Consists of Credit Card Number
|
|
IP Network
|
Consists of IPv4 and IPv6 IP Addresses
Examples:
192.0.2.0/24
198.51.100.0
2001:0db8:85a3:0000:0000:8a2e:0370:7334
2001:db8:1234::/48
|
|
Network Address
|
Consists of URLs, and domain names
Examples:
http://domain.name
https://domain.name
www.domain.name
domain.com
local.net
|
|
IBAN Code
|
Bank account number in International Bank Account Number (IBAN) format.
|
|
MAC Address
|
Searches for mac addresses, the unique identifier assigned to network cards.
|
Create a custom pattern
- Click 'Settings' > 'Data Protection Templates'
- Click the 'Patterns' tab
- Click 'Create Pattern'

- Enter a label for the pattern and click 'Create'
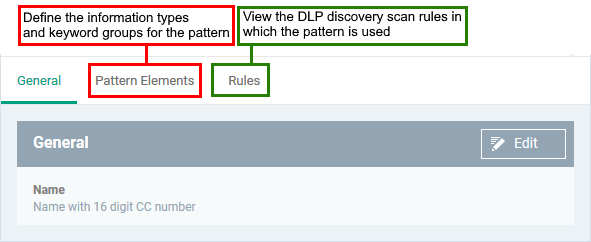
- Click the 'Pattern Elements' tab
- Click 'Add Element' and choose a component information type or keyword group to add to the pattern:
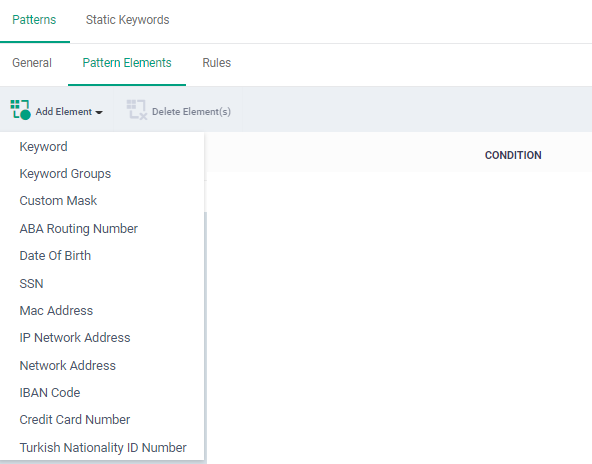
|
Keyword
|
Specify a single keyword as a component of the pattern
|
|
Keyword Groups
|
Add a keyword group to the pattern. You can manage term in a keyword group in 'Settings' > 'Data Protection Templates' > 'Static Keyword' interface. See Add keywords to keyword groups if you need help with this.
|
Custom Mask |
Specify a custom information type. You can define a sequence of different character types like alphabets, numerals and special characters in the order they appear in the data you want to search.
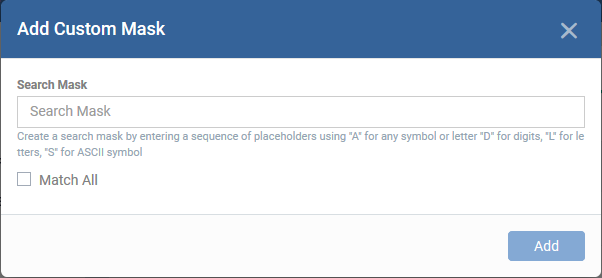
Use:
'A' in place of any character
'D' in place of a numeral
'L' in place of an alphabet letter
'S' in place of a special character
For example, to define a 7 character vehicle license plate number, you can specify:
'DLLLDDD'
Match All –
- Enabled – Only the data that match fully with the information type are identified by the rule in which the pattern is used
- Disabled – Data that match partially with the information type are identified by the rule in which the pattern is used
You can narrow down the scope of search by specifying constant characters in place of variables, while adding the pattern to a discovery rule. See Patterns for more details.
|
|
ABA Routing Number
Date of Birth
SSN
Mac Address
IP Network Address
Network Address
IBAN Bode
Credit Card Number
Turkish Nationality ID Number
|
Predefined - standard information types. |
- Repeat the process to add more elements to the pattern
Edit or delete a pattern
- Click 'Settings' > 'Data Protection Templates'
- Click the 'Patterns' tab
- Click a custom pattern to edit it.
- The process of editing is similar to adding a pattern
- Select a pattern and click 'Delete Pattern(s)' to remove it.
- Note – You can edit or delete only custom pattern. Pre-defined patterns cannot be edited or deleted.
Add keywords to keyword groups
Click 'Settings' > 'Data Protection Templates' > 'Keywords Variables'
- Keyword groups are used by DLP scans to identify sensitive data. Each group is a list of specific items which the scan will search for.
- For example, the ‘Names’ group should contain the surnames of the employees/users in your protected network.
- The keyword group is paired with an ‘information format’ to form a 'pattern'.
- An information format is a notation used by the type of data you want to find. For example, the information format of an SSN is a nine-digit number in 3-2-4 formation, like '123-45-6789'.
- So a search for the SSN ‘pattern’ will identify all instances of ‘Name + SSN’ in target documents.
- You MUST add some names to the ‘Names’ group or the search will not work. Patterns that have an empty keyword group will not produce any results.
Add names to the ‘Names’ keyword group
- Click 'Settings' > 'Data Protection Templates'
- Click the 'Static Keywords ' tab
- Click '+' at the left of a group name
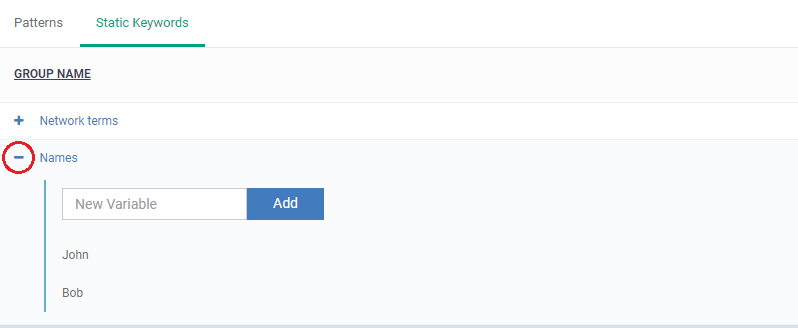
There are two ways you can add keywords:
1 Type them in the field provided. Click ‘Add’ after each keyword.
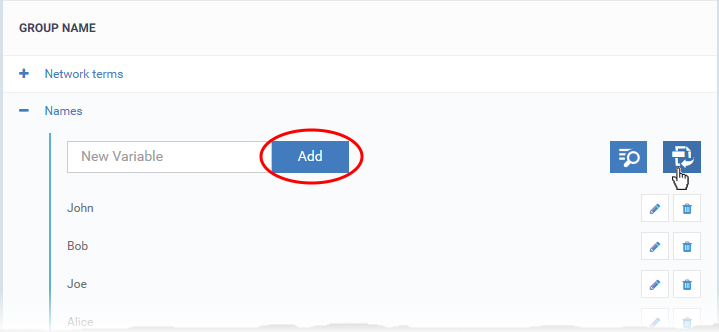
- Repeat the process to add more keywords
2 Import them from .csv file. Click the import icon on the right then browse to your .csv file:
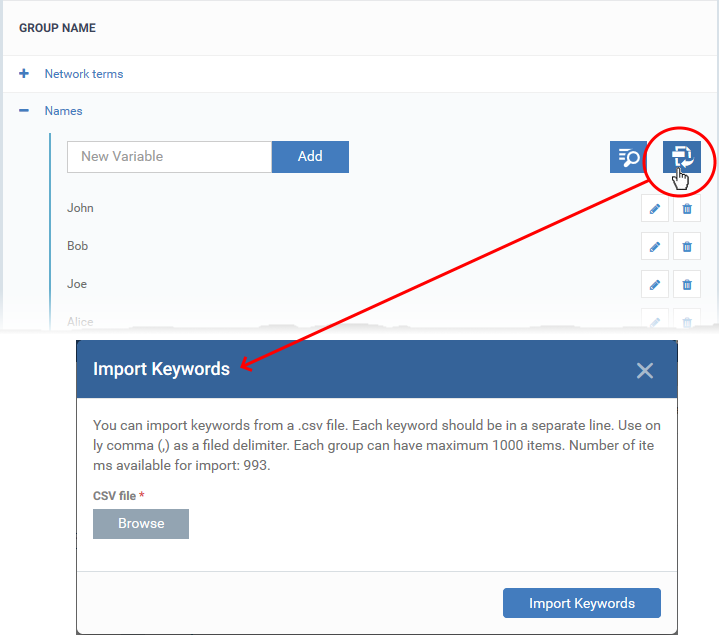
|
Advice:
- The scan searches for an exact match on the keywords you add.
- Because of this, we advise you add only surnames to the ‘Names’ group at first. This will detect the most variants of the subject’s name.
- For example, the keyword ‘Bowman’ will catch the following variants in an SSN pattern search:
Robert T Bowman 123-45-6789
Rob Bowman 123-45-6789
Robert Bowman 123-45-6789
R. Bowman 123-45-6789
Bowman Robert 123-45-6789
etc.
|
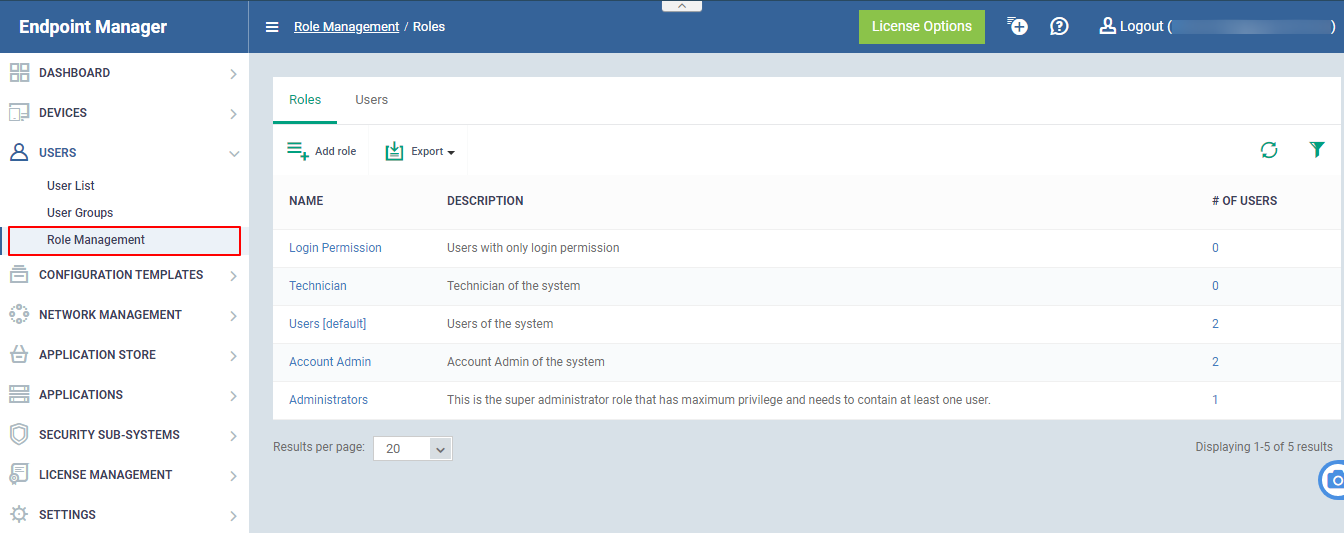
Manage User Permissions
-
Endpoint Manager ships with four roles, 'Account Admin', 'Administrators', 'Technician' and 'Users'. The 'Account Admin' role can be viewed but not edited. The permissions in the other three roles can be modified.
-
Each role defines a staff member's rights to access the certain EM modules and to manage users/devices belonging to different companies. You can restrict a role to manage specific companies and specific device groups. See this wiki if u need help to create or manage user roles.
Add or remove permissions assigned to a role
- Click a role name to view 'Role Details'.
- Click the 'Role Permissions' tab if it is not open
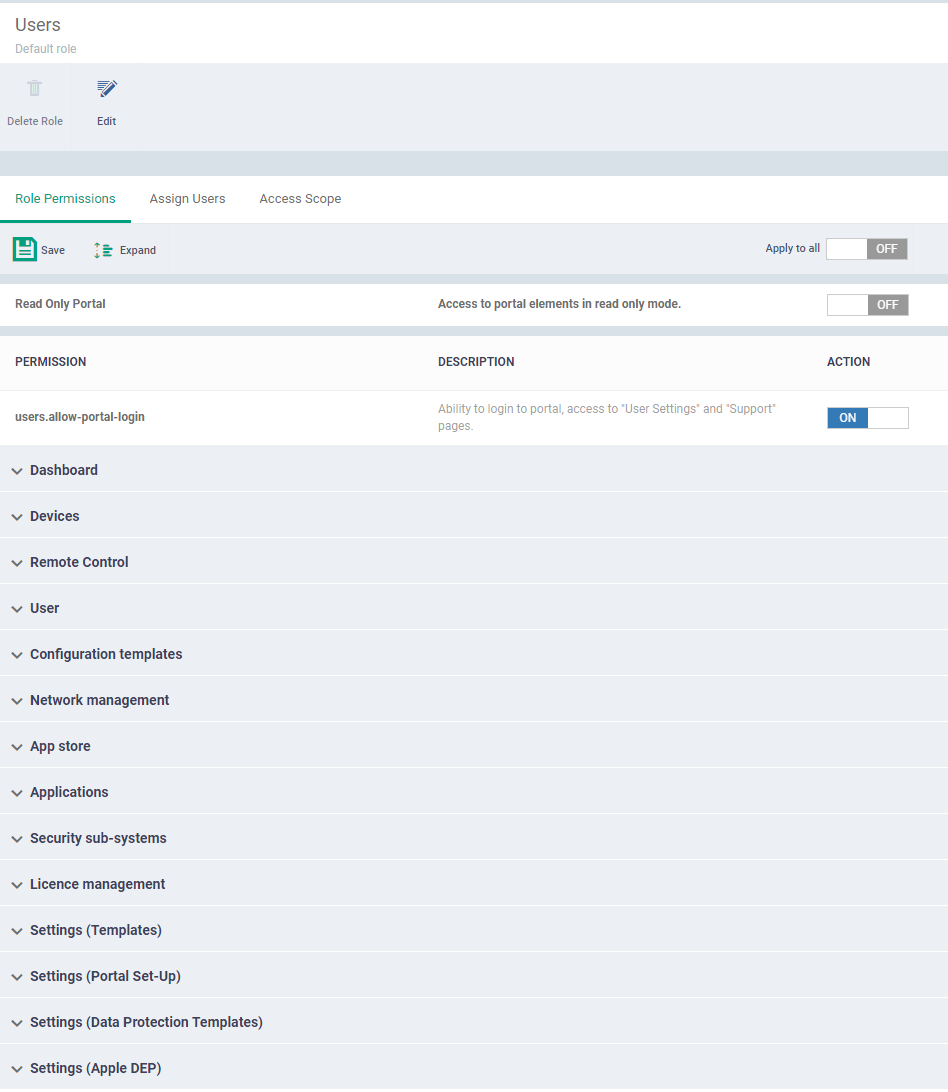
- Role Permissions defines the access rights and privileges for the role
Apply to all - Use 'Apply to all' will enable or disable all the permissions
Read Only Portal - Read-only mode allows the user to view the page in the Endpoint Manager. If we are enabling the button user can only view the page cannot make changes in the Endpoint Manager.
Each item in the list lets you choose permissions for a specific area.
- Click the down arrow next to a module name to view its permissions
OR
- Click 'Expand' at the top to view all permissions
You can now view or manage the ‘Data Protection Templates’ role permissions.
- Use the switches on the right to enable or disable specific permissions
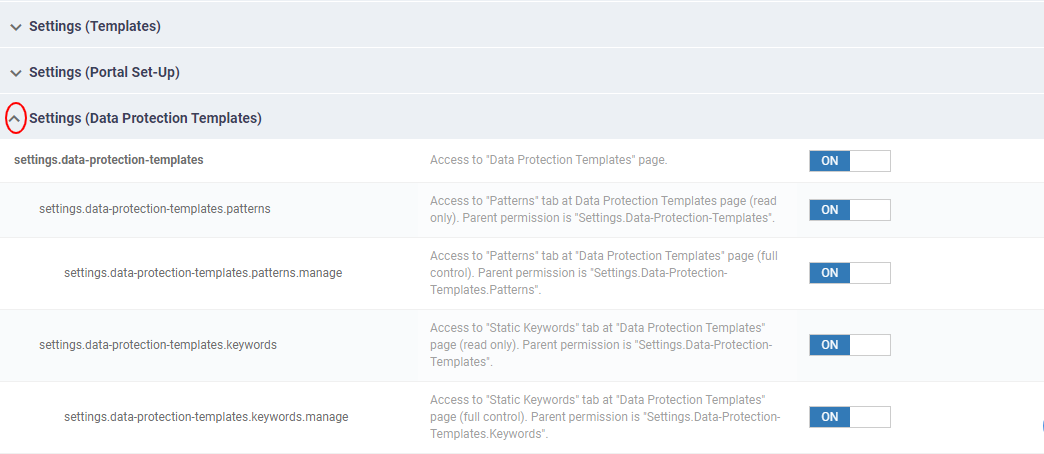
- Select the checkboxes of the permissions to be assigned to the role and click the save button at the top.
For Example, The Permission: "settings.data-protection-templates.patterns" has been selected to add to the role.
- Deselect the checkboxes, if you want to be removed from the role.
If we disable ‘’settings.data-protection.patterns’ permission, the user cannot access to 'Patterns' at Data Protection Template page.
- Click 'Save' for your settings to take effect
Note – Please refer this wiki if you need to know more about assign and reassign of roles
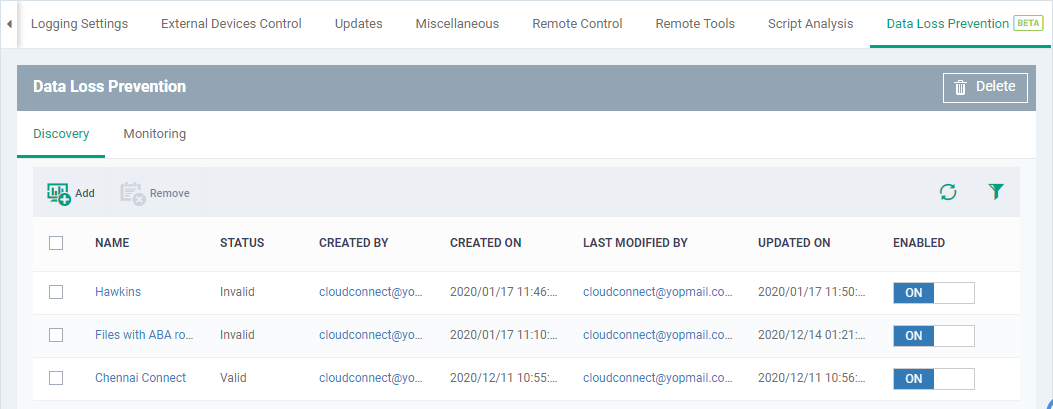
Add DLP discovery rules to a profile
The final step is to add a DLP section to your profile, then populate it with your scan rules.
- Click 'Configuration Templates' > 'Profiles'
- Click the ‘Profiles’ tab
- Open the Windows profile applied to your target devices
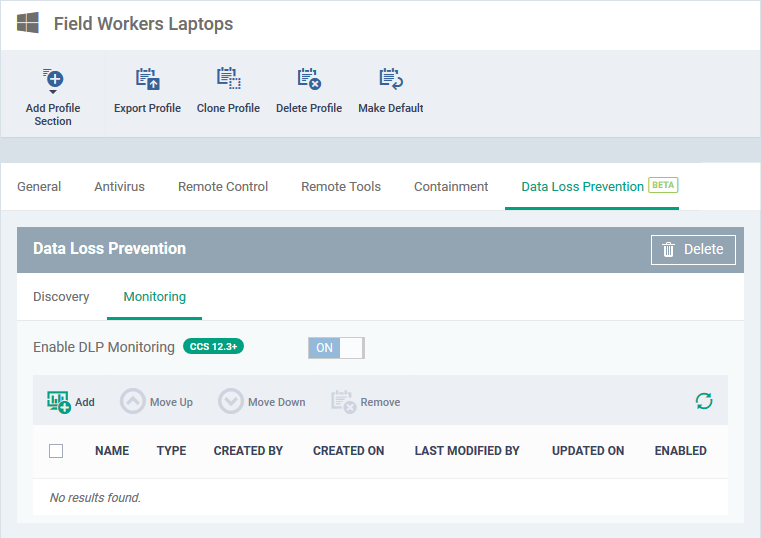
- Open the 'Data Loss Prevention' tab
OR
- Click 'Add Profile Section' > 'Data Loss Prevention', if it hasn't yet been added
- Click the 'Discovery' tab (if it is not open already)
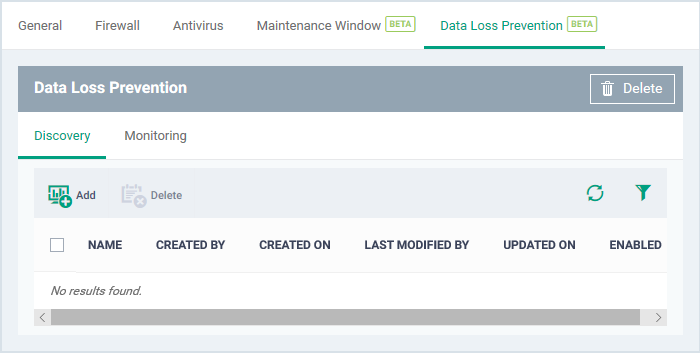
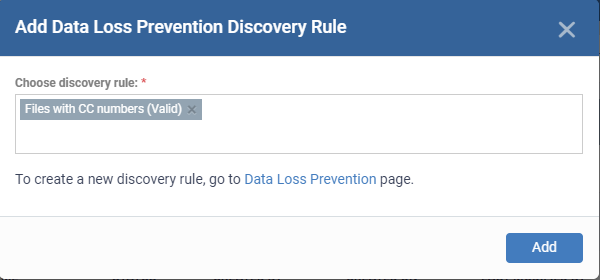
Choose Data Loss Prevention rule - Add an existing discovery rule to the profile.
- Start typing the first few letters of a rule name then select from the suggestions.
- You can be able to view the DLP rule is valid or invalid to use. If a rule is invalid, you can’t get the expected results.
- If you can’t remember your rule names, click ‘Configuration Templates’ > ‘Data Loss Prevention’
- Repeat the process to add more rules to the profile
- Click 'Add'
The interface shows all discovery rules you have added:
The profile pushes the DLP scan to the target devices.
Manually run a DLP scan
You can run DLP scans on-demand from the data loss prevention section:
- Click 'Security Sub-systems' > 'Data Loss Prevention'
- Select the 'Device List' tab
- Select your target devices
- Click 'Action on Endpoint' > 'Run all discoveries':
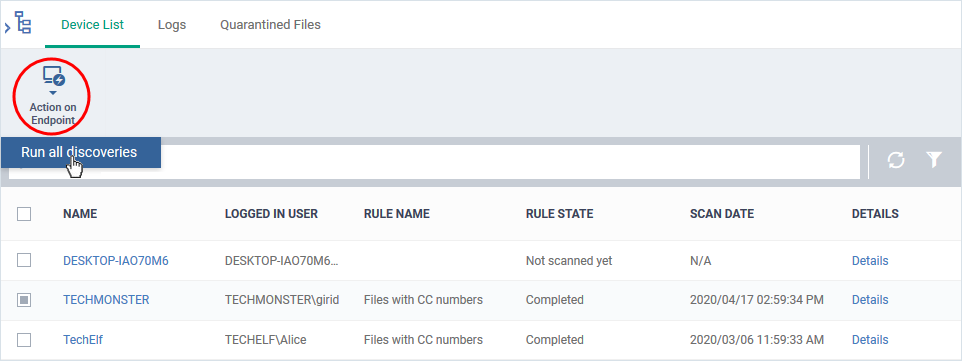
- The scan command is sent to the selected devices. CCS runs the scans based on the rules included in the profile active on the device.
- Click the 'Details' link when the scan finishes viewing files containing sensitive information
- See View scan results for more on the results.
View scan results
Click 'Security Sub-systems' > 'Data Loss Prevention' > 'Logs'
- The logs tab shows DLP events on endpoints.
- Log details include the name of the file, its location on the device, the rule that discovered the file, and the type of sensitive information in the file.
- You can use the 'Remote Tools' feature to connect to the target device and access the files on the path provided. You can then move/ remove/ edit file permissions as required.
View DLP scan logs
- Click 'Security Sub-systems' > 'Data Loss Prevention'
- Click the 'Logs' tab

- Date Time - The date and time at which the file was discovered
- Component - The type of rule that generated the log. This can be either a discovery rule or a monitoring rule.
- Action - The CCS response when the rule was triggered. The possible values are:
- Quarantined – The file is moved to quarantine in the local CCS installation. You can restore or delete quarantined files. See Manage DLP quarantined files for help with this.
- Ignored – No action has been taken on the identified file. You can manually take actions on the file by remotely accessing the device through the 'Remote Tools' feature.
Take action on identified files for help with this.
See the next section
- Device Name - The device on which the files reside.
- Click the name of the device to view its details.
- Rule - The DLP rule that triggered the event:
- DLP Discovery events - The name of the DLP discovery rule that identified the file.
- Monitoring events - Shows the rule name as 'Removable Storage Rule'
- File Name - The label of the file
- Click the
 icon to copy the file name to the clipboard.
- File Path - The location of the file on the device.
- Click the icon to copy the file path to the clipboard.
- File Hash - The SHA 1 hash value of the file
- Pattern - The type of data contained in the file.
- Match Count - The number of times the data of the type occurred in the file.
- Details - Click the 'Details' link to view the information on the detected file. An example is shown below:

Take action on identified files
There are two ways you can connect to remote devices in order to manage files that contain sensitive data:
1) Endpoint Manager - Click 'Devices' > 'Device List' > select a running Windows device > Click 'Remote Tools' > 'File Explorer'.
- See this wiki for help to use the 'Remote Tools' feature.
2) Remote Control app - Click 'Devices' > 'Device List' > 'Device Management' > select a Windows device > Click the 'File Transfer' button.
You need to download and install the remote control app to use this feature.
- See this wiki for help to use both of these remote control apps.
Manage DLP quarantined files
Click 'Security Sub-systems' > 'Data Loss Prevention' > ‘Quarantined Files’
The DLP quarantined files screen shows files that were quarantined on endpoints by a discovery rule.
- Click 'Security Sub-systems' > 'Data Loss Prevention'
- Click the 'Quarantined Files' tab.
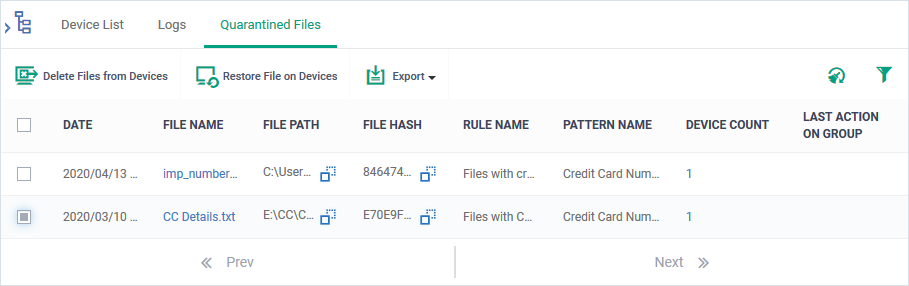
- Date - The date and time the file was quarantined
- File Name - The file in which sensitive data was found.
- Click the icon to copy the file name to the clipboard.
- Click the name to view file details. The file details pane shows the general information of the file and the devices on which the file was found. You can restore or delete the file on the devices. See View details of DLP quarantined files to read more.
- File Path - The location of the file on the device.
- Click the icon to copy the file path to the clipboard.
- File Hash - The SHA1 hash value of the executable file.
- Click the icon to copy the hash value to the clipboard.
- Rule Name - The discovery rule that quarantined the file
- Pattern Name - The data format that the rule searched for. For example, an ‘ABA routing number’ is a nine-digit code.
- Device Count - Number of devices on which the file was quarantined. Click the number to view the device details.
- Last Action on group - The admin’s response to the quarantined file. The possible values are:
The controls on the top lets you take actions on the quarantined files:
- Restore File on Devices - Select a file and click 'Restore file on Devices' to move the file from quarantine back to its original location
- Delete Files from Devices - Select a file and click 'Delete Files from Devices' to remove the file from the devices
Create a DLP monitoring rule
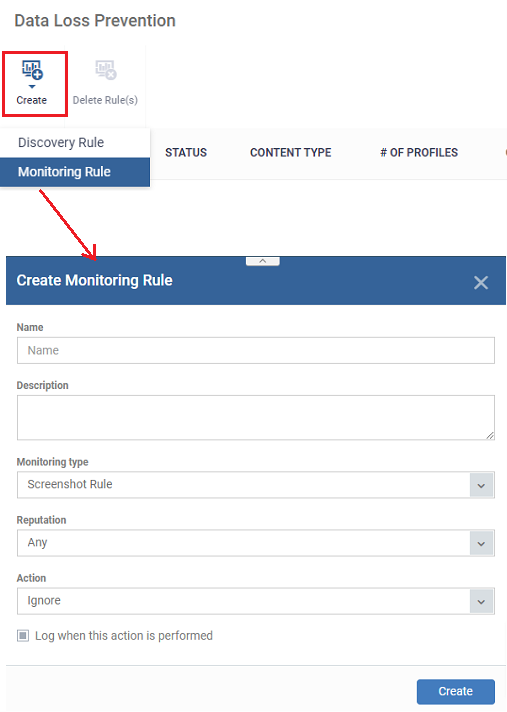
Click 'Configuration Templates' > 'Data Loss Prevention' > 'Create' > 'Monitoring Rule'
-
Monitoring rules let you prevent users from copying files to external devices and the ability to restrict their users to take screenshots and log the performed actions according to their preferences. You will define the following items in a rule.
You can create the following monitoring rules:
Removable Storage Rule
The Removable Storage Rules block or allow copy/move operations to external storage devices like USB data devices. You can add the monitoring rule to a profile, which is in turn applied to target devices or users.
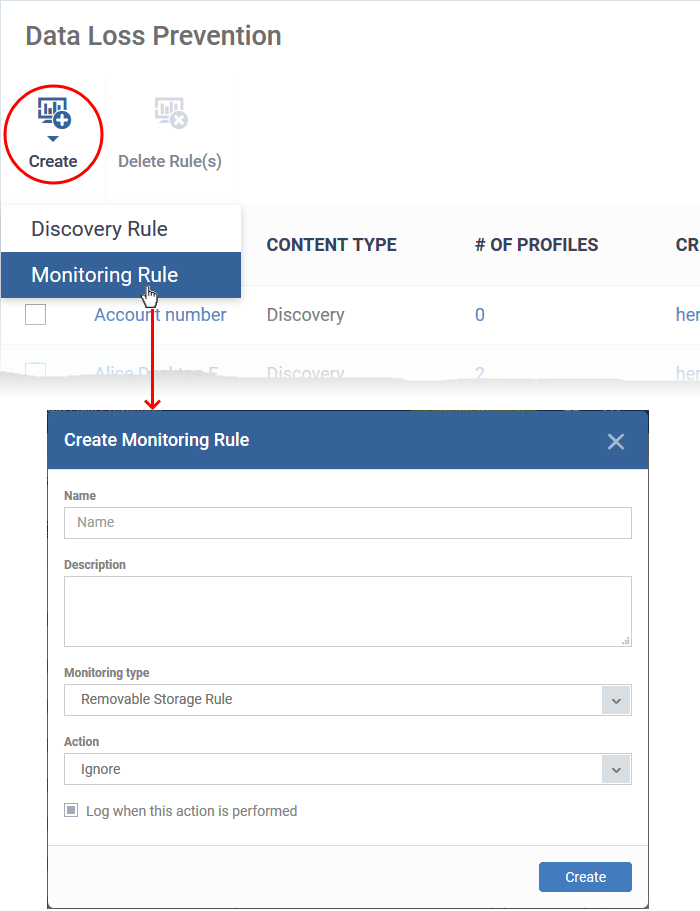
Name - Enter a label for the rule
Description – Add a short note for your reference
Monitoring type – Choose the channel to be monitored for data transfer.
Action - The response Endpoint Manager should take on files that meet the rule conditions. The options are:
- Ignore – Data transfers to the external storage device are allowed.
- Quarantine - The storage device is set to ‘Read-only’ mode. Users cannot copy data to/from the storage device.
Log when this action is performed - Choose whether you want to create an event log whenever the rule is enforced. You can view the logs in the 'Security Sub-systems' > 'Data Loss Prevention' > 'Logs' interface in EM.
- Click 'Create’ to move to the rule configuration screen:
- Click 'Edit' on the right.
- Use the following links for help with each tab
General
Criteria
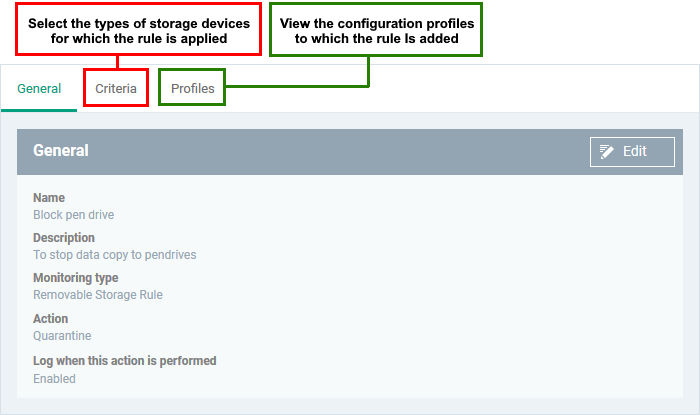
General
The general tab shows the name, description and action you chose for the rule in the previous step.
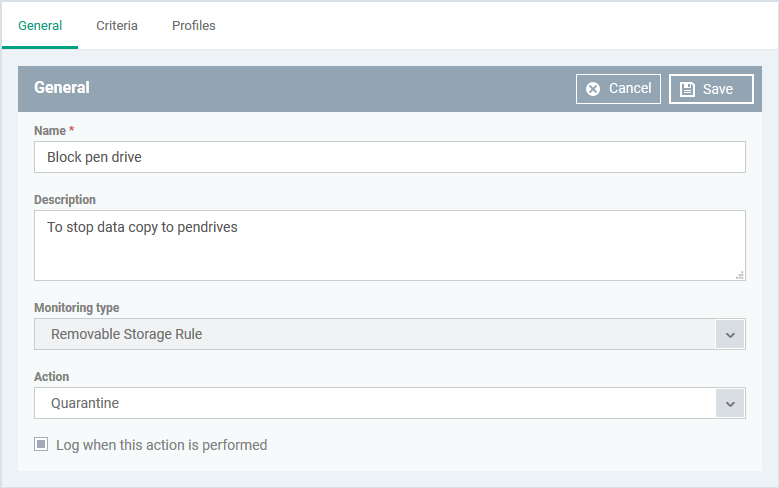
- Name, Description, Action and log option – Your choices made while creating the rule. Change these if required.
- Click 'Save'
Criteria
The criteria tab lets you select the type of target external storage devices.
- Click the 'Criteria' tab > 'Edit'
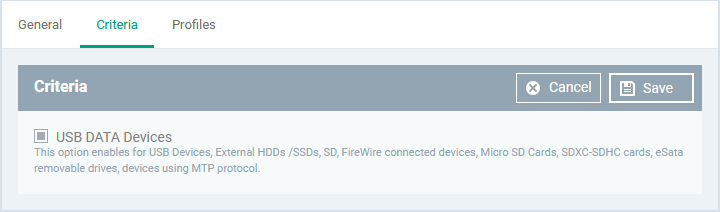
- Select the type of storage device. The only option available is 'USB DATA Devices'. This covers the following storage devices:
- USB Data Devices like pen drives
- External HDDs /SSDs
- USB connected external optical disk drives (CD/DVD)
- SD, Micro SD Cards, SDXC-SDHC cards
- eSata removable drives
- FireWire connected devices
- Devices using MTP protocol
The monitoring rule is created.
- Repeat the process to add more rules.
You can now add the rule to a profile.
Screenshot Rule
The Screenshot Rule can be used to prevent screenshot captures when a certain defined process is running. If the admin adds this rule and assigns it to any device profile, the associated devices should not be able to take a screenshot while the defined processes are running.
- Click 'Configuration Templates' > 'Data Loss Prevention'
- Click 'Create' > 'Monitoring Rule' > Select ‘Monitoring Type’ > ‘Screenshot Rule’
- Name - Enter an appropriate label for the rule
- Description - Enter short notes for the rule
- Monitoring type - Select 'Screenshot Rule' from the drop-down
- Reputation - The admin should be able to select a rating for the application created, these rating block the user to take a screenshot while the process is running. The available ratings are ‘Any’, ‘Trusted’, ‘Malicious’ or ‘Unrecognized’.
- If none of these is selected, the device should be blocked to take a screenshot for all. The default rating is ‘Any’.
- Action – The screenshot actions while selected applications are running.
- Ignore – The screenshot is allowed. The default action will be "Ignore
- Block - The device is set to 'Read-only' mode. Block the users to take a screenshot in this mode.
- Log when this action is performed - Choose whether you want to create an event log. You can view the logs in the 'Security Sub-systems' > 'Data Loss Prevention' > 'Logs' interface in EM.
- Click 'Create’
The rule is saved. The rule configuration screen opens:
Use the following links to jump the tab
General
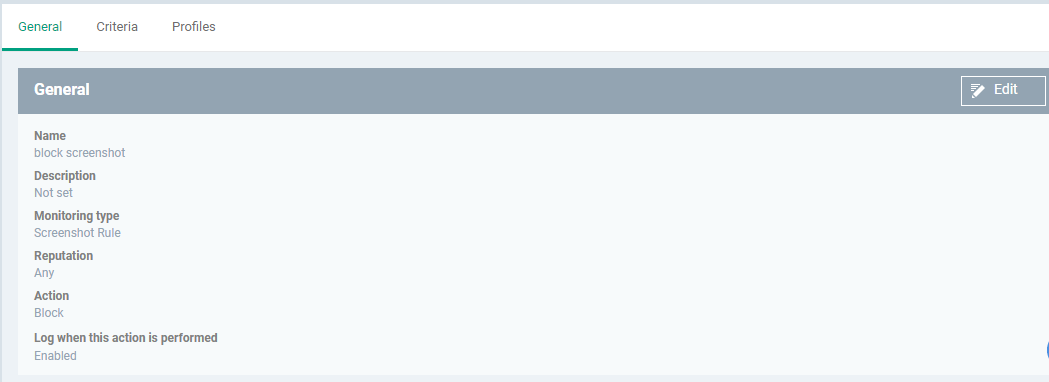
The general tab shows the name, description, monitoring type, reputation, and action you chose for the rule in the previous step.
- Click 'Edit' at top-right
- Update the fields if required.
- Click 'Save
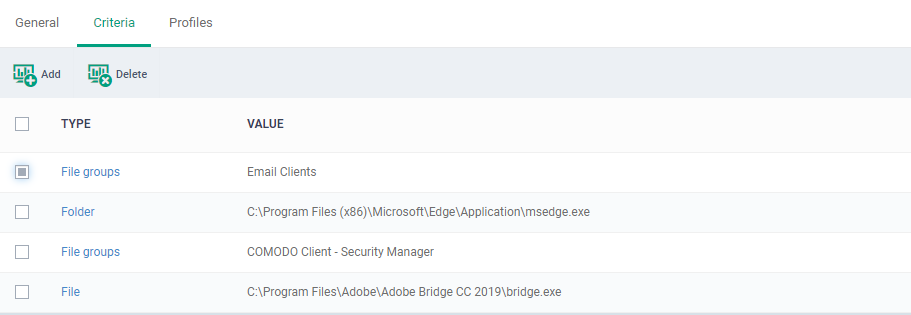
Criteria
The screenshot rule shows the list of all criteria types. You can set the preference criteria accordingly, the option is ‘File groups’, File’, ‘File hash’, ’Folder’,’ Process hash’.
- Click Criteria > Add
- Select the criteria type from the drop-down button you want to add.
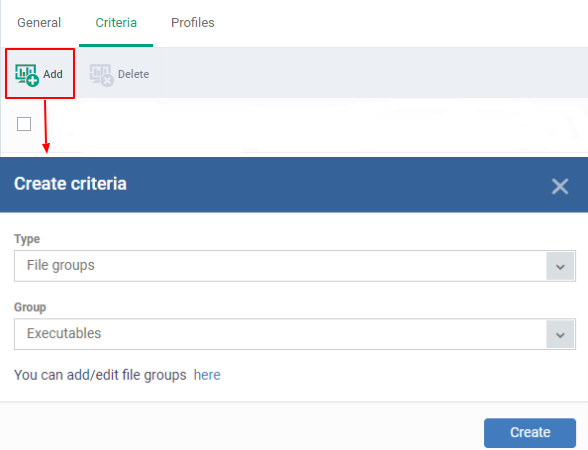
- Filegroups - Exclude a specific set of file types
- Click 'Settings' > 'Data Protection Templates' > 'File Groups Variables' to view and manage file groups or click the ‘You can add/edit file groups here’ option
- See this wiki if you need help to create and manage file groups.
- File – Enter the file path you need to exclude from the rule.
- File Hash – The file hash allows you to locate files by their SHA-1 hash value. Visibility, execution trend, file history and executive summary are listed for each file. It should be the SHA 1 checksum of a file.
- Folder – Add the folder path for the rule
- Process Hash – Add the SHA1 checksum of the process to exclude the screenshot rule.
- Click save
The screenshot rule is now created
- Repeat the process to add more rules.
- To delete a rule, select the rule > click the ‘Delete’ tab
You can now add the rule to the profile
Add a DLP monitoring rule to a profile
- Click 'Configuration Templates' > 'Profiles'
- Click the ‘Profiles’ tab
- Open the Windows profile applied to your target devices
- Open the 'Data Loss Prevention' tab
OR
- Click 'Add Profile Section' > 'Data Loss Prevention', if it hasn't yet been added
- Click the 'Monitoring' tab:
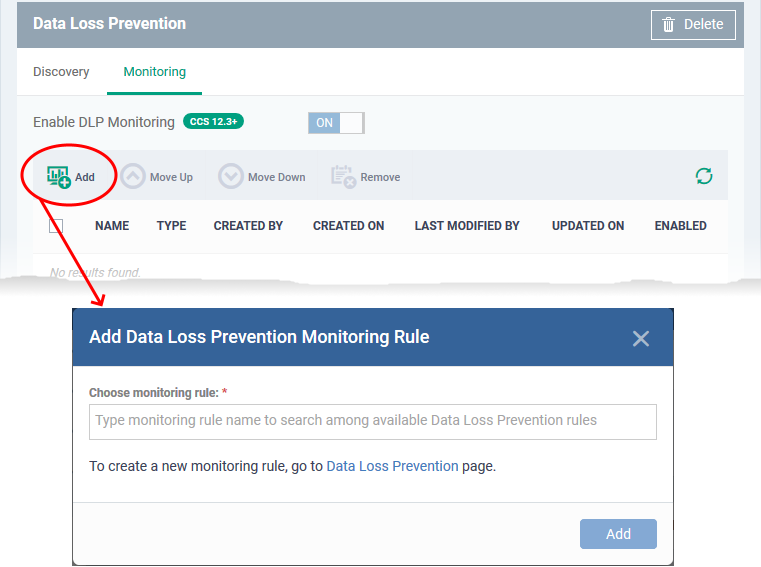
Choose monitoring rule - Add an existing monitoring rule to the profile.
- Start typing the first few letters of a rule name then select from the suggestions.
- If you can’t remember your rule names, click ‘Configuration Templates’ > ‘Data Loss Prevention’
- Repeat the process to add more rules to the profile
- Click 'Add'
The interface shows all monitoring rules you have added:
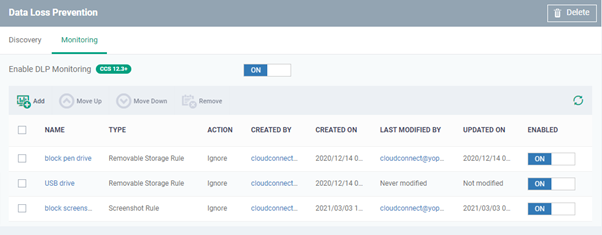
The rules are applied from top to bottom in order – meaning the rules at the top have more priority
- Select a rule and use 'Move Up' and 'Move Down' buttons to change the order of rules in the list
- Ensure that 'Enable DLP Monitoring' is enabled at the top
- The rule will take effect on all endpoints to on which the profile is active.
- You can view the logs of DLP monitoring events in 'Security Sub-Systems' > 'Data Loss Prevention' > 'Logs'. See View scan results to read more.