- Click 'Staff Panel' > 'Tickets' > 'Open' (...or select a different ticket category as required)
- Click on the number of the ticket you want to open
Tickets can be single stage or multi-stage depending on the category to which the ticket belongs.
- Single stage ticket - Can be closed by the department/staff member to whom it was assigned. You can configure this in 'Admin Panel' > 'Manage' > 'Ticket Categories'.
- Multi-stage tickets - Multi-stage tickets are suited to more complex issues which require input from more than one department. The ticket is auto-assigned to the next department or staff member after each stage is closed. See How to manage ticket categories to read more about this
The ticket details screen contains multiple sections. Click the following links to jump to the section you need help with:
- Title bar - Controls to manage the ticket.
- Ticket Information - General details about the ticket.
- Ticket Workflow - Appears only for multi-stage tickets. Displays the status of successive stages of the ticket.
- Ticket Actions - Take various actions on the ticket - post replies and notes, record time spent, assign the ticket, generate quotes for materials and more.
- History - A list of ticket activities.
- Material Details - Billable materials and expense items added to the ticket
- Time Spent - Time spent working on the ticket by all contributing staff members. This includes time recorded automatically during each service session, and manually added time. The table also shows how much of the time is billable.
- Staff - View staff members associated with the ticket and add new staff.
Title Bar
- The controls in the title bar let you perform various actions on a ticket:

Click the following links if you need more info about any item:
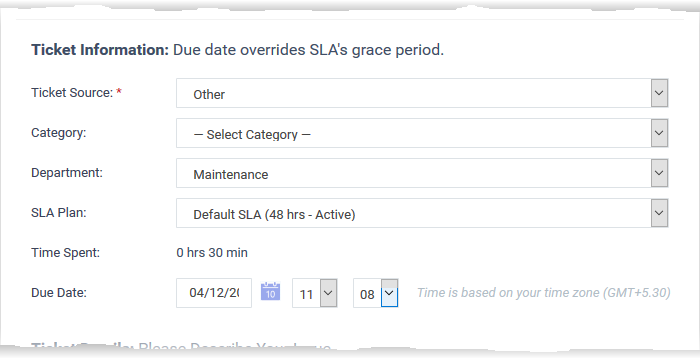
Ticket Information
- Click the 'Ticket Information' stripe
- The ticket information box shows the user who raised the ticket, the ticket status, the assignee, due date, billable time, and more.
- The number of fields shown here depends on the 'Forms' added to the ticket.
- You can edit these details, if required. See 'Edit the ticket' for help with this.
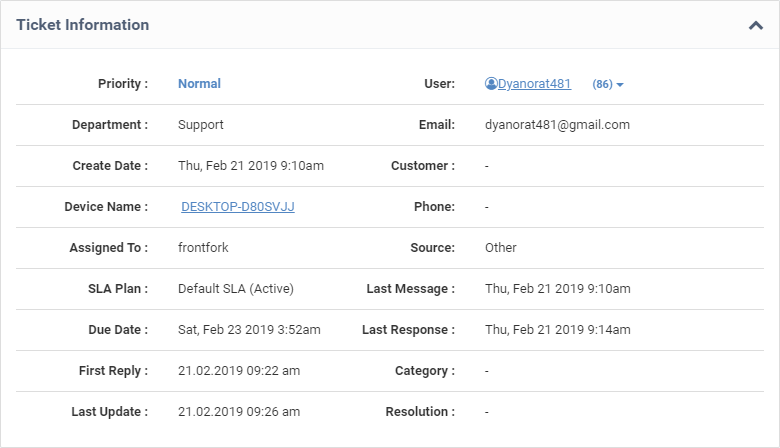
- Priority: The criticality of the ticket. Priority can be inherited from the ticket category or department, or set manually during ticket creation. Staff can also change the priority of the ticket while it is in progress.
- Department: The name of the department to which the ticket is assigned. Staff can change the department as required and assign it to a different staff member in the new department.
- Create Date: Date and time at which the ticket was received.
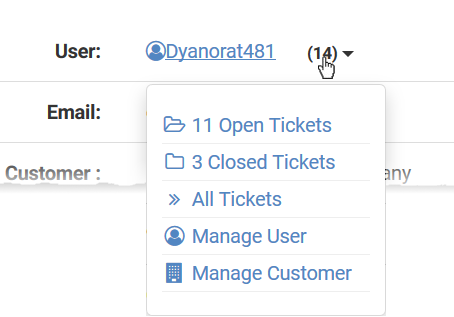
- User: The name of the user who created the ticket, or on whose behalf the ticket was created by an agent.
- Tickets auto-submitted by a managed device have the name of the device owner as the ‘user’.
- The number beside the user name shows the quantity of tickets raised by the user
- Click the number to manage the user, the user’s tickets tickets, and the company to which the user belongs.
- Email: The email address of the user who created the ticket, or on whose behalf the ticket was created by an agent. Tickets auto-submitted by a managed device state the email address of the device owner.
- Customer: The company to which the user belongs.
- Phone: The contact number of the user.
- Device Name - The label assigned to the device.
- Source: The channel through which the ticket was created. Possible values are 'Web', 'Phone' and 'Email'.
- Assigned to: The name of the staff member to whom the ticket is currently assigned. You can re-assign to a different staff member in the 'Actions' area.
- SLA Plan: The service level plan associated with the ticket. The SLA can be inherited from the ticket category or from the department. Staff can change the SLA, if required, when working on a ticket.
- Due Date: The date and time by which the ticket should be closed. The due date may be determined by the SLA plan or the department, or is set manually by staff at ticket creation. You can change the due date by editing the ticket.
- Category: The help topic chosen when creating the ticket.
- Last Message: Date and time at which the most recent reply was received from the user.
- Last Response: Date and time of the most recent reply by a staff member.
- First Reply: Date and time the first response was sent to the user by a staff member
- Last Update: Date and time at which the ticket was most recently updated
- Asset Type: The type of item which the ticket concerns. For example, 'Workstation', 'Printer', 'Server' etc. The asset type can be chosen when creating the ticket. This helps to determine the billing rate.
- Ticket Type: The broad class of issue as chosen by the user or staff member who created the ticket. The options available are 'Alert', 'Order' and 'Problem'.
- Ticket Sub Type: Specific issue type as chosen by the person who created the ticket. For example, 'Overheating' may be a sub-category of 'Problem'.
- Resolution: A description of the fix/solution. Alternatively, this may contain a description of the steps taken so far, and those that remain, in order to bring about a fix. This is set by the staff member attending to the ticket.
Ticket workflow
- Click the 'Ticket Workflow' stripe
- This box only appears for multi-stage tickets. It shows all stages added to the ticket based on the ticket category.
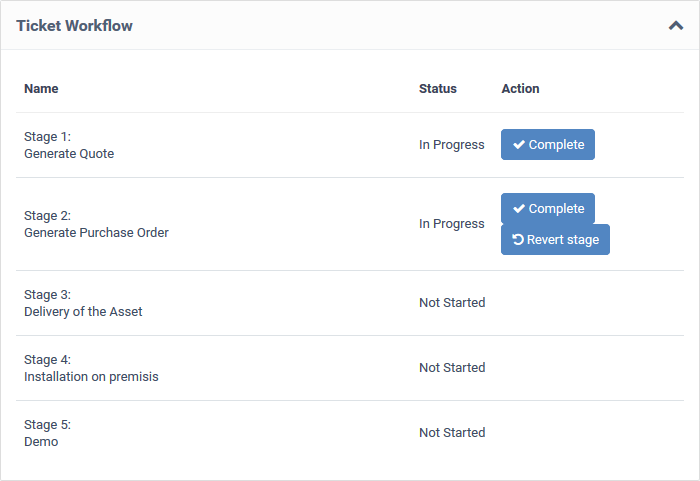
- Specific departments and staff members can be assigned responsibility of each stage.
- Once a staff member has completed their stage, the ticket is auto-assigned to the next department/staff member.
- This process will continue till the final stage is completed and closed.
- A ticket can be moved to the previous stage by clicking 'Revert stage'.
- You have the option to send a notification to staff and the user whenever a ticket transfers from one stage to another. This must be configured in the ticket category. See How to manage ticket categories for more on this.
Ticket actions
- Click the 'Ticket Actions' stripe
The ticket actions box lets staff post replies, claim a ticket, re-assign a ticket, add materials, pause/resume a ticket, and more.
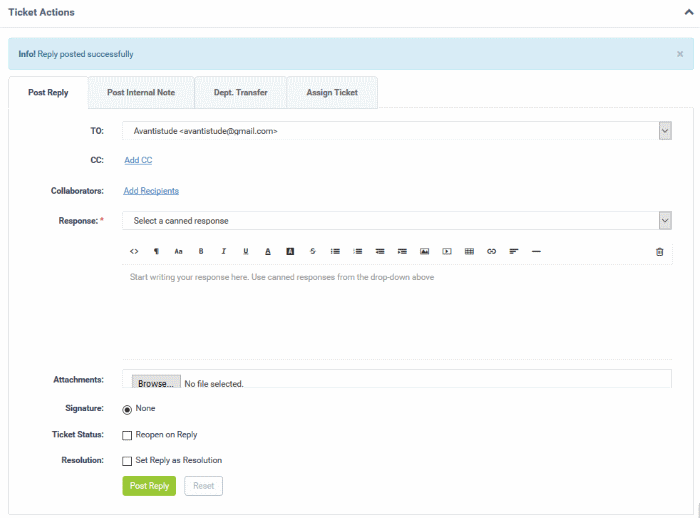
Post a reply to the ticket
- Click the 'Post Reply' tab
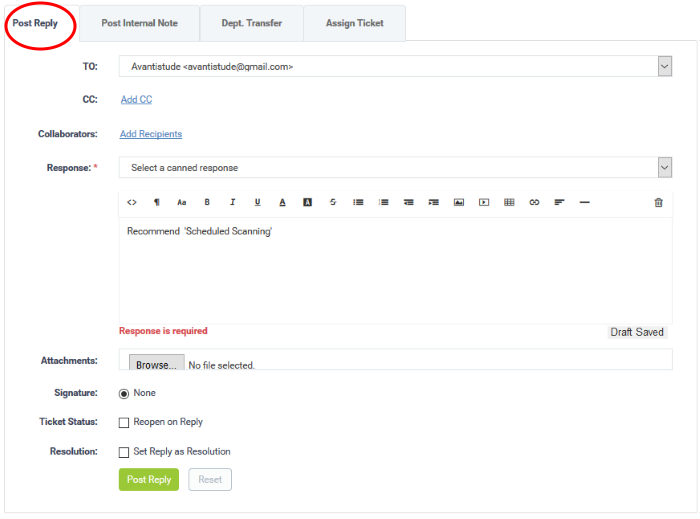
- To: The recipient's email address.
- 'Do Not Email Reply' – the response is not emailed to to the user. The user can view the response on the web portal.
- CC: Add more recipients for the response mail.
- Collaborators: Add people who also worked on the ticket as additional recipients.
- Click the 'Recipients' link to view and manage the list of collaborators added to the ticket
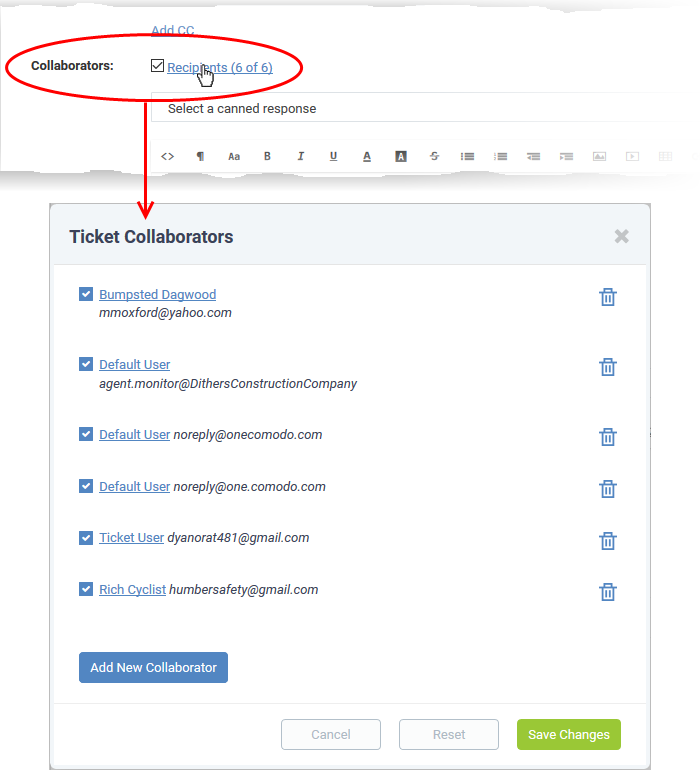
- Click 'Add New Collaborator' to add additional collaborators
- You can add an existing user as a collaborator, or create a new user:
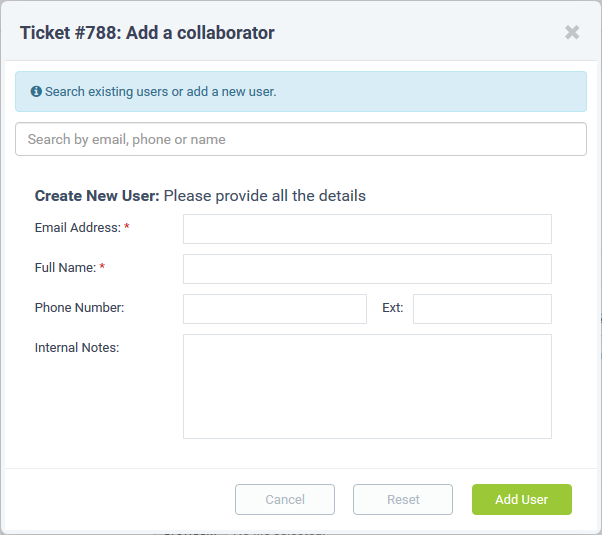
Click 'Save Changes' for your changes to take effect.
- Response: Type a reply in the text editor or select an option from the drop-down:
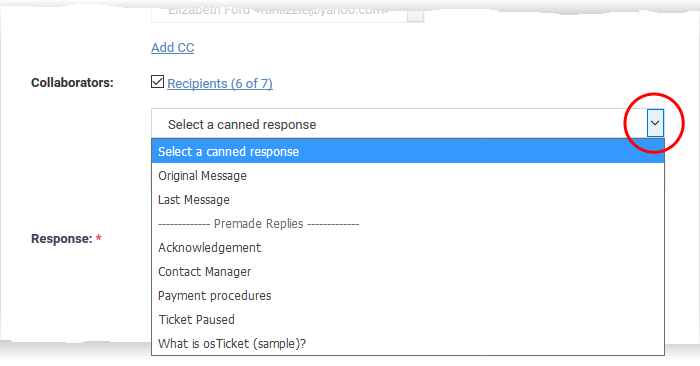
- Original Message: The last message sent by the user.
- Last Message: The first message sent by the user.
- Canned Responses: Send a preset response to the user. You can create canned responses in the knowledgebase section ('Staff Panel' > 'Knowledgebase' > 'Canned Responses'). See How to manage canned responses in Service Desk for more
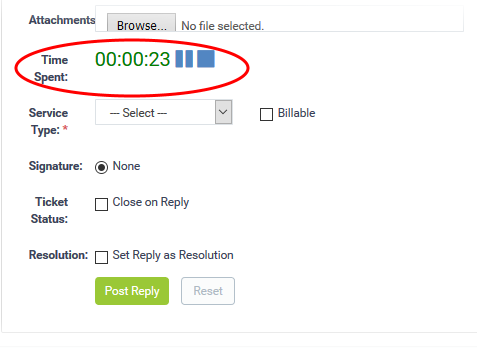
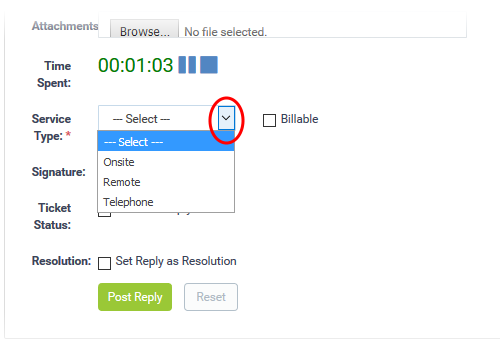
- Attachments: Click the 'Browse' button to add attachments to the response.
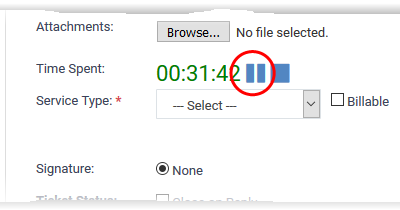
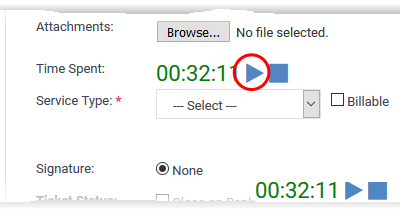
- Time Spent: The timer shows the time spent on the current service session
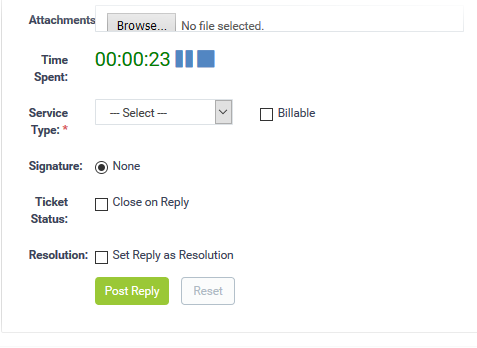
- Select 'Billable' to charge the customer for time spent on the issue.
- Service Type: Choose the kind of service offered during the session. The charges are calculated based on the time spent, asset type mentioned in the ticket, and the service contract you have with the customer company.
- Signature:
- None - Means you can either send with no signature OR type a custom signature in the editor.
- 'Dept. Signature' - Use the signature of the department to which the ticket is assigned.
- Ticket Status: Select 'Close on reply' if your response will complete all possible work on the ticket. The ticket will be automatically closed when the response is sent to the user.
- Resolution: Select 'Set Reply as Resolution', if you want to add the message entered in the 'Response' field as the description of fix/solution for the issue.
The resolution field of a ticket indicates its current place in your workflow. It is a communication of ticket progress rather than a definitive ticket status like 'Closed', 'Open' etc. This option means your note will also become the ticket's current resolution status.
Example. A resolution status of 'Resolved' means a fix has been implemented and is ready for testing. A ticket status of 'Closed' means the resolution has been verified and no further work is required on the ticket.
- Click the 'Post Reply' button to respond to the ticket.
Post an internal note
- Click the 'Post Internal Note' tab
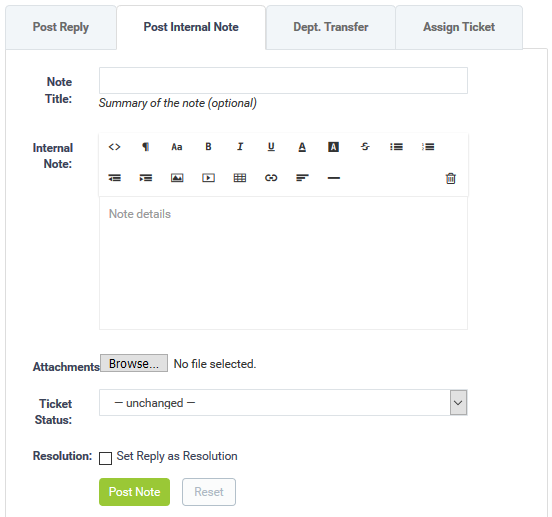
- Note Title: Enter a short summary of the note.
- Note Details: Enter any comments, notes, reminder or reason for pausing the ticket in the in the text editor
- Attachments: Click the 'Choose File' button to add attachments to the note.
- Time Spent: The timer shows the time spent on the current service session
- Select 'Billable' to charge time spent on the ticket to the customer.
- Service Type: Choose the kind of service offered during the session from the drop-down. The charges for the current session are calculated from the time spent, the asset type that was worked on, and the SLA you have with the customer.
- Ticket Status: Select the state to which the ticket is to be changed, from the drop-down.
- Resolution: 'Set Reply as Resolution' - The message you type in the 'Response' field is the fix for the issue.
The resolution field of a ticket indicates its current place in your workflow. It is a communication of ticket progress rather than a definitive ticket status like 'Closed', 'Open' etc.
Example. A resolution status of 'Resolved' means a fix has been implemented and is ready for testing. A ticket status of 'Closed' means the resolution has been verified and no further work is required on the ticket.
- Click the 'Post Note' button. The note is saved, the work time is added to the ticket and the status of the ticket will be changed as chosen from the 'Ticket Status' drop-down.
Change the department
The ticket category determines the department to which the ticket is assigned. The category is chosen by the user when they first create the ticket.
You can change the department if required.
- Click the 'Dept. Transfer' tab in the 'Ticket Actions' pane to assign the ticket to another department. Note - department transfer is not available for 'Paused and 'Overdue' tickets.
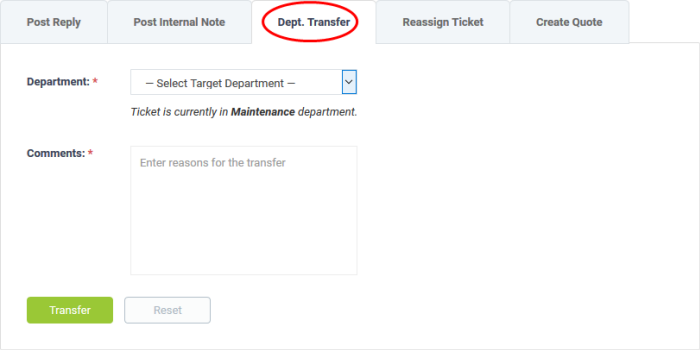
- Department: Select the department to which you want to reassign the ticket
- Comments: Enter any notes or reasons for changing the department.
- Click the 'Transfer' button to assign the ticket to a different department.
Assign/Reassign a ticket
Tickets that are already assigned to a staff member can be re-assigned to a different staff member.
- Click the 'Assign Ticket' / 'Reassign Ticket' tab in the 'Ticket Actions' pane.
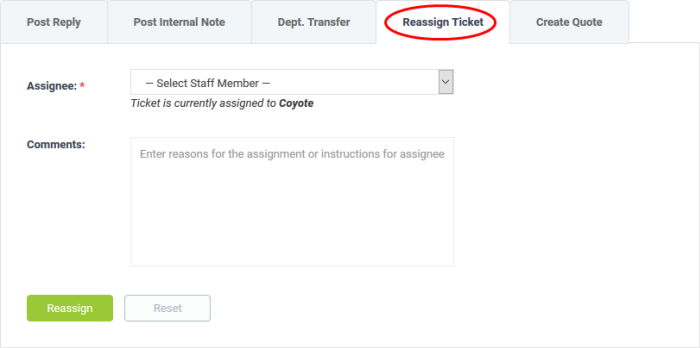
- Assignee: Select the staff member to whom you want to reassign the ticket.
- Comments: Enter any reasons for changing the assignee.
- Click the 'Reassign' / 'Assign' button to assign the ticket to a different staff member.
Initiate Quotes for Products/Services
Comodo Quote Manager (CQM) allows you to generate price quotes for products and services (more details at https://community.itarian.com/help/topic-452-1-958-13358-Introduction-to-Quote-Manager.html).
Quotes can also be generated by Service Desk tickets then pushed to Comodo Quote Manager.
You must enable quotes in a department to use this feature. Go to 'Admin panel' > 'Staff' > 'Departments' > click on a department > enable the 'Quote' feature.
Initiate quotes from a ticket
- Ensure the quote feature is enabled for the department. Click ‘Admin Panel’ > ‘Staff’ > click department name > enable the 'Quote' feature.
- Ensure the ticket is assigned to you. If not, click 'Claim' to assign the ticket to yourself.
- Click the 'Ticket Actions' stripe to open the 'Ticket Actions' pane, if not already opened.
- Click the 'Create Quote' tab
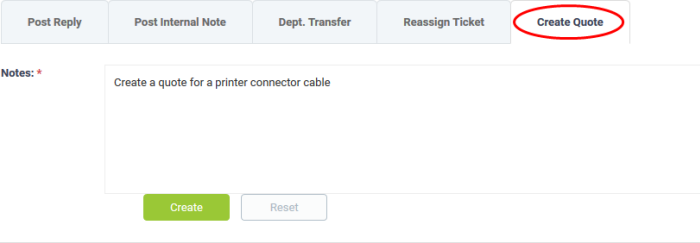
- Enter a message in the 'Notes' field for the staff member attending the Quote Manager console.
- Click 'Create'
- A draft quote is generated in the Quote Manager console:
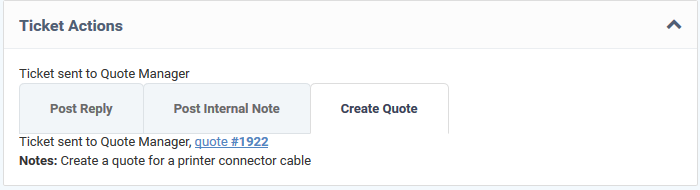
- Click the 'Quote # NN' link to view it in the Quote Manager console.
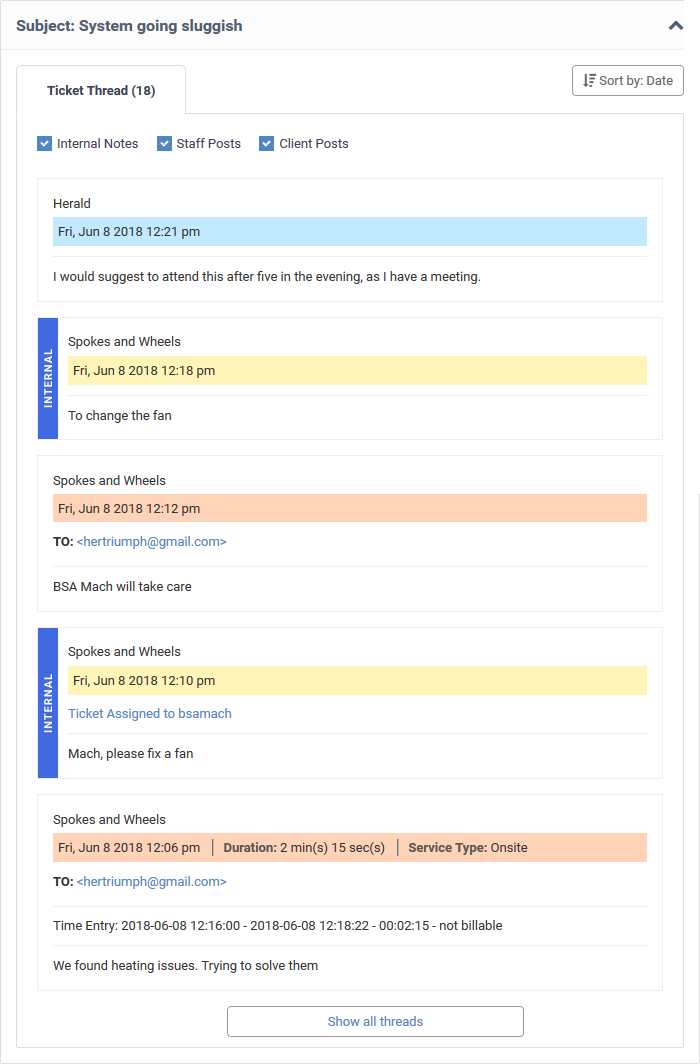
View ticket threads
The 'Ticket Thread' pane contains a log of all actions taken on the ticket. Actions can be messages from the user, replies from staff, reassignments, status updates, and more.
View ticket logs
- Open the 'Staff' panel (see last link on the left)
- Click 'Tickets' then a ticket type ('Open', 'Unassigned', 'Overdue', etc)
- Click the number of the ticket you want to open
- Click the 'Subject: <summary of the ticket> stripe to open the 'Ticket Thread' pane.
- The number beside the 'Ticket Thread' text shows how many actions have been taken on the ticket.
- The 'Ticket Thread' pane contains five actions by default. Click 'Show all threads' at the bottom to view all items.
- The header color of each action lets you easily identify the type of action:
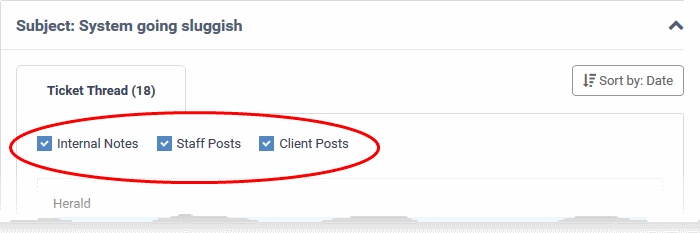
Yellow = Internal Notes - system events or internal notes
Blue = Staff Posts - responses from end-users
Orange = Client Posts - replies from staff to end-users
- Use the check boxes at the top to filter actions by type:
- Click 'Sort by Date' at the top right to sort the entries in ascending or descending chronological order.
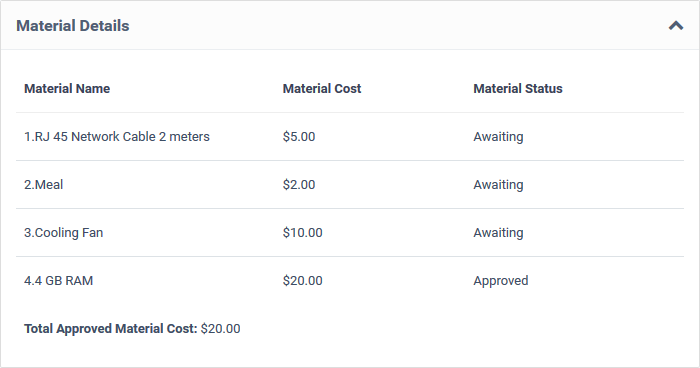
View materials / expense items added to the ticket
- The 'Materials Details' pane shows materials and expenses incurred when fixing the issue.
- Materials are added by staff members and must be approved by an administrator.
- The total cost of approved items is displayed at the bottom.
- If a material/expense item has been rejected then the reason is displayed under 'Status'.
View the materials added to a ticket
- Open the 'Staff' panel (see last link on the left)
- Click 'Tickets' then a ticket type ('Open', 'Unassigned', 'Overdue', etc)
- Click the number of the ticket you want to open
- Click the 'Material Details' stripe to open the 'Material Details' pane.
- Staff members can add items and their cost by clicking the 'Add Material' button at the top of the ticket. An administrator must approve the item before its cost is added to the ticket.
- See Add materials /expense to the ticket for more details.
View and manage time spent on the ticket
- The 'Time Spent' pane shows the cumulative time spent by all staff on the issue so far. Billable time is shown on a separate row.
- The time spent counter starts each time the ticket is opened. Staff can also add any 'on-site' time manually.
- Each service session on the ticket is shown as a separate row.
View and manage time spent on a ticket
- Open the 'Staff' panel (see last link on the left)
- Click 'Tickets' then a ticket type ('Open', 'Unassigned', 'Overdue', etc)
- Click the number of the ticket you want to open
- Scroll down and expand the 'Time Spent' stripe
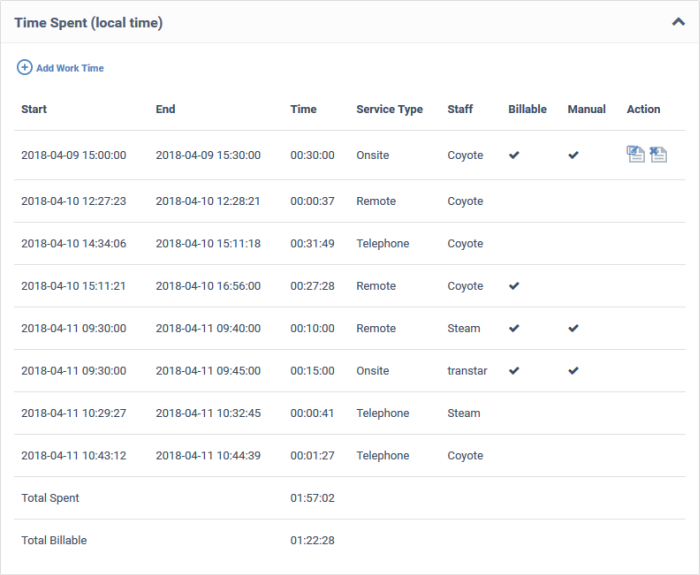
Start - Date and time the session began
End - Date and time the session finished
Time - Length of the session
Service Type - The kind of service provided during the session. Possible values are:
Staff - Name of the staff member who provided the support.
Billable - Whether or not the customer will be charged for the session.
Manual - Whether or not the any time was added manually by staff. For example, to cover time spent during a site visit.
Action - Controls for editing and removing a session:
 - Edit the time spent
 - Delete the item
There are two ways time spent can be added to a ticket:
The 'Time-Spent' Counter
- The time spent counter automatically starts when a staff member opens a ticket. The counter is shown in the near the bottom of the page:
- Staff can pause, resume and reset the timer as required.
- After concluding a session, staff can choose the type of service provided and select whether the time is billable.
Manual Time Entry
- Staff assigned to the ticket can manually add time for themselves or other staff that have worked on the ticket. This is useful for recording time that was not automatically recorded. For example, time spent during an on-premise visit.
- Staff that are not assigned to the ticket can only add time for themselves.
- The option to manually add time must be enabled in 'Admin Panel' > 'Settings' > 'Tickets' (Under 'Time Settings').
Manually add time to a ticket
- Open the 'Staff' panel (see last link on the left)
- Click 'Tickets' then a ticket type ('Open', 'My Tickets', 'Unassigned', 'Overdue', etc)
- Click the number of the ticket you want to open
- Click the 'Time Spent' stripe to open the 'Time Spent' pane
- Click the 'Add Work Time' link in the left-corner of the table
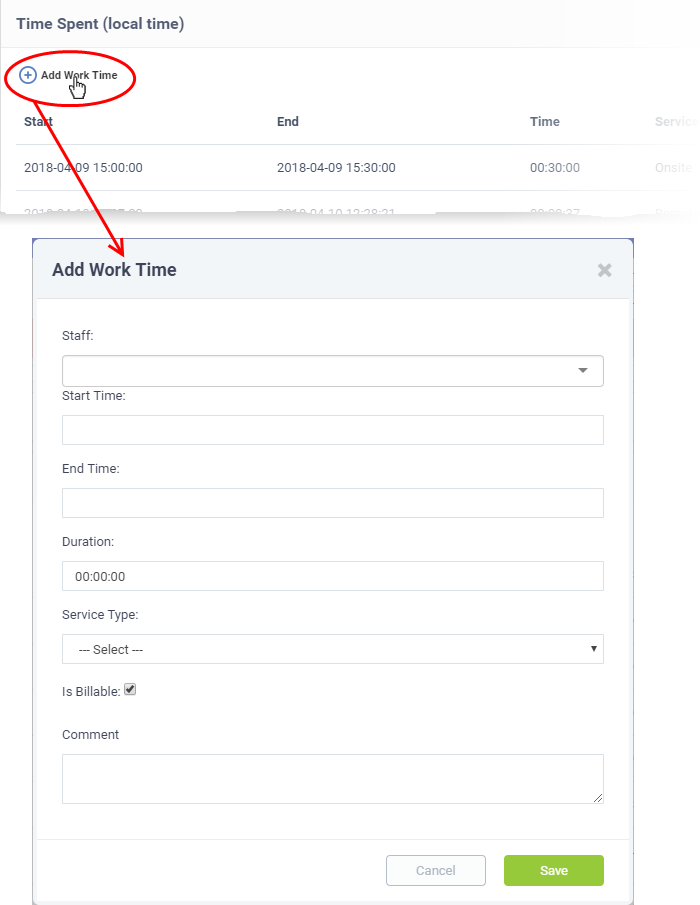
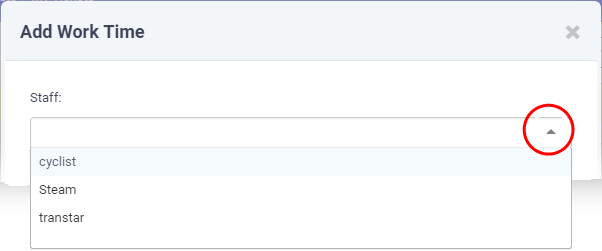
Staff – The drop-down lists staff assigned and staff added to the ticket. Select the staff member for whom you want to add time.
Start Time and End Time - Click inside the 'Start Time' and 'End Time' fields then enter the date/time manually, or select the dates from the calendar. Click 'Now' to use the current date/time as the start or end time.
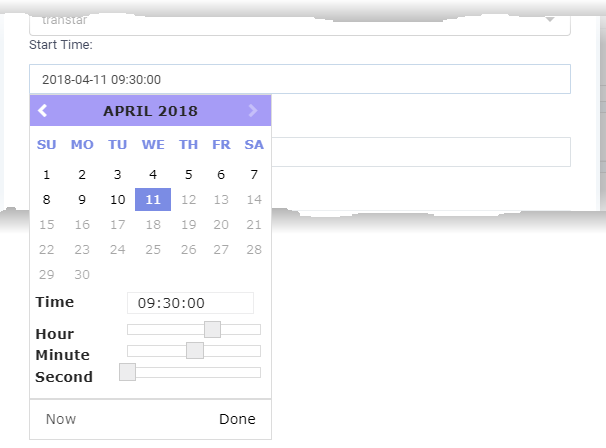
- Click 'Done' in the calendar after selecting the date and time.
Duration - This field is auto-calculated as the difference between the start and end times.
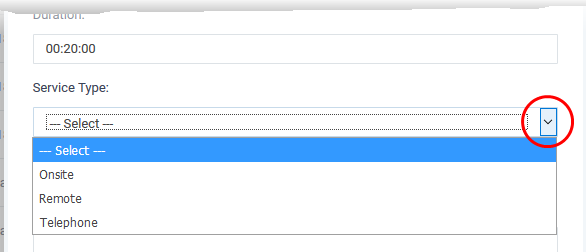
Service Type - Choose the service type offered during the session:
- Specify whether the time is billable by selecting the checkbox
- Enter any comments in the 'Comment' text box. This will be added to ticket activity.
- Click 'Save'.
The time spent is added to the list.
View and manage staff assigned to a ticket
- The staff box shows staff assigned to the ticket and the time they have spent on it.
- You can manually add staff as required.
View and manage staff added to a ticket
- Open the 'Staff' panel (see last link on the left)
- Click 'Tickets' then a ticket type ('Open', 'Unassigned', 'Overdue', etc)
- Click the number of the ticket you want to open
- Scroll down and click the 'Staff' stripe.
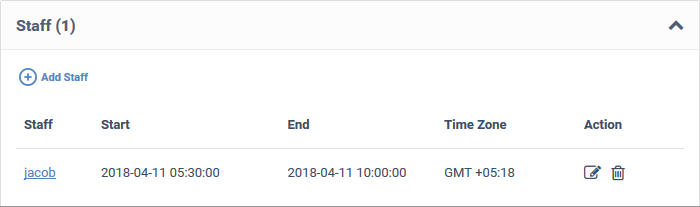
Staff - The name of the staff member added to the ticket. Click the name to edit the member's details
Start - The date and time at which the staff member started working on the ticket
End - The date and time at which the staff member finished working on the ticket
Time Zone - The time zone of the staff member
Action - Controls for editing and removing staff
Add a new staff to the ticket
- Click 'Add Staff' at the top left of the table:
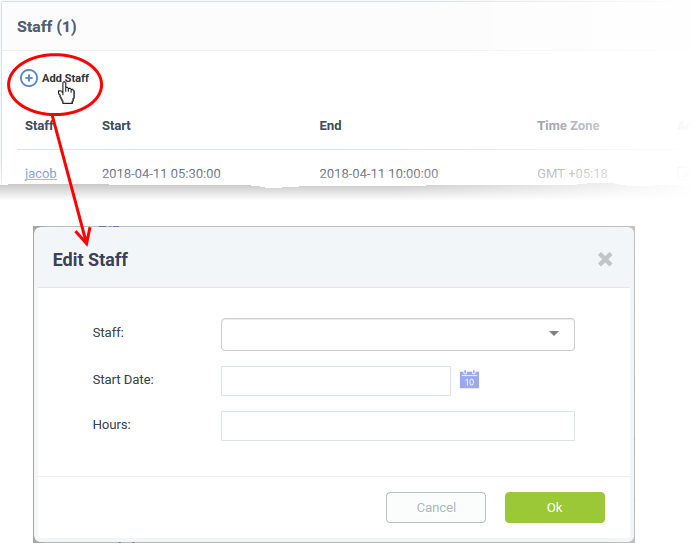
- Choose the staff member from the drop-down
Start Date: Enter the date and time at which the staff member started working on the issue.
Hours: Enter the approximate period of time the staff member worked on the issue. This is only a rough indicator which will not be added to the actual time spent on the ticket.
- If required, you can manually add time to the ticket for the staff member as described here.
- Click 'OK'
The staff member is added to the ticket.
Add materials / expense items to the ticket
- Staff can add components, consumables and expenses to a ticket which were used when resolving an issue.
- Materials and expenses added to a ticket need to be approved by an administrator. Only then will they be charged to the customer.
- The 'Material Details' pane in the 'Ticket Details' interface shows all existing materials on the ticket.
Add a material or additional charges
- Open the 'Staff' panel (see last link on the left)
- Click 'Tickets' then a ticket type ('Open', 'Unassigned', 'Overdue', etc)
- Click the number of the ticket you want to open
- Click the 'Add Material' button at the top:
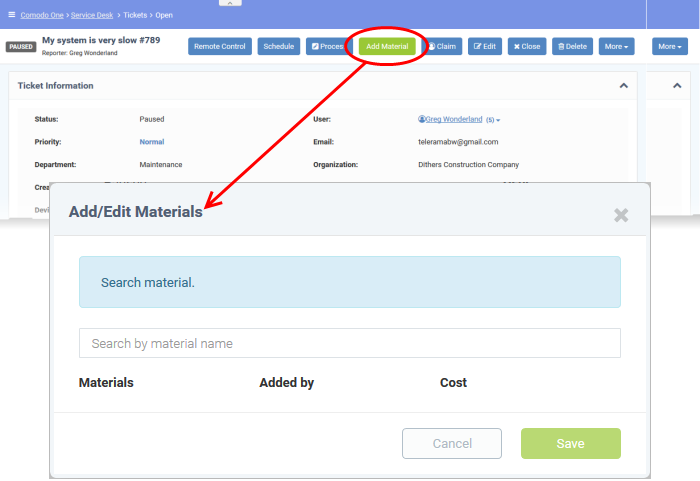
- Start typing the name of the material in the search dialog. Select the material from the suggestions that appear.
- The material is added to the list.
- Enter the charge for the material in the 'Cost' field.
- Repeat the process to add more items
- Click 'Save' to add the list of items to the ticket
- You can view all materials on a ticket by expanding the 'Material Details' pane of the 'Ticket Details' screen:
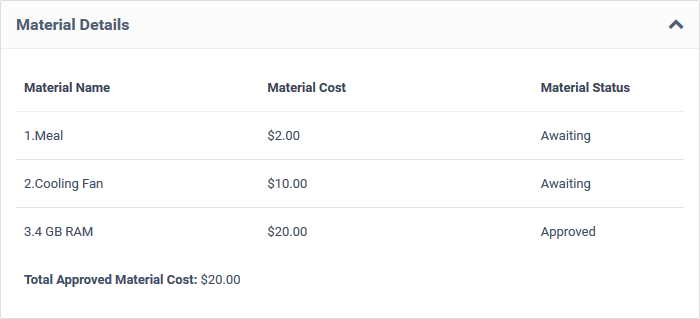
New items have an approval status of 'Awaiting'.
- Admins can approve or reject expense items by going to 'Admin Panel' > 'Staff' > 'Material Approval'.
Create a schedule for the ticket
A task schedule allows you to pick a time-slot in the future to start a ticket. For example, you could create a schedule for task that involves an on-site visit.
- The schedule is added to your calendar.
- You can view your calendar at 'Staff Panel' > 'Calendars' > ‘My Calendar’.
- You can re-schedule a ticket at anytime. Your calendar will be updated according to the new schedule.
Create a schedule for the ticket
- Open the 'Staff' panel (see last link on the left)
- Click 'Tickets' then a ticket type ('Open', 'Unassigned', 'Overdue', etc)
- Click the number of the ticket you want to open
- Click the 'Schedule' button
Your calendar opens with the ticket details shown on the title bar:
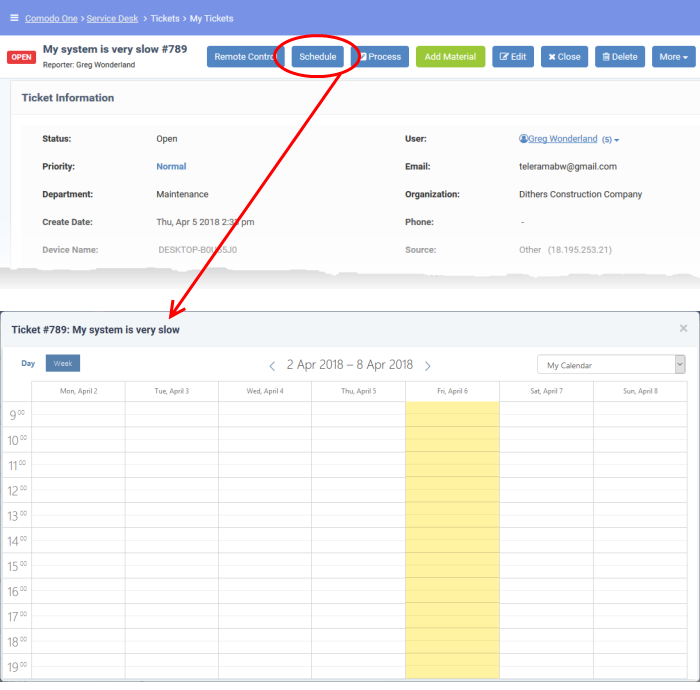
- The current week is shown by default. Use the '>' button to move to the next week / day
- Double-click on the time slot you want to assign to the ticket
- Enter a short description for the task.
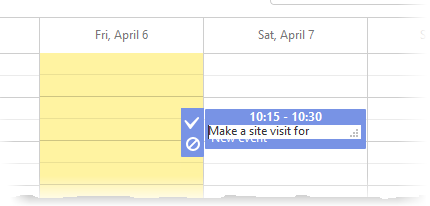
- Click the check mark
 to save the schedule
- The appointment is added to the calendar. You can view your calendar from the 'My Calendar' interface.
Create a knowledgebase article from the ticket
- The knowledgebase is a repository of support articles, FAQs and useful information intended to assist end-users with answers to common issues.
- It allows users to identify and solve common issues by themselves without needing to create a support ticket.
- Apart from providing a better service to your users, knowledgebase items can also reduce staff workload.
Add a knowledgebase article from a ticket
- Open the 'Staff' panel (see last link on the left)
- Click 'Tickets' then a ticket type ('Open', 'Unassigned', 'Overdue', etc)
- Click the number of the ticket you want to open
- Click 'More' then 'Create KB Entry' from the options.
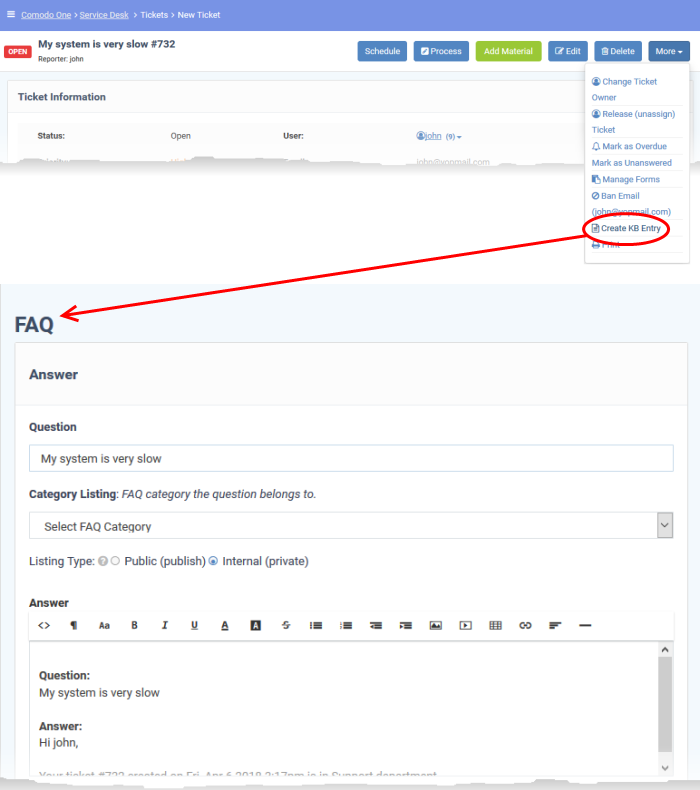
The FAQ screen allows staff to select the category under which the FAQ will be placed. You can also specify articles which are related to the FAQ, and choose to make the FAQ 'Public' or 'Internal'.
Change the ticket owner
- Open the 'Staff' panel (see last link on the left)
- Click 'Tickets' then a ticket type ('Open', 'Unassigned', 'Overdue', etc)
- Click the number of the ticket you want to open
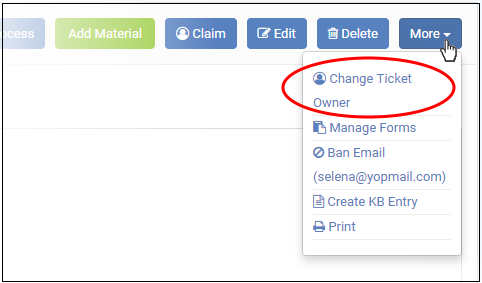
- Click the 'More' button and choose 'Change Ticket Owner'.
You can change to an existing user, or create a new user:
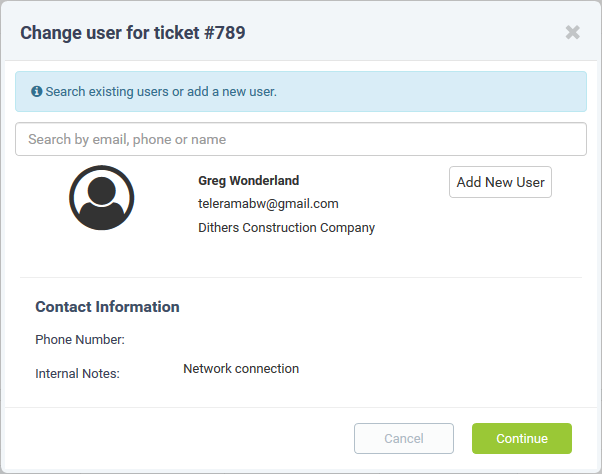
- Enter the user name or email address of an existing user in the search field. Select the user from the suggestions that appear. Click 'Continue'.
- Alternatively, create a new user by clicking the 'Add New User' button Complete the user details form:

- Click 'Add User' to change the ticket owner. The new user is added as a guest. You can assign the user to a customer organization from the 'Users' > 'User Directory' interface
Claim / self assign a ticket
- Open the 'Staff' panel (see last link on the left)
- Click 'Tickets' then a ticket type ('Open', 'Unassigned', 'Overdue', etc)
- Click the number of the ticket you want to open
- Click the 'Claim' button
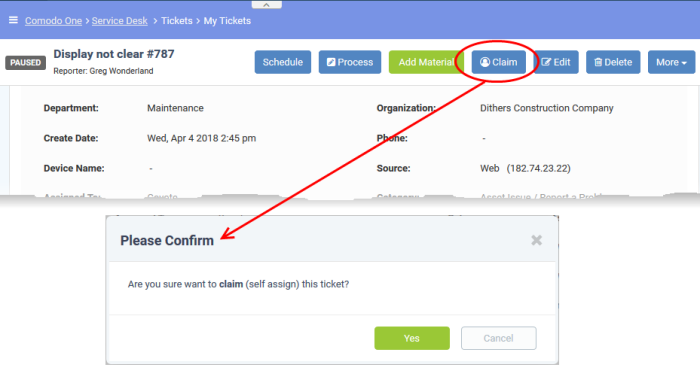
- Click 'Yes' in the confirmation screen to claim the ticket.
Manage form fields
- Staff can add custom fields to a ticket to request more details about an issue.
- Once added, the fields can be completed by a staff member in the ticket edit screen, or by the user in the web portal.
Manage the forms for a ticket
- Open the 'Staff' panel (see last link on the left)
- Click 'Tickets' then a ticket type ('Open', 'Unassigned', 'Overdue', etc)
- Click the number of the ticket you want to open
- Click the 'More' button and choose 'Manage Forms'.
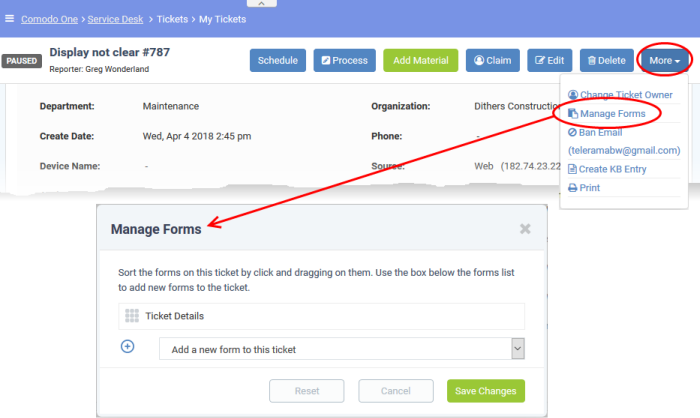
- Select the form you want to add from the drop-down.
- Forms can be added by admins in 'Admin Panel' > 'Manage' > 'Forms' > 'Add Custom Form.'
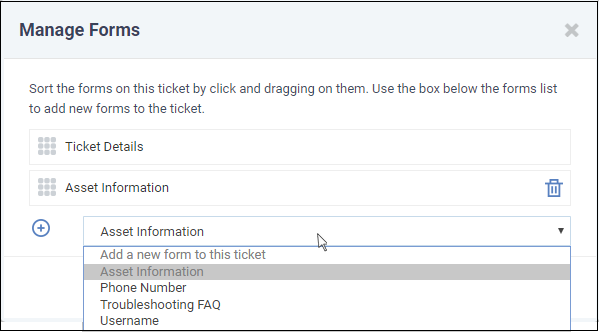
- Click the 'Save Changes' button.
- Staff can view and complete the form in the edit screen. It will also be visible to the user in the web portal.
Ban a user
Service Desk allows staff to ban users so they will no longer be able to create support tickets. Users can be blocked from the details screen of tickets that they have created.
- Open the 'Staff' panel (see last link on the left)
- Click 'Tickets' then a ticket type ('Open', 'Unassigned', 'Overdue', etc)
- Click the number of the ticket you want to open
- Click the 'More' drop-down at the top right and choose 'Ban Email'.
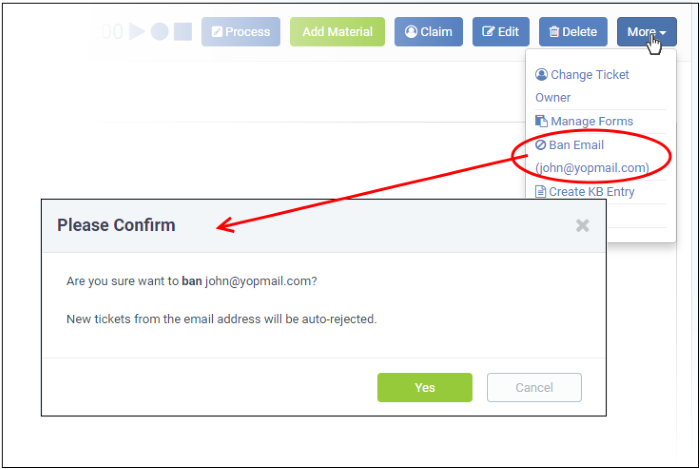
- Click 'Yes' in the confirmation dialog to ban the user.
Though the user may still be able to login to the web portal, they will not be able to create new tickets.
Print a ticket
Ticket print-outs contain all ticket activity as well as the time spent on the issue.
- Open the 'Staff' panel (see last link on the left)
- Click 'Tickets' then a ticket type ('Open', 'Unassigned', 'Overdue', etc)
- Click the number of the ticket you want to open
- Click 'More' then 'Print' from the options:
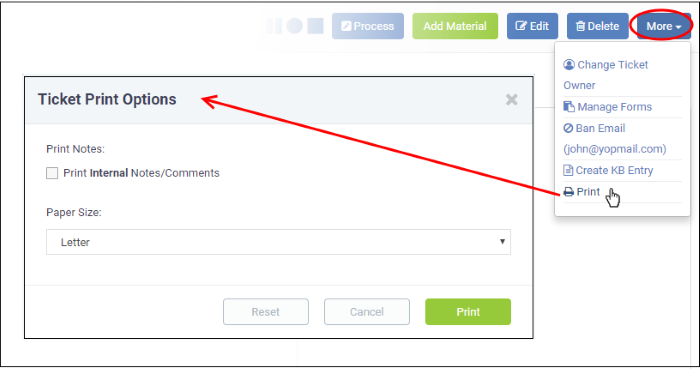
- Print Notes: Select if internal notes and comments should be included in the print
- Paper Size: Select the size and click the 'Print' button.
A PDF of the selected ticket is generated and shown:
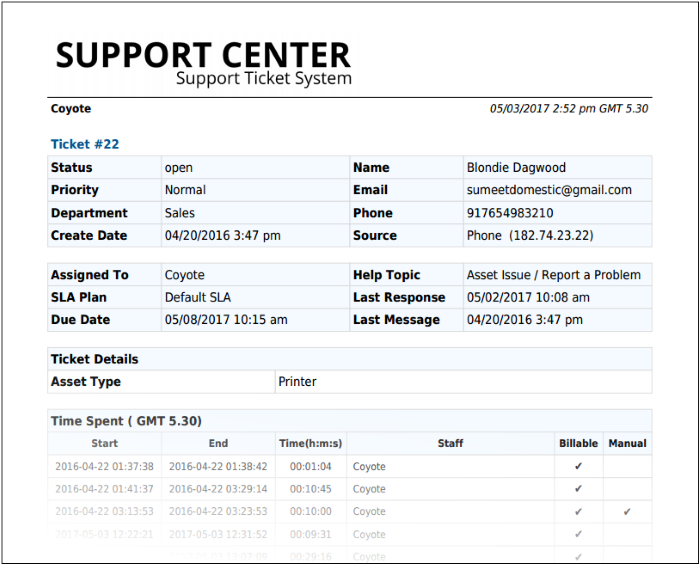
- Save the file for your future reference and/or print the ticket from the pdf file.
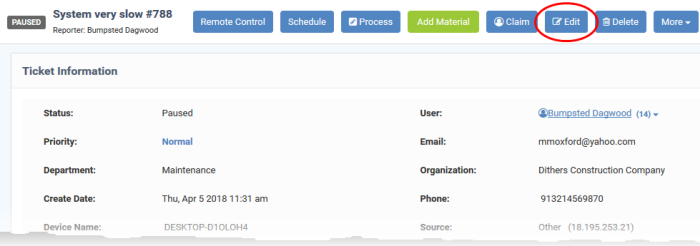
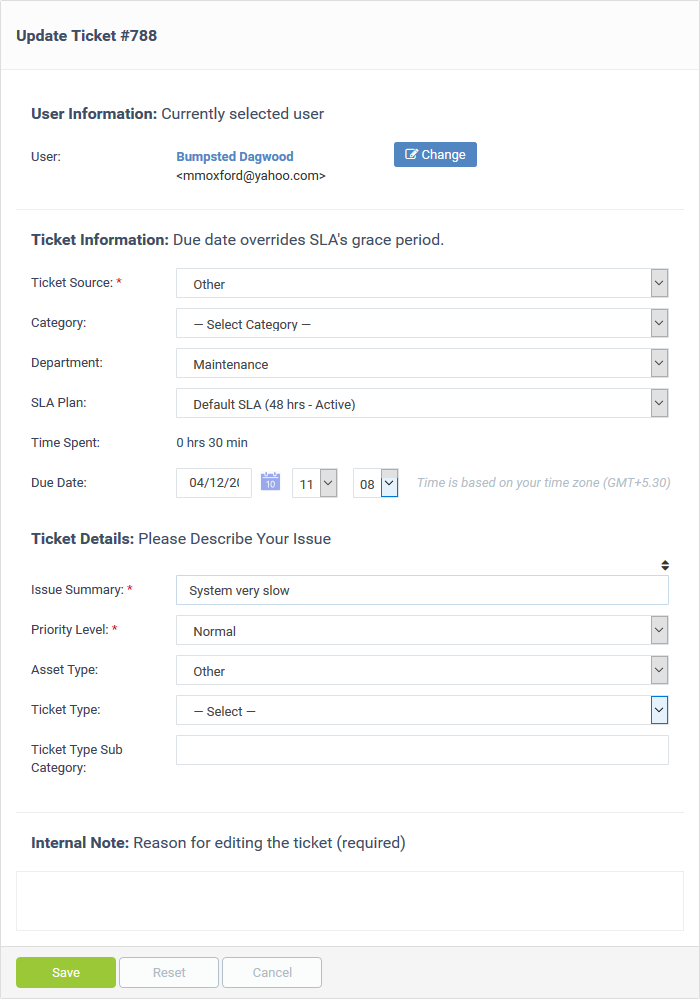
Edit a ticket
Basic ticket details can be updated at anytime from the 'Ticket Details' interface.
- Open the 'Staff' panel (see last link on the left)
- Click 'Tickets' then a ticket type ('Open', 'Unassigned', 'Overdue', etc)
- Click the number of the ticket you want to open
- Click the 'Edit' button
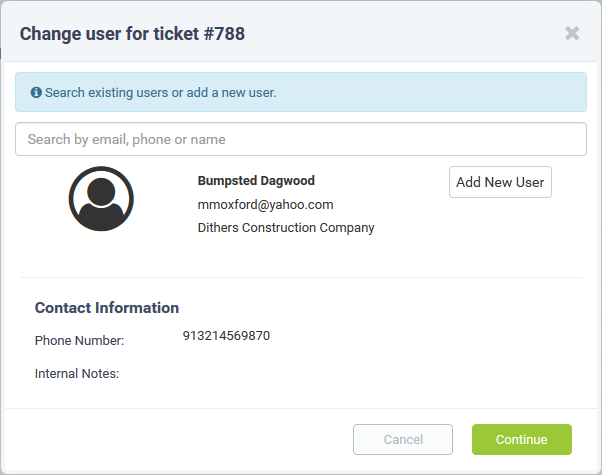
User Information
Details about the user who submitted the ticket, or on whose behalf the ticket was submitted. This user is also known as the 'Owner' of the ticket. You change the ticket owner from this area.
Click the 'Change' button to specify a different owner.
- Enter the user name or email of an existing user in the search field. Select from the suggestions that appear.
OR
- Click 'Add New User' to create a new user. Complete the new user form. New users are added as guests.
Ticket Information
Ticket information is fetched automatically from the system. You can change these details as required.
- Ticket Source: The channel through which the ticket was created. Change the source if required.
- Category: The help topic under which this ticket falls. You can change the ticket category if required.
- Department: The department to which the ticket is currently assigned. You need to change the department if the ticket is assigned to a staff member in a different department.
- SLA Plan: The service level plan associated with the ticket. This depends on the category to which the ticket belongs. You can also manually change the SLA plan if required.
- Time Spent: The cumulative time spent by all staff on the ticket. This includes time measured by the counter and time that was manually entered.
- Due Date: The date and time by which the ticket should be closed. Due dates may be auto-generated by the ticket category, department or SLA plan. You can change the due date as required, overriding the existing date.
Ticket Details
- Issue Summary: The description that was entered when the ticket was created. Change this if required.
- Priority Level: Ticket criticality. This is pre-selected, depending on the chosen ticket category. Change the priority if you want.Asset Type: The type of item that the ticket concerns. For example, 'Workstation', 'Server', 'Printer', 'Mobile'. Change the asset type using the drop-down if required.
- Type: The kind of the request. The possible values are 'Alert', 'Order' and 'Problem'. Change the type using the drop-down, if required.
- Sub Type: Specific issue type as chosen by the person who created the ticket. For example, 'Overheating' may be a sub-category of 'Problem'. Change the sub-category, if required.
Internal Note
- Enter a reason for updating ticket details.
- Click the 'Save' button to update the ticket
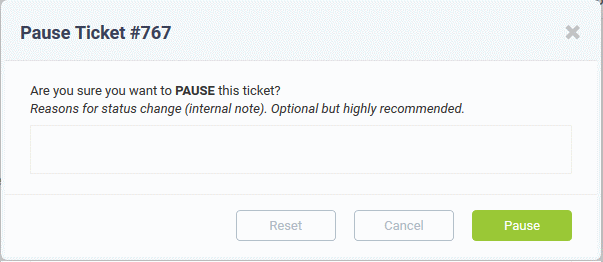
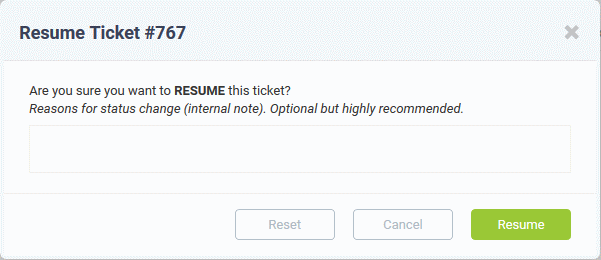
Pause/Resume a ticket
Tickets can be paused and resumed by staff. Paused tickets can only be resumed by the same staff member or by an administrator.
- Open the 'Staff' panel (see last link on the left)
- Click 'Tickets' then a ticket type ('Open', 'Unassigned', 'Overdue', etc)
- Click the number of the ticket you want to open
- Click the 'Ticket Actions' pane, if not already opened.
The time spent counter shows the time spent during the current support session.
- Click the 'Pause' or 'Resume' button depending on the ticket status.
The respective internal note screen is displayed.
Close/reopen the ticket
You can close tickets if all tasks are complete. All billable time will be assigned to the customer. If required, staff members can reopen closed tickets.
- Only tickets with 'Open' status can be closed. 'Paused' tickets cannot be closed. If required, you can resume the ticket and close it. See Pause and resume a ticket if you need help with this.
- Staff members can only close tickets that are assigned to them
- Admins can close tickets assigned to any staff member
- You can also add a resolution status when you close a ticket.
You can close a ticket in two ways:
- Manually - Click the 'Close' button at the top of the interface. See the explanation given below.
- Close a ticket after sending a reply. See Post a reply for more details.
Manually close a ticket
- Open the 'Ticket Details' screen of the ticket, if it is not already opened
- Open the 'Staff' panel (see last link on the left)
- Click 'Tickets' then a ticket type ('Open', 'Unassigned', 'Overdue', etc)
- Click the number of the ticket you want to open
- Click the 'Close' button
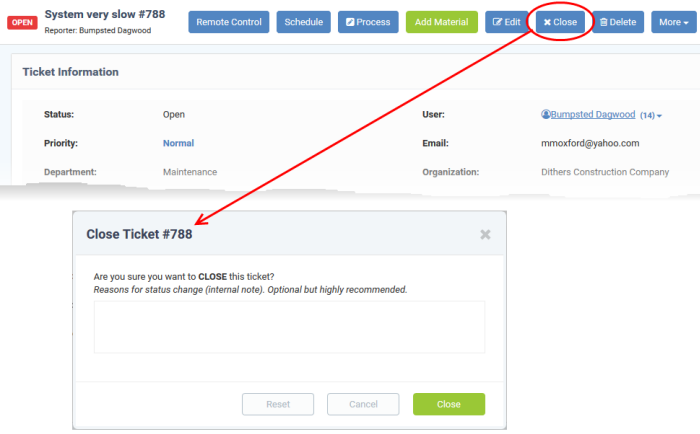
- Enter the reason and click 'Close'
Re-open a closed ticket
- Click 'Staff Panel' > 'Tickets' > 'Closed'
- Click the ticket number to open the ticket details interface.
- Click 'Reopen'
- The 'Reopen Ticket' screen will be displayed:
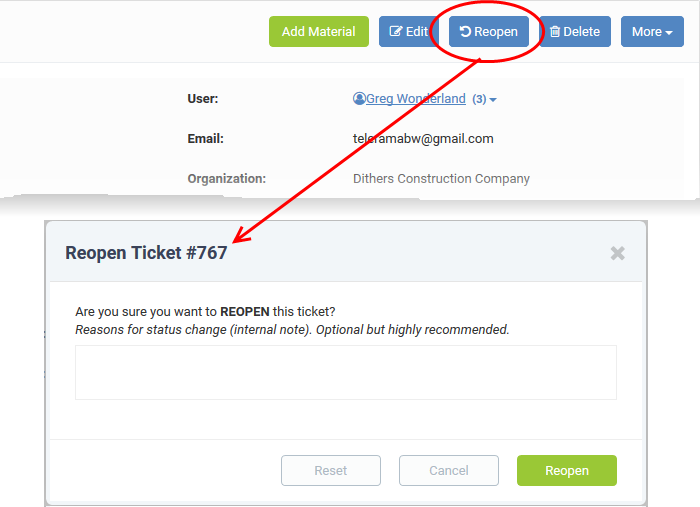
- Enter a reason for reopening then click the 'Reopen' button.
Staff members can now resume work on the ticket.
Delete the ticket
You can delete a ticket as follows:
- Open the 'Staff' panel (see last link on the left)
- Click 'Tickets' then a ticket type ('Open', 'Unassigned', 'Overdue', etc)
- Click the number of the ticket you want to remove
- Click the 'Delete' button from the ticket details interface
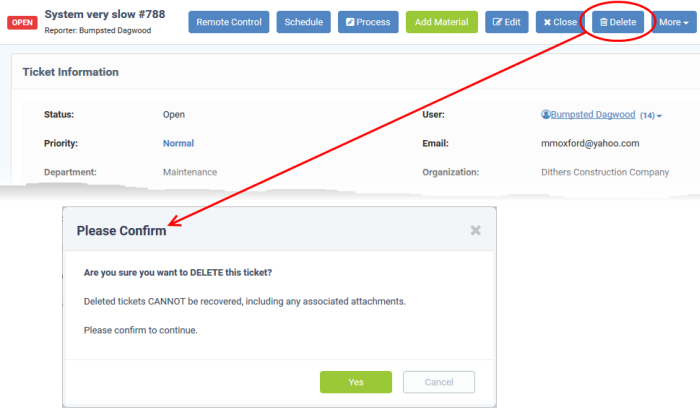
- Click 'Yes' in the confirmation screen.
Please note when a ticket is deleted, it cannot be recovered.