Click ‘Configuration Templates’ > ‘Profiles’ > open a Windows profile > Click ‘Add Profile Section’ > ‘Antivirus’Click ‘Configuration Templates’ > ‘Profiles’ > open a Windows profile > Click ‘Add Profile Section’ > ‘Antivirus’
Background
- The antivirus section of a profile lets you control how the virus scanner operates on managed Windows endpoints.
- There are three sub-sections you can configure:
- Realtime scan – Settings that apply to the ‘always-on’ virus monitor which runs in the background.
- Scans – Settings that apply to ‘on-demand’ scans and scheduled scans. You can use a pre-defined scan profile, or create a custom profile with specific settings.
- Exclusions - Files and folders that should be skipped on devices to which the profile is applied. Items you add here are excluded from all types of scan.
- It is essential to add an antivirus section to a profile if you want virus scanning on your endpoints.
Add an AV section to a profile
- Login to ITarian
- Click 'Applications' > 'Endpoint Manager'
- Click 'Configuration Templates' > 'Profiles'
- Click the ‘Profiles’ tab
- Open the Windows profile applied to your target devices
- Click 'Add Profile Section' > 'Antivirus'
- Open the 'Antivirus' tab if it has already been added to the profile
OR
- Click 'Add Profile Section' > 'Antivirus' if it hasn't yet been added:
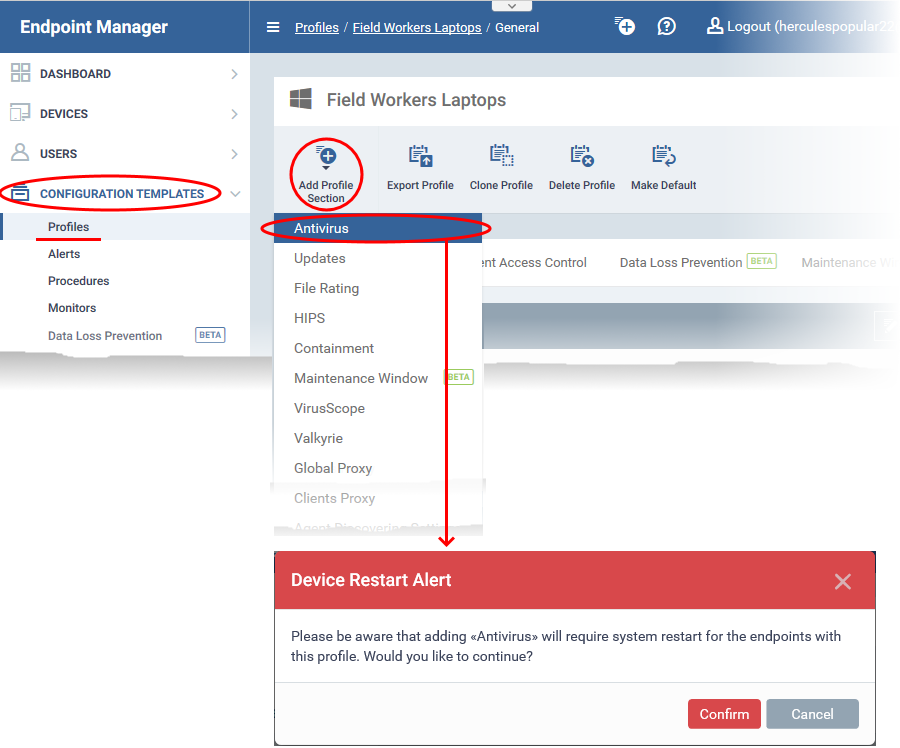
- The antivirus section requires that target endpoints are restarted on application.
- Click 'Confirm' to continue.
You can use the default AV settings or import them from a predefined profile:
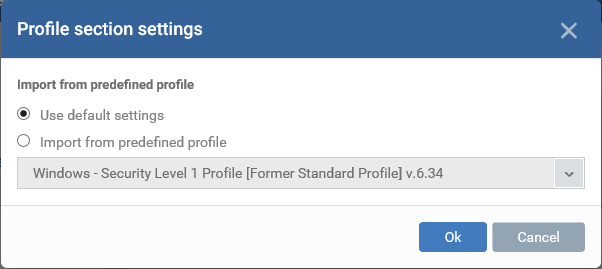
- The default settings differ slightly from those in the various profiles. For example, ‘Show antivirus alerts’ is disabled in the security level 1 profile but is enabled in the default settings.
- In either case, you can always modify the AV settings later as required.
- Make your selection then click ‘Ok’.
The AV settings screen opens.
- Click the following links for help to configure each tab:
- Click 'Save' to apply the section to your profile.
Realtime Scan
- The real-time scanner runs in the background on managed endpoints, constantly protecting the user against known threats.
- This area lets you configure the behavior of the real-time scanner. For example, you can choose whether alerts are shown on the endpoint, the default action when malware is found, the maximum file size to scan, and more.
|
Enable Realtime Scan
|
Activate the ‘always-on’ virus monitor on endpoints.
The real-time scanner constantly protects your devices from malware. It checks every running process and inspects files whenever they are created, opened or copied.
(Default = Enabled)
|
|
Enable Scanning Optimizations
|
Various techniques to improve antivirus scan performance and reduce resource use.
(Default = Enabled)
|
|
Do not show auto-scan alerts
|
CCS can automatically scan external devices as soon as they get connected to an endpoint. Example devices include USB sticks, external hard drives, etc.
This setting lets you choose whether to show a notification to end-users when such a device is connected.
- Disabled – CCS shows a notification when a device connects. Users can decide whether or not to scan the device from the alert.
- Enabled – No notification is shown when a device connects.
You need to choose the default action that CCS should take:
- Ignore – Do not scan the device
- Scan – Scan the devices for viruses
(Default = Enabled with 'Ignore' option)
|
|
Run cache builder when the computer is idle
|
The cache builder runs whenever the computer is idle to boost the speed of real-time scans.
(Default = Disabled)
Applies only to CCS versions 8.3 or lower.
|
|
Scan computer memory after the computer starts
|
If enabled, CCS runs a virus scan of system memory at computer startup.
(Default = Disabled)
|
|
Show antivirus alerts
|
Choose whether threat alerts should be shown on the endpoint when malware is found.
- Disabled – Alerts are not shown, and CCS will automatically deal with the threat. You need to choose the action that CCS should take:
- Quarantine threats – Move all detected threats to quarantine. You can review quarantined files at ‘Security sub-systems’ > ‘Antivirus’ > ‘Quarantined Threats’.
- Block threats - Deletes the threat.
- Enabled – A pop-up alert is shown when malware is detected. The alert asks the user whether they want to quarantine or allow the threat.
Default = ‘Enabled’ (show alerts)
|
|
Decompress and scan archive files of extensions
|
The antivirus will open and scan archive files such as .jar, RAR, ZIP, ARJ, WinARJ, and CAB.
If enabled, you can choose which types of archives should be decompressed and scanned. Click the 'Extensions' link to view existing extensions and add new extensions.
(Default = Disabled)
|
|
Set new on-screen alert timeout to (secs)
|
Specify how long an alert should stay on the screen at an endpoint.
(Default = 120 seconds)
|
|
Set new maximum file size to (MB)
|
Specify the maximum file size that the antivirus should attempt to scan.
CCS will not scan files larger than the size specified here. (Default = 40 MB)
|
|
Set new maximum script size limit to (MB)
|
Specify the maximum size of a script that the antivirus should attempt to scan.
CCS will not scan scripts larger than the size specified here (Default = 4 MB)
|
|
Use heuristic scanning
|
The heuristic scan level determines how likely the scanner is to classify an unknown file as a threat.
- Low - Lowest sensitivity to detecting unknown threats / generates fewest false positives. This setting balances a very strong ability to detect new viruses with a low rate of false positives. Comodo recommends this setting for most users. (Default)
- Medium - Detects unknown threats with greater sensitivity than the 'Low' setting, but with a corresponding rise in possible false positives.
- High - Highest sensitivity to detecting unknown threats / increased possibility of false positives.
(Default = Enabled with 'Low ' option)
What is heuristics?
Heuristics is an antivirus technology designed to identify new, previously unknown threats.
The technology identifies code typical of a virus, rather than looking for a signature that matches a signature on the blacklist. This allows the engine to discover brand new viruses, even if they are not in the current virus database.
|
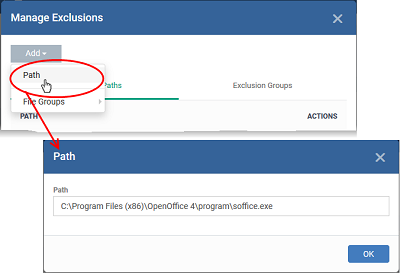
| Block all Microsoft Office documents containing macro script |
Block files containing macro script except for the specified files/folders so that you can prevent the damage of harmful macros in word files.
- You can define exclusions so the necessary files/file groups are excluded from blocking. When this setting is enabled, the portal should send configurations to CCS so that CCS can block files containing macro scripts.
(Default = Disabled)
- Click 'Exclusion'. The 'Manage Exclusions' dialog will appear with a list of defined exclusions under two tabs:
- Exclusion Paths - Enter the location of an individual item that you want to exclude. Contained files can write to the files/folders you specify here. You can add multiple files by clicking 'Add' again.
-
Click 'Add'
- Exclusion Groups - Allow contained apps to access apps and files in a particular group. A file group is a collection of file types that have similar attributes, scope, or functionality. For example, 'Executables', 'Metro Apps', or 'Windows System Applications. Xcitium ships with a set of pre-defined file groups. You can create custom file groups from the 'Settings' > 'Settings' > 'System Templates' > 'File Groups Variables' interface.
-
Click 'Add'
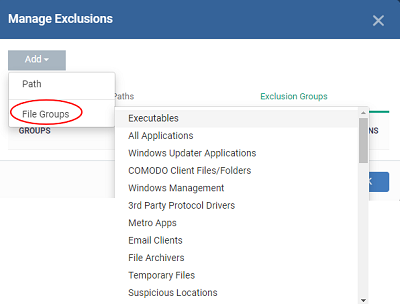
- Click 'OK' to save your settings.
- You can edit or remove the exclusions using the respective buttons in the 'Action' column in the File/Folders interface.
|
On-demand / Scheduled Scans
The scans area lets you configure profiles for on-demand and scheduled scans, and to create your own custom scans.
Each scan profile is a collection of settings that tell CCS:
- Where to scan (which files, folders or drives should be covered by the scan)
- When to scan (you have the option to specify a schedule)
- How to scan (specify the behaviour of the scan engine when running this profile)
Once you have created a scan profile, you can apply it to scheduled scans and on-demand scans.
- You can launch a manual scan on your devices direct from Endpoint Manager. Go to 'Security Sub-Systems' > 'Antivirus' > 'Device List' > select a target device > Click the ‘Scan’ button.
- You can also run manual scans from the CCS installed on the Windows device. Click 'Tasks' > 'General Tasks' > 'Scan'. See this wiki page if you need help to run on-demand scans on the local device.
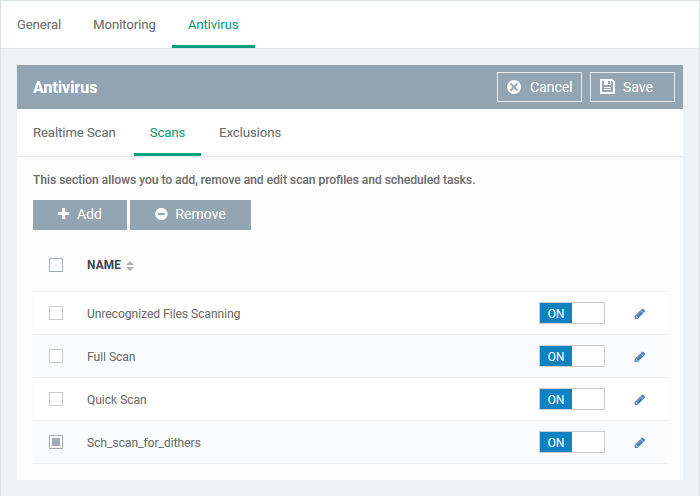
Endpoint Manager ships with three pre-configured scan profiles:
- Full Scan - Scans every drive, folder, and file on the target device. External devices like USB drives and hard disk drives are also scanned.
- Quick Scan - Scans critical areas which are most prone to attack from malware. Scanned areas include system memory, auto-run entries, hidden services, boot sectors and other significant areas.
- Quarantined Files Scan - Only scans files which are currently quarantined. CCS will obtain the file’s latest trust rating from our master online database.
- Unrecognized Files Scan - Only scans files that have an ‘Unknown’ trust rating. CCS will obtain the file’s latest trust rating from our master online database.
Background - A file can have a rating of ‘Trusted’, ‘Untrusted’, or ‘Unrecognized’.
- Quarantined files usually have an ‘Untrusted’ rating, indicating that they are malware.
- ‘Unrecognized’ means that the file has neither a ‘Trusted’ nor ‘Untrusted’ rating. Unrecognized files are automatically run in the container until they acquire a definitive ‘trusted’ or ‘untrusted’ rating.
If a scan finds that a file’s rating has changed, then it is moved appropriately.
Create a custom scan
- Open the ‘Antivirus’ section of your profile
- Click the ‘Scans’ tab
- Click 'Add'
- Create a name for the custom scan profile, and choose the files, folder or regions you want to scan:
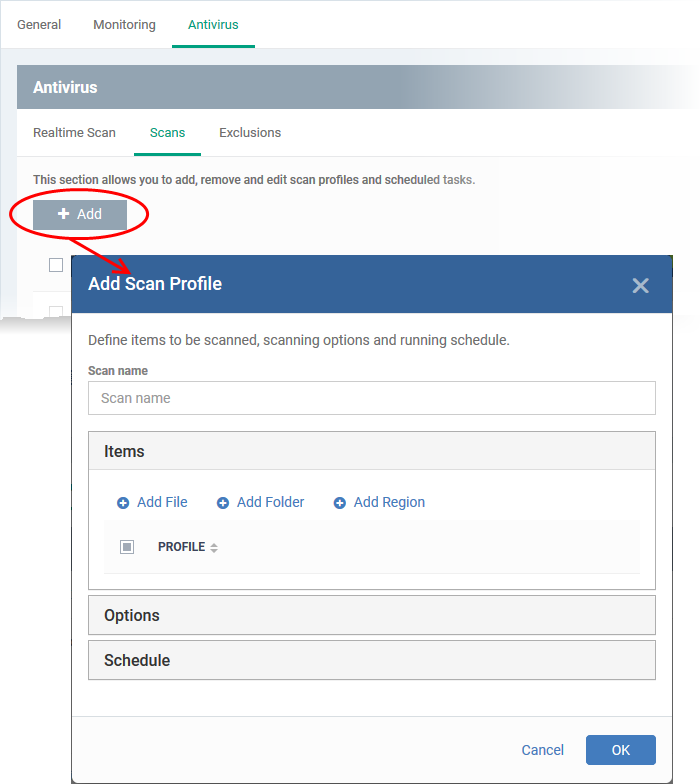
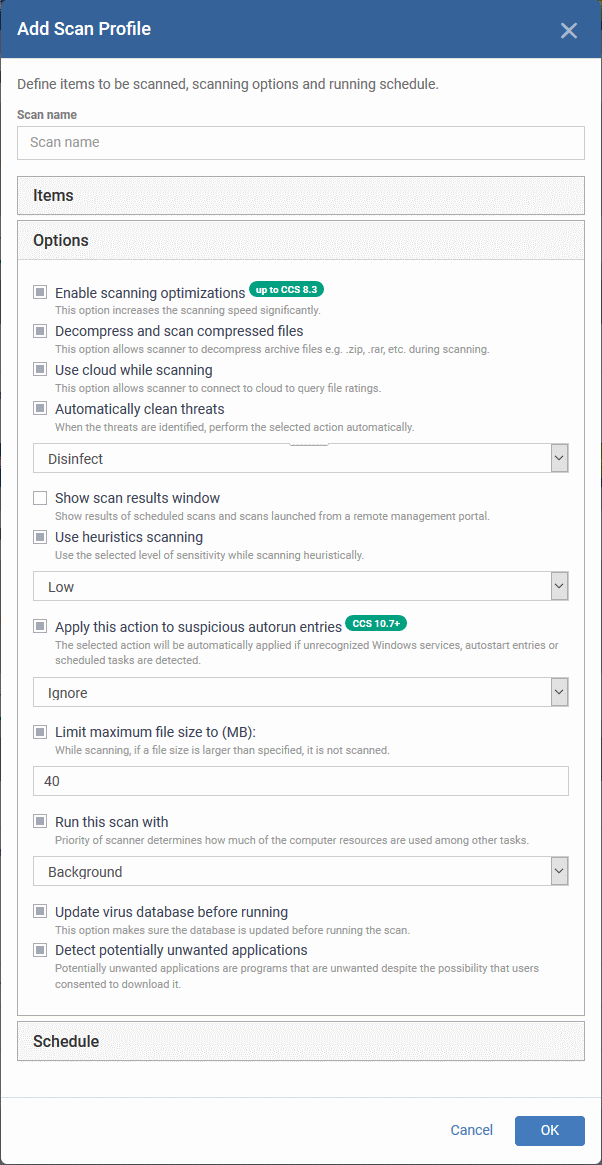
Next, choose your scan options:
|
Enable scan optimizations
|
The antivirus will employ various optimization techniques to speed- up the scan process (Default = Enabled).
- Applies only to CCS versions 8.3 or lower.
|
|
Decompress and scan compressed files
|
The antivirus will open and scan archive files. Supported formats include RAR, WinRAR, ZIP, WinZIP ARJ, WinARJ and CAB archives (Default = Enabled).
|
|
Use cloud while scanning
|
Augments the local scan with a real-time look-up of Comodo's online signature database. This makes virus scans more accurate because the cloud database is the most up-to-date.
With cloud scans enabled, CCS can detect new malware even if the local database is old. (Default = Enabled).
|
|
Automatically clean threats
|
CCS will automatically deal with detected threats. This is instead of showing the results screen with a list of threats.
You can choose the action to be taken from the drop-down. The available options are:
(Default = Enabled with Disinfect option)
|
|
Show scan results window
|
Displays a results screen at the end of a virus scan. The screen shows all threats identified by the scan. (Default = Disabled)
|
|
Use heuristic scanning
|
The heuristic scan level determines how likely the scanner is to classify an unknown file as a threat.
- Low - Lowest sensitivity to detecting unknown threats / generates fewest false positives. This setting balances a very strong ability to detect new viruses with a low rate of false positives. Comodo recommends this setting for most users. (Default)
- Medium - Detects unknown threats with greater sensitivity than the 'Low' setting, but with a corresponding rise in possible false positives.
- High - Highest sensitivity to detecting unknown threats / increased possibility of false positives.
(Default = Enabled with 'Low ' option)
What is heuristics?
Heuristics is an antivirus technology designed to identify new, previously unknown threats.
The technology identifies code typical of a virus, rather than looking for a signature that matches a signature on the blacklist. This allows the engine to discover brand new viruses, even if they are not in the current virus database.
|
|
Apply this action to suspicious autorun entries
|
CCS will inspect auto-run entries, Windows services, startup items and scheduled tasks during each scan.
You can apply one of the following actions to services started by unrecognized or malicious processes:
- Quarantine and Disable: The service will be stopped and permanently disabled. The file that started the service will be quarantined on the device.
- Terminate and Disable - The service will be stopped and permanently disabled. If required, the service can be enabled manually. (Default)
- Terminate - The service will be stopped for the current session.
- Ignore -The detection will be logged but the service allowed to run normally.
Applies only to CCS versions 10.7 or higher.
|
|
Limit maximum file size to
|
Specify the maximum file size that the antivirus should attempt to scan.(Default = 40 MB).
|
|
Run this scan with
|
Set the Windows priority for the scan. Choices are high, medium, low and, run in the background. (Default = Enabled with Background option)
|
|
Update virus database before running
|
Makes CCS check for database updates before each scan. Available updates will be downloaded prior to the scan.
(Default = Enabled).
|
|
Detect potentially unwanted applications
|
CCS also scans for software that
(i) A user may be unaware of is installed on their computer.
or
(ii) May contain functionality that wasn’t made clear to the user.
Example PUA's include adware and browser toolbars.
PUA's are often installed as an additional extra when the user is installing a different piece of software. Unlike malware, PUA's are 'legitimate' software with their own EULA agreements. However, the true functionality of the software might not have been made clear at the time of installation.
For example, a browser toolbar that tells you the weather may also contain code that tracks your online activity.
(Default = Enabled).
|
The next step is to schedule when the custom scan should run.
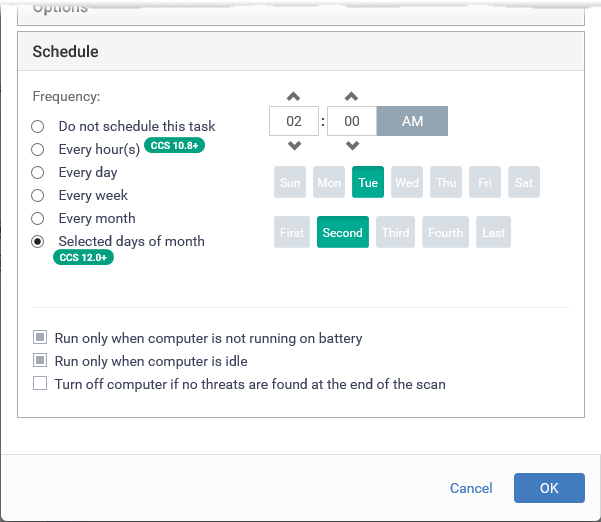
Frequency
- Do not schedule this task - The scan is not run automatically at a set time. The scan is saved after you click ‘Ok’ and is available for manual, on-demand scans.
- Every hour(s) - Run the scan once every n hours. For example, once every 3 hours.
- Every Day - Runs the scan every day at the time specified.
- Every Week - Runs the scan weekly on the days and time you specify
- Every Month - Runs the scan monthly on the days and time you specify.
- Selected days of month - Runs the scan on specific days in selected weeks of every month, at the time you specify. Select the weeks and days from the menus and set the time.
Run only when computer is not running on battery - Runs the scan only if the computer is connected to the mains supply. This is useful if you are using a laptop or any other battery-driven device.
Run only when computer is idle - Scans only run when there is little-to-no activity on the computer. Select this if you do not want to be disturbed, or if you are running resource-intensive programs and do not want the scan to take processing power.
Turn off computer if no threats are found at the end of the scan - Powers down the endpoint if the scan finds no threats. This is useful, for example, if you have scans scheduled to run at night.
- Click 'OK' to save the profile. It will be listed along with the other scan profiles:
- The scan profiles will be applied to your target devices when you save the full configuration profile.
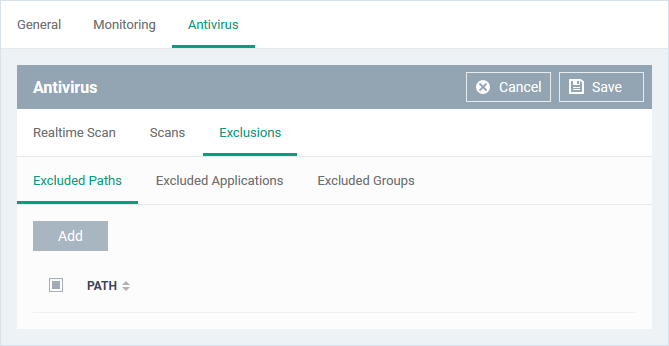
Exclusions
- The 'Exclusions' tab lets you specify files and folders that should be ignored by the antivirus scanner.
- Items you add here are skipped by all types of the virus scan.
Add exclusions
- Click 'Exclusions'
- The 'Exclusions' screen has three subsections that allow you to add a list of file locations, list of applications/files and 'File Groups' which should be excluded from the antivirus scan.
Add a location to be excluded
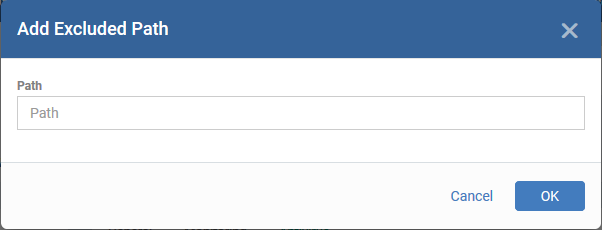
- Enter the full path that should be excluded from scanning and click 'OK'.

- Repeat the process to include more paths
- To change the path, click the edit button
 , edit the parameters and click 'OK'
- To remove a path from the list, select it and click 'Remove'
Add excluded applications
- Click 'Excluded Applications'
- EDR agent will add as Exclusions in Windows Default profile.
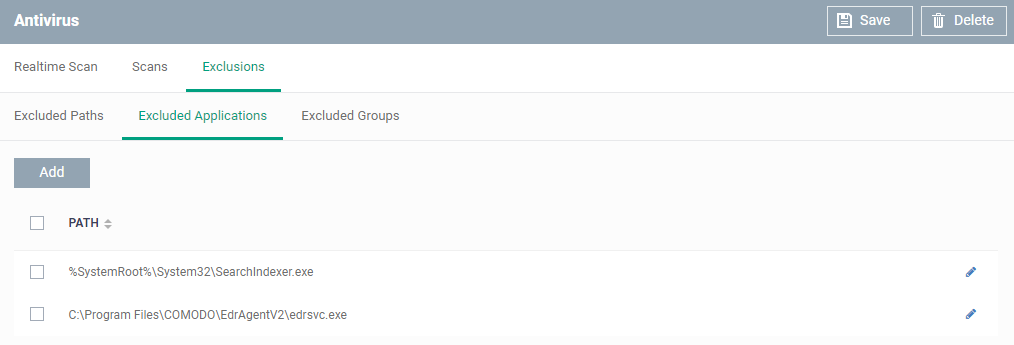
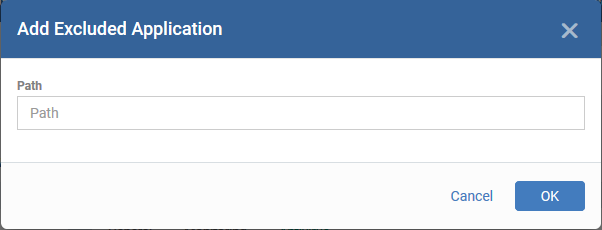
- Enter the full path including the application that should be excluded from scanning and click 'OK'
- You can use wildcard characters ('*' and '?') in the path to specify several items in a folder
The allowed characters are:
- :* - asterix symbol – Replaces several characters before or after the given text
Examples:
- C:\Users\* - Includes all files and subfolders in the folder C:\Users
- C:\Users\test* - Includes all files whose names start with 'test' in the folder
- C:\Users\*test.exe – Includes all files whose filenames end with 'test.exe' in the folder
- ? - question mark – Replaces one character.
Examples:
- C:\Users\test?,exe - Includes all files that have anyone character after 'text' in the file name
- C:\Users\test1.exe
- C:\Users\test2.exe
- C:\Users\test3.exe
- Repeat the process to include more applications
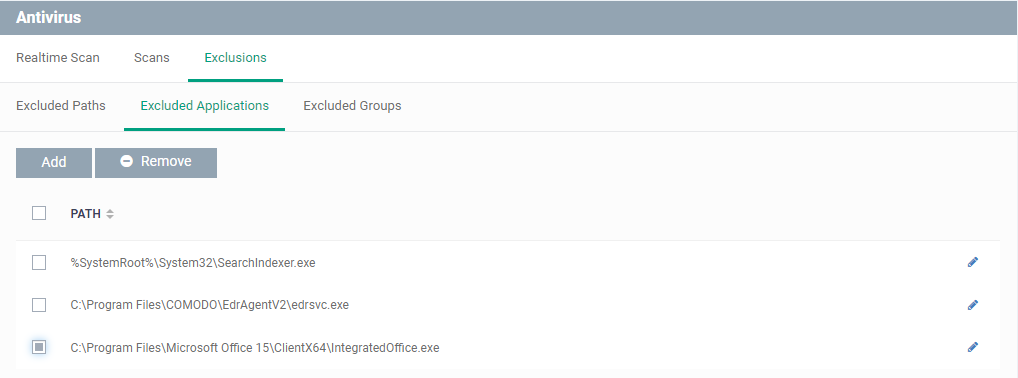
- To change the application path, click the edit button , edit the parameters and click 'OK'
- To remove an application from the list, select it and click 'Remove'
Add Excluded Groups
Filegroups make it easy to exclude an entire class of file types. EM ships with a set of predefined groups, and you can create new groups and edit groups as required. See 'File Groups' under 'Settings' > 'System Templates' > 'File Groups Variables'.
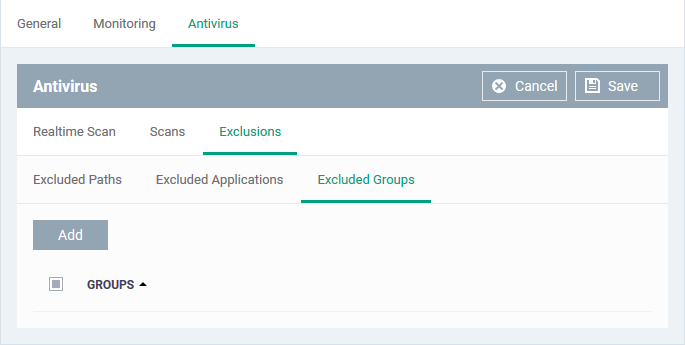

- Choose the group from the 'Group' drop-down and click 'OK'.
The group will be added to the exclusions.
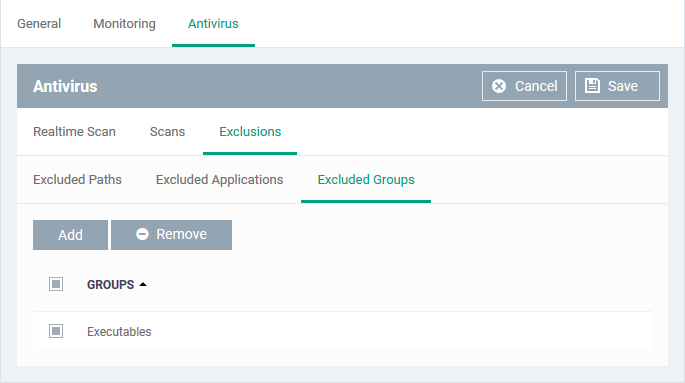
- Repeat the process to add more filegroups
- Click the 'Save' button for the antivirus settings to take effect on the devices applied with the profile.
Further reading:
How to run virus scans on devices from the security sub-systems menu
How to run on-demand antivirus scans in CCS on Windows devices
How to view antivirus scan results and quarantined files on a device in Endpoint Manager
How to manage quarantined items in Endpoint Manager
How to configure antivirus settings in a Linux profile
How to configure antivirus settings in a Mac OS Profile