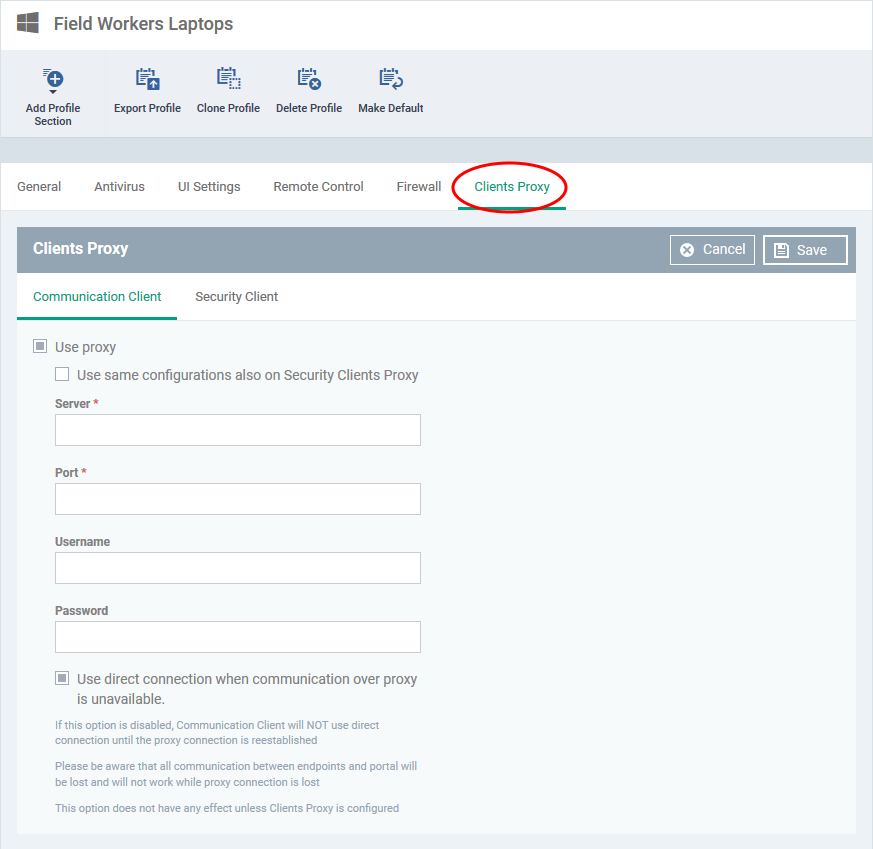
Click ‘Configuration Templates’ > ‘Profiles’ > open a Windows profile > Click ‘Add Profile Section’ > ‘Clients Proxy’
- The ‘Client Proxy’ section of a profile lets you choose a proxy through which the security and communication clients should connect to Endpoint Manager and other ITarian services.
- You can configure a proxy for the remote control tool in the software itself.
- In both cases, you also have the option to revert to a direct connection if the proxy is unavailable.
- Note. The clients proxy only affects the connections of Endpoint Manager clients. It does not affect how other applications on the endpoint connect to the internet.
- If required, proxy settings for the entire host can be configured in the ‘Global Proxy’ section of a profile.
Click the following links to go to the section you want help with:
Endpoint Clients
- Log into ITarian
- Click ‘Applications’ > ‘Endpoint Manager’
- Click ‘Configuration Templates’ > ‘Profiles’
- Open the profile you want to work on
- Click the ‘Clients Proxy’ tab
OR
- Click ‘Add Profile Section’ > ‘Clients Proxy’, if it hasn’t yet been added

- Server - Enter the IP address or hostname of your proxy server
- Port - The port on your proxy that the clients should connect to. If you do not have a set port number, port 8080 will work in many cases.
- Username/Password – If your proxy requires authentication, enter the admin credentials here.
- Use a direct connection when communication over a proxy is unavailable – Allow the clients to fallback to a direct internet connection if the proxy fails.
- If you specify a proxy BUT disable direct connections, then your endpoints will not be able to connect to EM if the proxy fails.
- Leave the direct connection option enabled to ensure your devices are managed at all times.
Click ‘Save’ to apply your changes. The new settings will be automatically deployed to all endpoints on which the profile is active.
Remote Control Tool
- The remote control tool is a standalone application which lets you remotely connect to managed Windows and Mac devices.
- You can use the tool to takeover remote machines, troubleshoot issues, install software, transfer files, and run system maintenance.
- You can download the tool from the ITarian interface at ‘Tools’ > ‘Remote Control’ tile.
- Once installed, you can connect to machines by selecting them in ‘Devices’ > ‘Device List’, then clicking the ‘Remote Control’ button.
Configure a proxy for the tool
- Open the Remote Control tool on your management PC/laptop.
- See this wiki for help to access the remote control tool
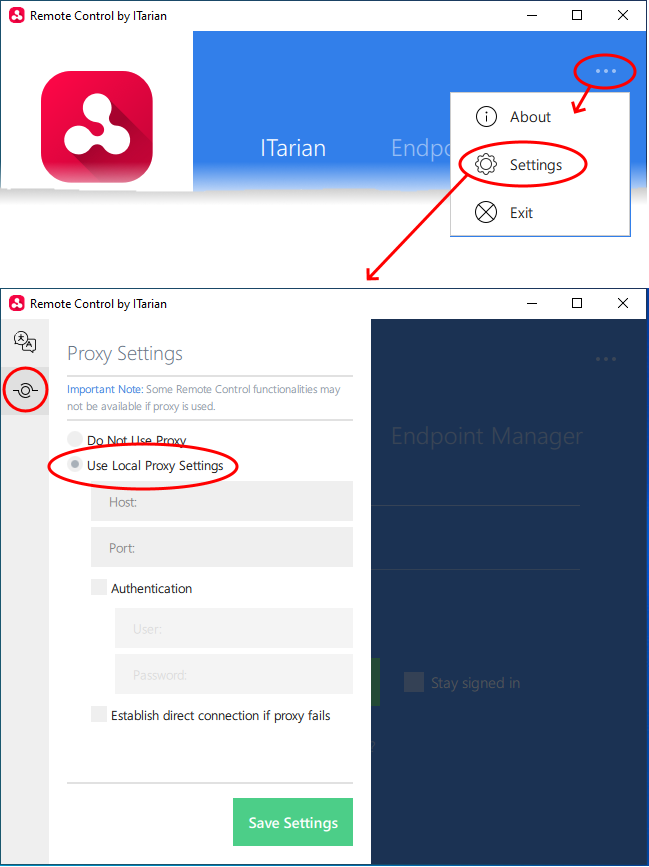
- Click the ellipsis icon at the top right and choose 'Settings'
- Click the ‘Proxy Settings’ icon on the left of the 'Settings' pane:

- Host - Enter the IP address or hostname of your proxy server.
- Port - The port on your proxy that the remote tool should connect to. If you do not have a set port number, port 8080 will work in many cases.
- Username/Password – If your proxy requires authentication, enter the admin credentials here.
- Establish direct connection if proxy fails - Allow the remote tool to use a direct internet connection if the proxy fails.
- If you specify a proxy BUT disable direct connections, then you won’t be able to connect to remote machines if the proxy fails.
- Leave the direct connection option enabled to ensure you can connect at all times.
Click 'Save Settings' for your settings to take effect
Related topics


