Click ‘Configuration Templates’ > ‘Profiles’ > click the name of a Windows profile > 'Add Profile Section' > 'Firewall' > 'Rulesets'
A firewall ruleset is a collection of one or more firewall rules. Each rule in a set outlines an application's permissions regarding a specific type of traffic.
At the simpler end of the spectrum, a firewall rule can just allow or block internet access for a certain application. You can also create complex rules that implement specific actions based on traffic direction, protocol, source/destination port, and more.
You can add multiple rules to a single ruleset. Rules nearer the top of the list have priority in the event of a settings conflict.
This article explains how to create custom ruleset in a Windows profile.
See Firewall Rules Explained at the end of this page if you want more help to construct a rule.
Use the links below to jump to the task you need help with:
Add rules to the ruleset
Click 'Applications' > 'Endpoint Manager'
Click ‘Configuration Templates’ > ‘Profiles’
Open the Windows profile applied to your target devices
Open the 'Firewall' tab if it has already been added to the profile
OR
Click 'Add Profile Section' > 'Firewall' if it hasn't yet been added:
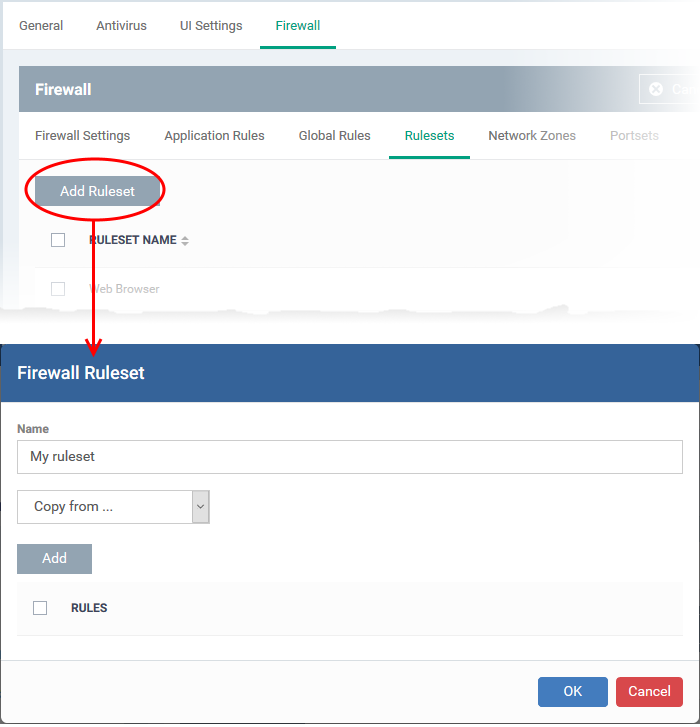
Open the 'Rulesets' tab:
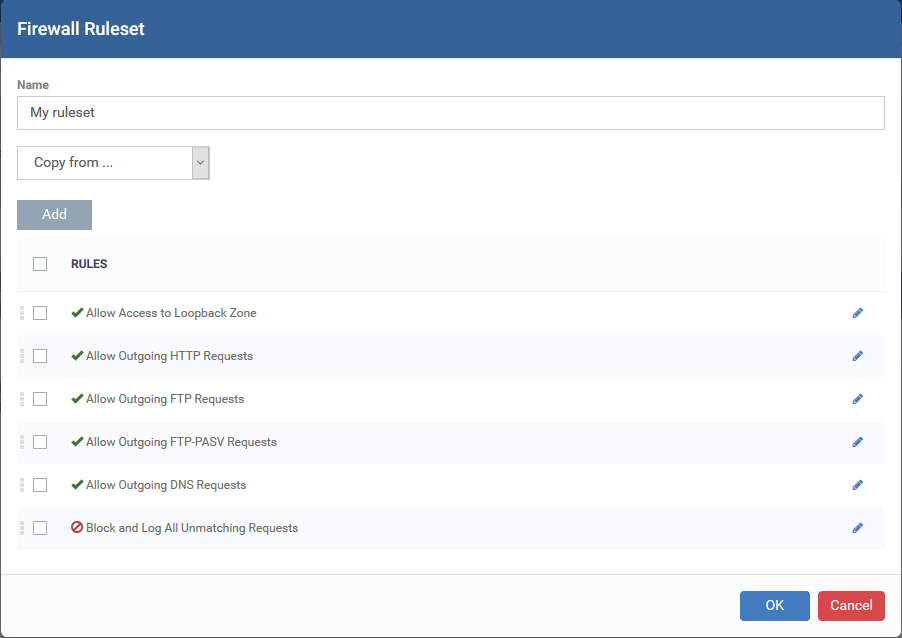
Click 'Add Ruleset' to create a new custom ruleset:
Name - Enter a label for the ruleset. Choose a name that describes the action and/or targets of the rule. For example, ‘Block instant messenger apps’.
Next, add and configure the individual rules for the ruleset. You have a couple of options here:
...or a mixture of both the above.
Copy rules from an existing rule set and modify them
You can create a ruleset from the ground up by configuring its individual rules, but this practice may prove time consuming.
An easier method is copy an existing ruleset then modify its rules to suit your needs. You can also add additional rules as required.
You can also copy rules from the ruleset which is applied to another application or application group.
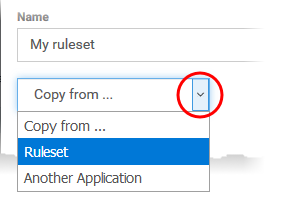
Choose the type of source ruleset from the 'Copy from' drop-down
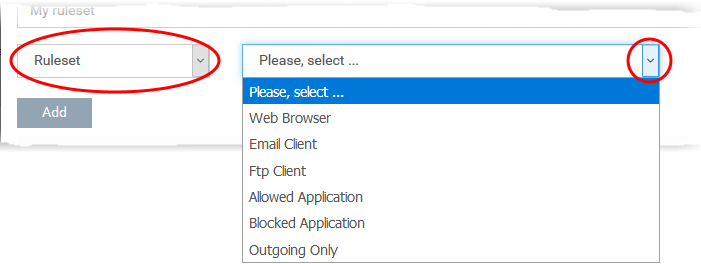
Ruleset - Choose a pre-defined ruleset from the menu to the right:
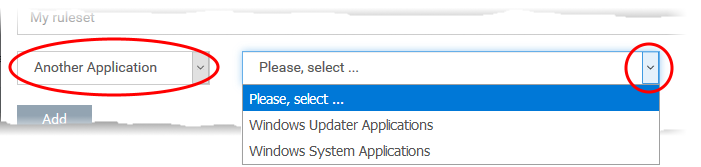
Another Application - The drop-down shows rulesets configured for specific applications/file groups. You also view these in in the 'Application Rules' tab. Choose the application rule set from which you want to import your rules:
The rules are imported with their existing priority. If a piece of traffic is covered by more than one rule, then the rule highest in the list takes priority. You can change rule order as required:
Click the pencil icon beside a rule to edit it.
See 'Create and edit individual firewall rules' for help to create and modify rules
See Firewall Rules Explained if you want more help to construct rules
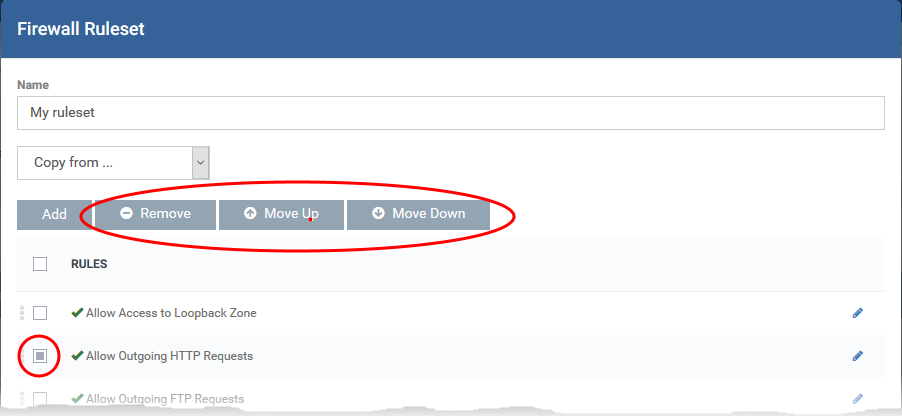
Select a rule and click 'Move Up' or 'Move Down' to change its priority order
Select a rule and click 'Remove' to delete a rule from the rule set.
Click 'OK' to add the ruleset
Click 'Save' in the Firewall settings pane to save the ruleset to the profile
Create and edit individual firewall rules
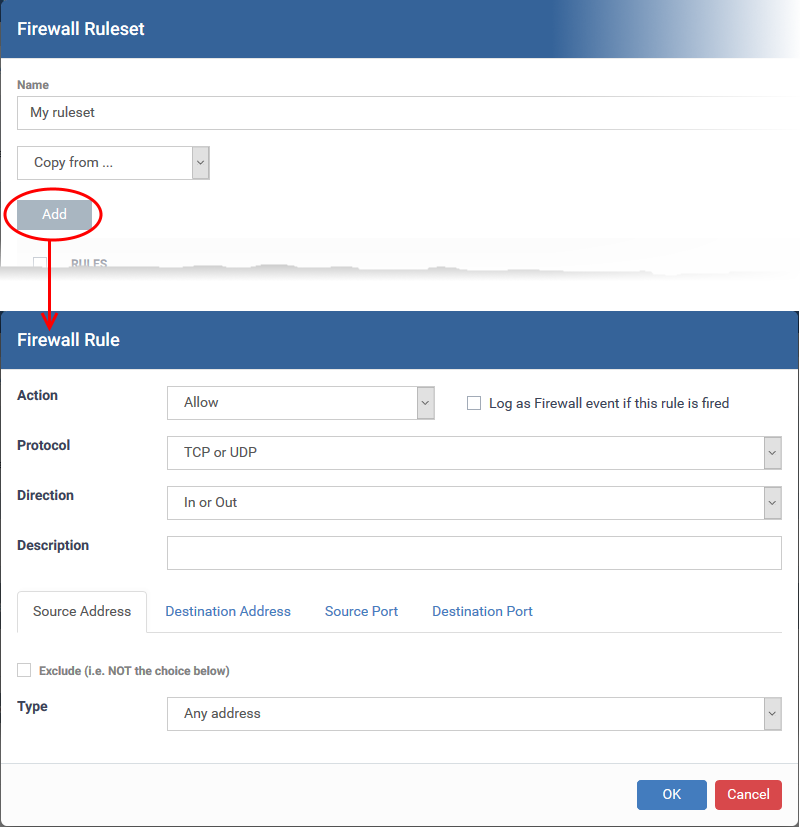
Click 'Add' in the 'Firewall Ruleset' dialog:
You configure custom rules by defining the target traffic, and the action you want to take on that traffic.
Traffic conditions includes protocol, direction, source and destination address, and source/destination port.
If you are unsure about the settings in this area, we advise you first gain some background knowledge by reading Firewall Rules Explained.
Direction: Specify whether the traffic should be inbound, outbound, or both directions. The options are 'In', 'Out' or 'In/Out' (Default).
Log as a firewall event if this rule is fired: Creates a firewall event log on the device whenever this rule is called into operation (i.e. when ALL conditions have been met). Default = Disabled.
Description: Type a friendly name for the rule. Name the rule by its intended purpose – e.g. 'Allow Outgoing HTTP requests'. If you create a friendly name, then this is shown instead of the full actions/conditions in the 'Firewall Ruleset' dialog.
Protocol
i. 'TCP', 'UPD' or 'TCP or UDP'
If you select 'TCP', 'UPD' or 'TCP or UDP' as the protocol, then you also have to set the source and destinations:
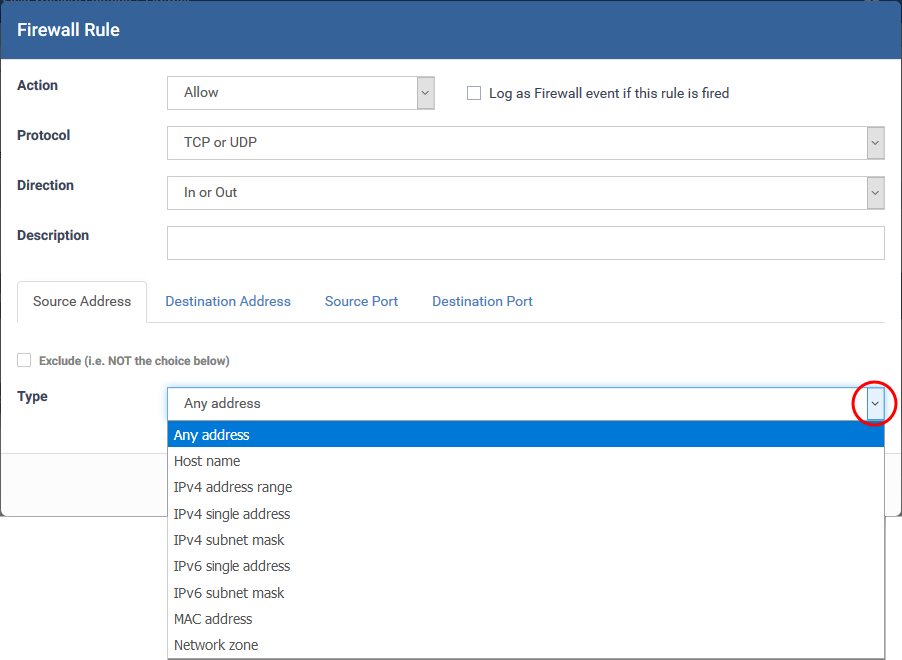
Source Address and Destination Address:
Host Name - Enter the name in the 'Host Name' text field
IPv4 Address Range - Enter the first and last IP addresses in the 'Start IP' and 'End IP' text boxes.
IPv4 Single Address - Choose a single IPv4 address
Enter the IP address in the 'IP' text box, e.g., 192.168.200.113.
IPv4 Subnet mask - Choose an IPv4 network. IP networks can be divided into smaller networks called sub-networks (or subnets).
Enter the IP address and mask of the network.
IPv6 Address Range - Choose all IPv6 addresses covered by a range - for example a segment in your private network
Enter the first and last IPv6 addresses in the 'Start IP' and 'End IP' text boxes.
Single IPv6 Address - Choose an IPv6 address
Enter the IP address in the 'IP' text box, e.g., 3ffe:1900:4545:3:200:f8ff:fe21:67cf.
IPv6 Subnet Mask - Choose a IPv6 network. IP networks can be divided into smaller networks called sub-networks (or subnets).
Enter the IP address and 'Mask' of the network in the respective fields
MAC Address - Choose a single source/destination by specifying its physical address
Enter the address in the 'MAC Address' text box.
Network Zone - Choose an entire network. This menu defaults to Local Area Network. You can also define your own zones in the firewall section of the profile. See How to configure network zones in a Windows profile for help on creating custom network zones
Exclude (i.e. NOT the choice below) - Applies the action to all items except the one you specify. For example - create a block rule, specify an IP address, then select 'Exclude'. The rule will block traffic for every address except the one you specified.
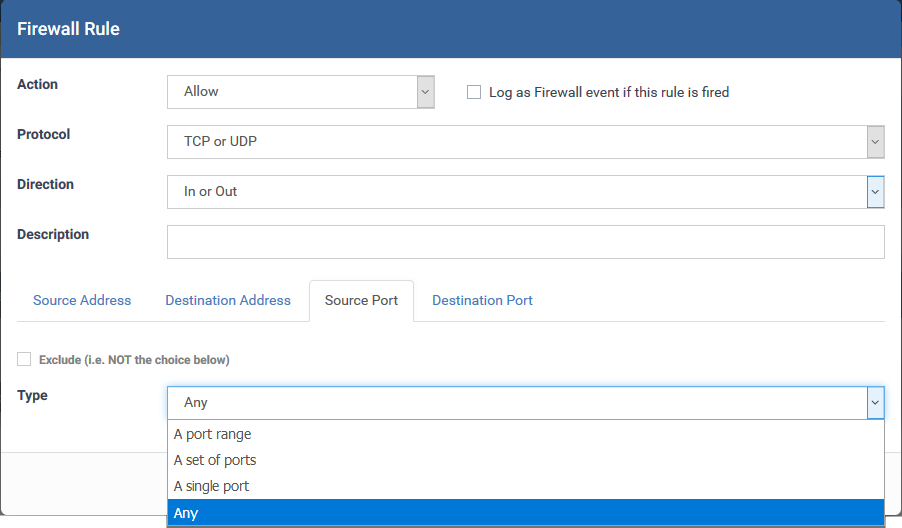
Source and Destination Ports
A single port - Specify a one port number
Enter the single port number in the 'Port' drop-down combo-box .
Any - Apply the rule to any port number - set by default, 0- 65535.
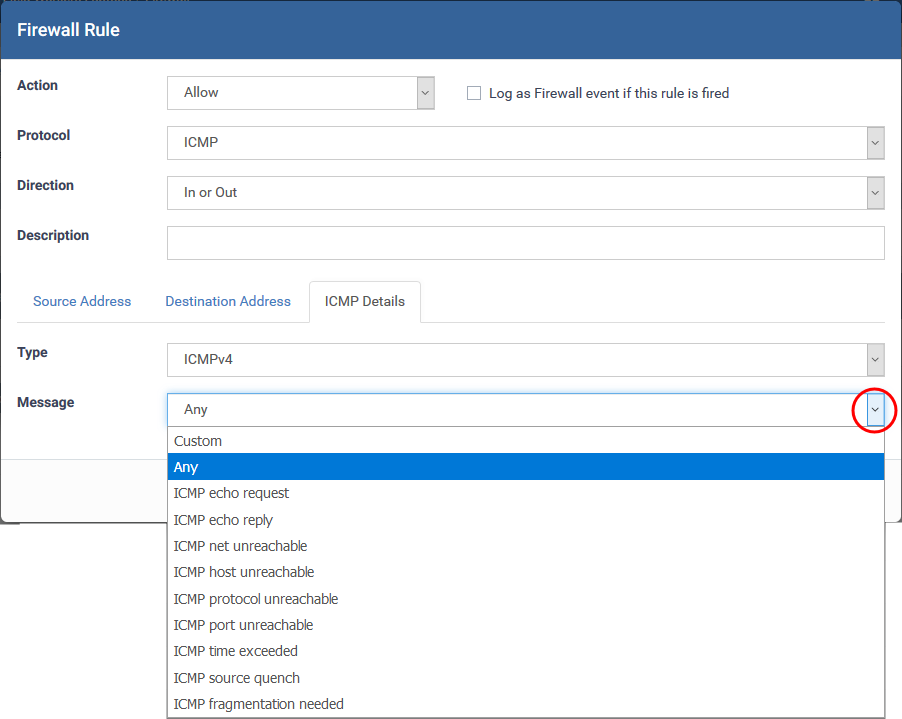
ii. ICMP
ICMP (Internet Control Message Protocol) packets contain error and control information to announce network errors, congestion, timeouts, and to assist in troubleshooting. It is mainly used for traces and pings. Pinging is frequently used to perform a quick test before initiating communications.
If you select 'ICMP' as the protocol, then you also have to set the source and destination addresses and ICMP details.The source and destination addresses can be specified as explained above.
ICMP Details
iii. IP

Click 'OK' in the 'Firewall Rule' dialog to add the rule to the ruleset
Repeat the process to add more firewall rules
The rules will be added to the list. You can re-order, remove and edit the rules as explained above.
At their core, each firewall rule is a simple IF THEN trigger - a set of conditions that a packet of data must meet, and an action that is taken if those conditions are met.
Comodo firewall analyzes the attributes of every packet of data that attempts to enter or leave the host. Attributes of a packet include the application that is sending or receiving the packet, the protocol it is using, the direction in which it is travelling, the source and destination IP addresses, and the ports it is attempting to traverse.
The firewall looks for a rule that matches all packet attributes so it can decide whether it should be allowed or not. If there is no matching rule, then the connection is automatically blocked until a rule is created.
The conditions (attributes) of a rule depend on the protocol it addresses.
• 'TCP', 'UDP' or 'TCP and UDP' - rules have the form: Action |Protocol | Direction |Source Address | Destination Address | Source Port | Destination Port
• 'ICMP' - rules have the form: Action | Protocol | Direction | Source Address | Destination Address | ICMP Details
• 'IP' - rules have the form: Action | Protocol | Direction | Source Address | Destination Address | IP Details
You should now specify the traffic covered by the rule, and the action taken if all conditions are met:
• Action: The action the firewall takes when the conditions of the rule are met. The options are 'Allow', 'Block' or 'Ask'.
• Protocol: The connection method that the application is attempting to use. Options are 'TCP', 'UDP', 'TCP or UDP', 'ICMP' or 'IP'
• Direction: Choose whether the rule applies to inbound traffic, outbound traffic, or both. Options are 'In', 'Out' or 'In/Out'
• Source Address: The origin of the connection attempt. The rule shows 'From' followed by one of the following: IP, IP range, IP Mask, Network Zone, Host Name or Mac Address
• Destination Address: The target of the connection attempt. The rule shows 'To' followed by one of the following: IP, IP range, IP Mask, Network Zone, Host Name or Mac Address
• Source Port: The port number that the application is attempting to send through. Shows 'Where Source Port Is' followed by one of the following: 'Any', 'Port #', 'Port Range' or 'Port Set'
• Destination Port: The ports on the remote host that the application is trying to connect to. Shows 'Where Source Port Is' followed by one of the following: 'Any', 'Port #', 'Port Range' or 'Port Set'
• ICMP Details: The Internet Control Message Protocol (ICMP) message that must be detected to trigger the action. Only applies if the protocol is ICMP. See Create and edit individual firewall rules for details of available messages that can be displayed.
• IP Details: The type of internet protocol (IP) that must be detected to trigger the action. See Add and Edit a Firewall Rule to see the list of available IP protocols that can be displayed here.
Once a rule is applied, Comodo Firewall monitors all network traffic relating to the chosen application and takes the specified action if the conditions are met.
How to configure general firewall settings in a Windows profile
How to configure internet access rights for applications via Endpoint Manager
How to add global rules to firewall in a Windows profile
How to configure network zones in a Windows profile
How to configure port sets in a Windows profile
CLOUD BASED IT MANAGEMENT SOFTWARE FOR
MSPs and ENTERPRISE
Remote Monitoring and Management | Service Desk | Patch Management
Now Add Up To 50 Devices for Free
---