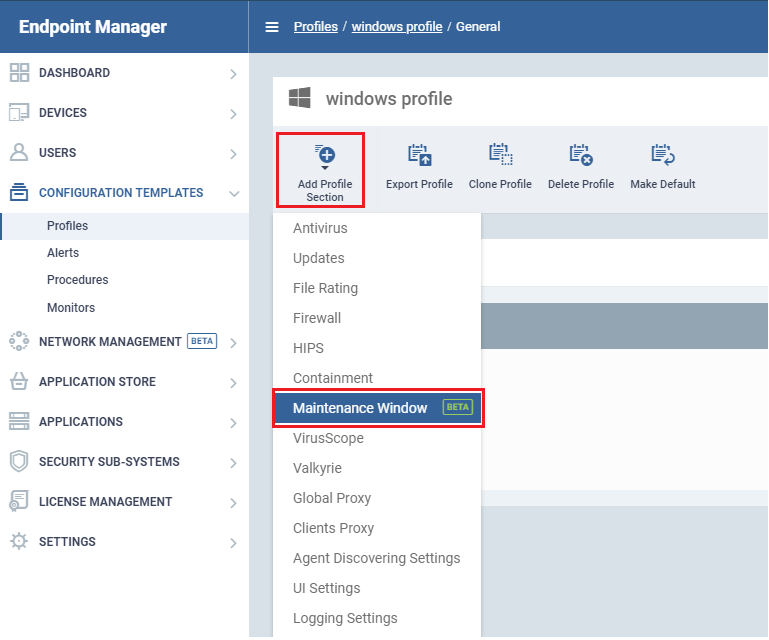
Click ‘Configuration Templates’ > ‘Profiles’ > open a Windows profile > Click ‘Add Profile Section’ > ‘Maintenance Window’
- A maintenance window is a scheduled time-slot when your Endpoint Manager procedures will run. You can create them by adding a ‘Maintenance Window’ section to a Windows profile.
- Once created, you can assign a procedure to a maintenance window in the procedure’s settings screen. You can assign multiple procedures to the same window. Your procedures will start at the time set in the window.
- You can also add multiple maintenance windows to a profile. This lets you assign different procedures in your profile to different time-slots.
- You have the option to pause all running monitors while the maintenance window runs, and to randomize task start times to avoid system congestion.
- Other options include the ability to block certain Endpoint Manager tasks if someone tries to run them outside a maintenance window, and to set times when maintenance windows should not run (holidays, etc.)
Use the links below to go to the section you need help with:
Create a Maintenance Window
Assign the maintenance window to a procedure
Further reading
Create a Maintenance Window
- Open Endpoint Manager
- Click 'Configuration Templates' > 'Profiles'
- Open the Windows profile applied to your target devices
- Open the 'Maintenance Window' tab
OR
- Click 'Add Profile Section' > 'Maintenance Window', if it hasn't yet been added
The maintenance window settings screen has two tabs:
- Maintenance Window - Manage existing windows and create new windows.
- General Settings - Choose whether to randomize tasks and/or pause monitors during a maintenance window.
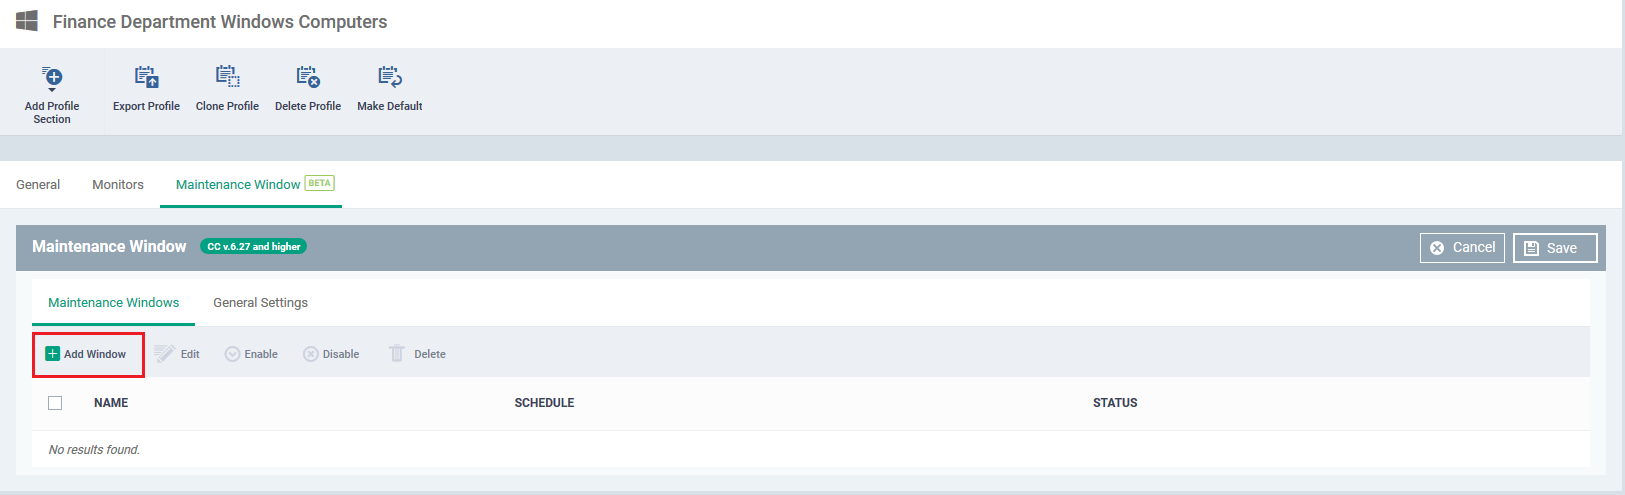
- Open the ‘Maintenance Window’ tab if it is not already open
- Click ‘Add Window’:
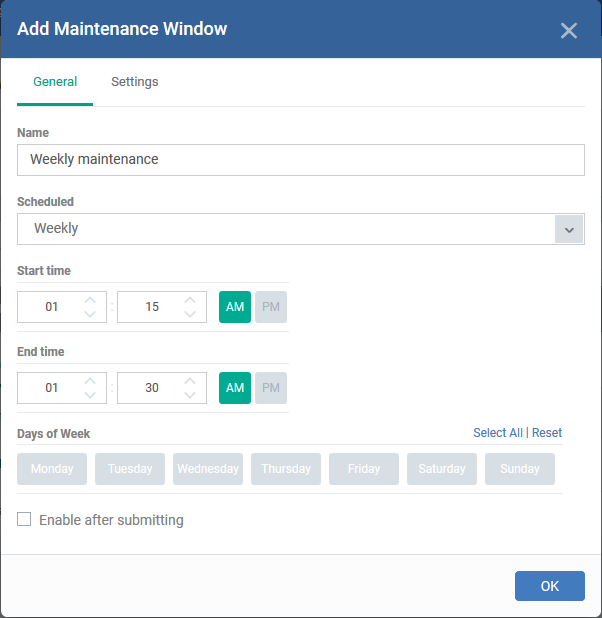
‘General’ tab - Configure the following items as required:
- Name – Create a label for the window. For example, 'Maintenance Window – 11 PM to 1 AM'
- Scheduled – Choose how often you want to run the maintenance.
- Daily – Select the start and end time of the window. The window runs every day at the time you set.
- Weekly - Select the start and end times, and the days of the week that the window should run.
- Monthly - Select the start and end times, and the days of the month that the window should run.
- Week of Month – Select the start and end times, the week number, and the days that the window should run. Use this, for example, if you want to run the window once every two weeks.
- Enable after submitting – Make the window available for use after clicking 'OK'. You must enable a maintenance window before you can assign it to a procedure. You can enable it here, or later by clicking the ‘Enable’ button above the list of saved windows.
Setting' tab
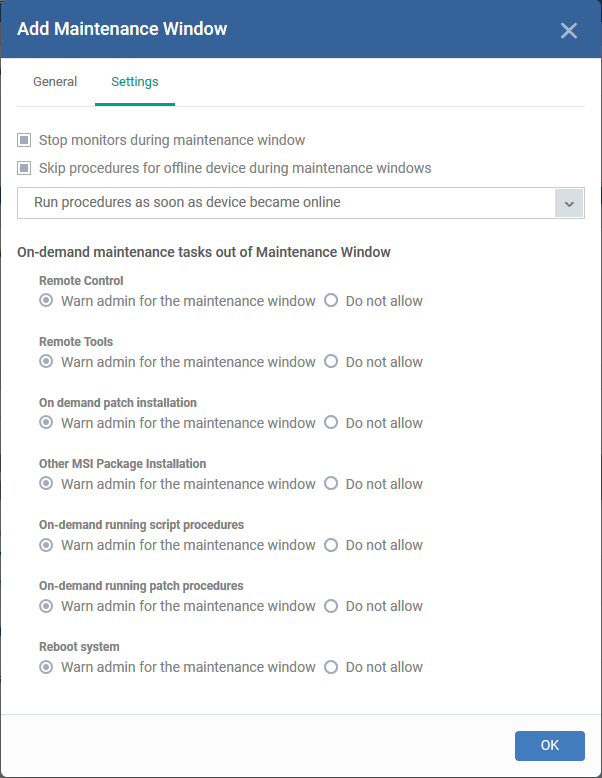
Configure the following items as required:
- Stop monitors during maintenance window - Pause all the monitors from being run at the scheduled time of maintenance window.
- Skip procedures for offline device during maintenance windows – Set procedure options for non-responsive devices. You have the following choices:
- Run the procedures as soon as the device become online: Run the procedure as soon as device comes online.
- Run the procedures during closest maintenance window: Run in the next maintenance window after the device comes online
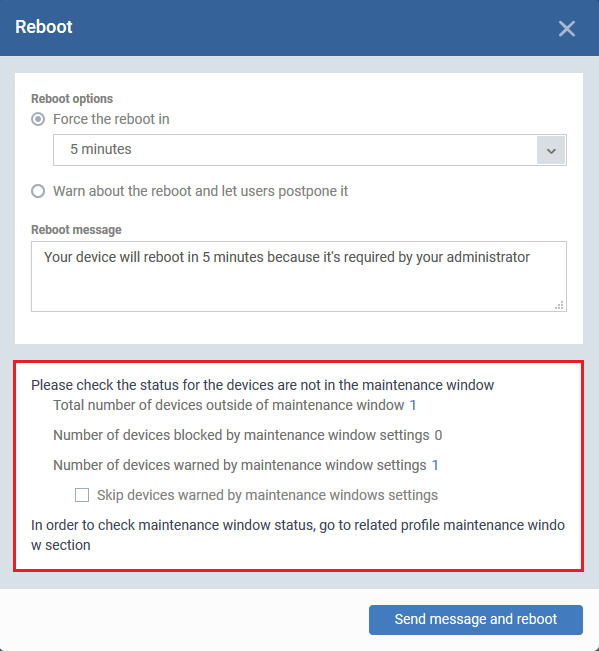
- On-demand maintenance tasks out of maintenance window – You can block certain tasks from running outside a maintenance window, or warn the admin instead. You can set block or warn options for the following tasks:
- Remote Control session
- Remote Tool session
- On-demand patch installation
- MSI package installation:
- On-demand script procedures
- On-demand patch procedures
- Reboot system
Admins will see the following notification when they try to run one of these tasks. The notification states whether the task was blocked or not:
Click ‘OK’ to save the window. You new window is listed in the ‘Maintenance Windows’ tab.
Configure general settings
- Click the ‘General Settings’ tab then click 'Edit'
Note - the settings you choose here apply to all maintenance windows on the profile:
- Randomize task starting times for each device – Staggers task start-times to prevent several procedures running at the same time on each device. This can ease congestion and lead to a smoother roll-out of your procedures.
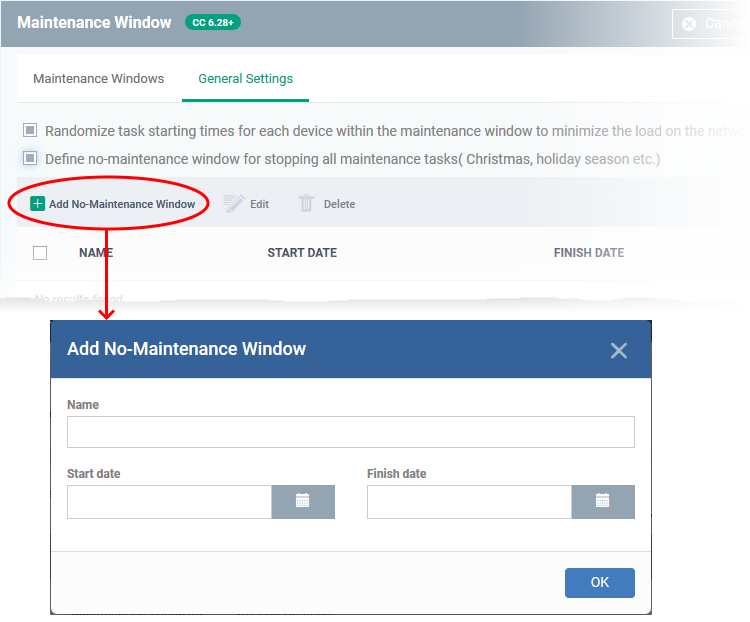
- Define no-maintenance window for stopping all maintenance tasks – Set times when all maintenance windows are cancelled. For example, during Christmas or other holiday periods. Procedures assigned to maintenance windows will not run during these times.
- Click ‘Add no-maintenance window’
- Create a name for the window. For example, ‘Easter stop maintenance’.
- Set the pause start and end dates
- Click ‘Ok’
- Click 'Save' in the maintenance window panel for your settings to take effect
Assign the maintenance window to a procedure
- Procedures are standalone instruction scripts for Windows devices. You can create procedures to accomplish various tasks, like identify and fix issues, monitor resources, and run patches.
- Procedures are added to a profile which is in turn deployed to target devices.
- See this wiki if you need to read some background on this process.
Follow these steps to assign a maintenance window to a procedure:
- Click ‘Configuration Templates’ > ‘Profiles’
- Click the name of the Windows profile to which you added the maintenance window earlier
- Open the ‘Procedures’ tab of the profile
OR
- Click ‘Add Profile Section’ > ‘Procedures’ if you haven’t yet added a procedure section
- Click ‘Add’ in the procedures tab to open the following configuration screen:
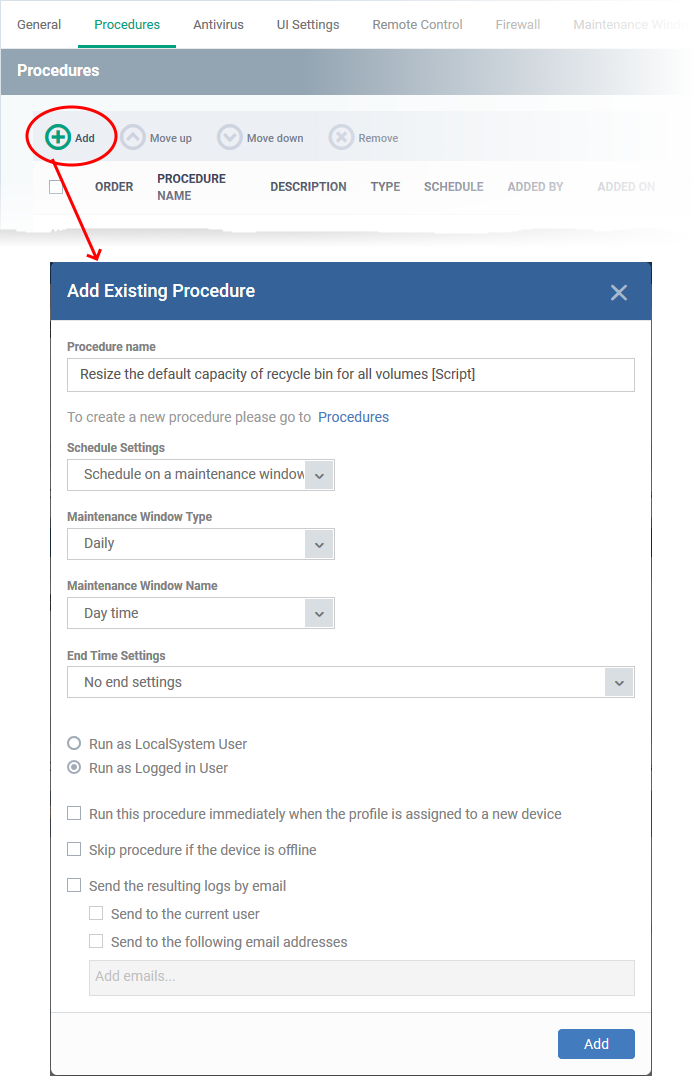
Procedure Name - Select an existing OS patch, third-party application patch or Windows script procedure by typing the first few characters of its name. Make sure you have already approved the procedure.
- See this wiki if you need help to create and manage procedures
Schedule Settings – Choose ‘Schedule on a maintenance window’. Doing so will open the following options:
- Maintenance Window Type - Choice of ‘Daily’, ‘Weekly’, ‘Monthly’ and ‘Week of month’. This is the frequency you selected when you created the maintenance window earlier.
- Maintenance Window Name – Shows a list of maintenance windows which have the frequency you chose in the ‘Window Type’ box above. Select the window you want to add to the procedure.
- End Time Settings:
- No end settings – All procedures will run to completion.
- Run until – Chose a cut-off time from the calendar.
- Run no more than – Specify how long the procedure should run.
Note – For the last two settings, any procedure that does not finish by the cut-off time is aborted and all changes undone.
User Account Options - Choose 'Run as system user' or 'Run as logged in user' based on the access rights required for the procedure to run at the endpoint. This applies only to 'Script' procedure
Execution Options
- Run this procedure immediately when the profile is assigned to a new device - The procedure will run on target devices as soon as the profile is applied to the device, in addition to any schedule.
- Skip procedure if the device is offline - The procedure will be aborted is the device is not connected to EM at the time of execution. By default, procedures are queued for later if the device is not connected to EM. The task will run as soon as it comes online. Select this option If you do not want the task to be queued.
Report Options - Only for script procedures
- Send to current user - Procedure results are sent to the admin who is currently logged into Endpoint Manager.
- Send to the following email addresses - Add email addresses to whom log results should be sent.
Configure parameters - Only for script procedures with variable parameters.
- Click ‘Configure parameters’. Use the default values or choose a new value.
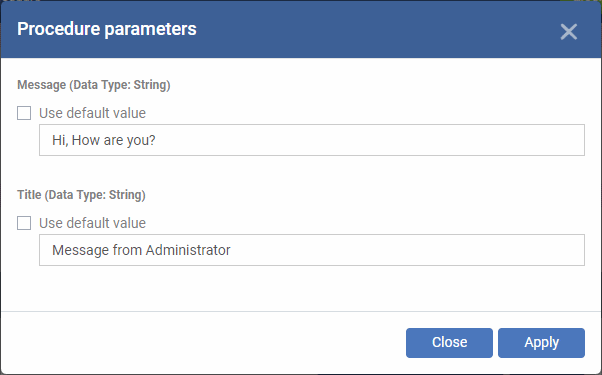
- Click ‘Apply’ to add the parameters
- Click ‘Add’ to add the procedure to the profile
- Repeat the process to add more procedures
- Procedures are run in order from top to bottom
- Select a procedure and click 'Move up' or 'Move down' to set the priority
- Click 'Save' for your settings to take effect on the devices to which the profile is applied
Further reading:
How to configure and run procedures on managed devices
How to schedule and run procedures in a profile