Click 'Users' > 'User List'
- The user list shows all users and staff you have enrolled to Endpoint Manager.
- From here, you can add and manage users, enroll user devices, apply profiles to devices, run procedures, and more.
- See this wiki if you need help to add users
- See this wiki if you need help to add user devices
See the following links for further help:
The user list interface
- Login to ITarian
- Click 'Applications' > 'Endpoint Manager'
- Click 'Users' > 'User List':
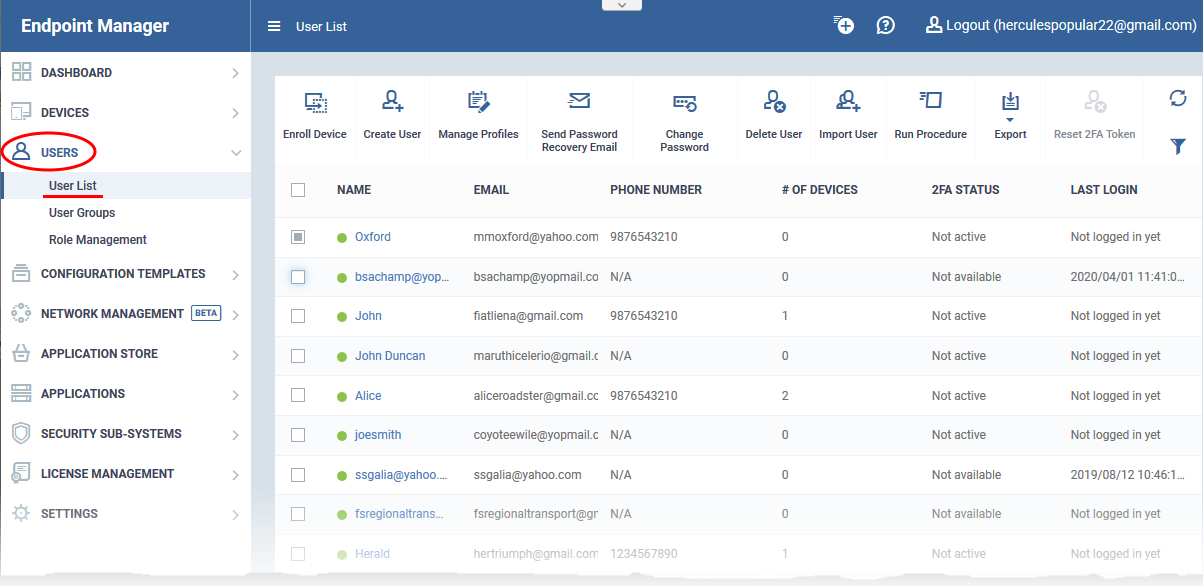
Name - First and last name of the user.
Email - The registered email address of the user. Account activation and device enrollment mails are sent to this address.
Phone Number - The registered contact number of the user.
Number of Devices - The total count of devices enrolled for the user.
2FA Status - States whether two-factor authentication (2FA) is enabled for the user.
- Active - 2FA is enabled and the user has completed the setup process.
- Not active - The user has not yet completed the 2FA setup process. 2FA may or may not be enabled in the portal.
- Not configured - 2FA was reset by an admin and the user is yet to re-configure it.
- Not available - Indicates the user was added via the ITarian portal. For these users, 2FA is configured in ITarian.
Setup 2FA in ITarian – Login to ITarian > Click ‘Management’ > ‘Account’ > ‘Account Security Detais’ > ‘Enable Two factor Authentication’. See this help page for more.
Setup 2FA in Endpoint Manager – Open Endpoint Manager > Click ‘Settings’ > ‘Portal Management’ > ‘Account Security’ > ‘Force users to use 2FA’. See this help page for more.
- The preferred option is to setup in ITarian. Doing so enables 2FA for the ITarian portal AND Endpoint Manager AND other ITarian modules such as Service Desk.
Last Login - Date and time that the user most recently accessed EM.
The controls on the top lets you perform various actions:
Enroll Device - Add user devices for management by EM. You can enroll Android, iOS, Mac, Windows and Linux devices.
- See this wiki if you need help to enroll user devices
Create User - Manually add users to EM.
- You can only add devices for users after you have enrolled the users themselves. See this wiki if you need help to add new users.
- You can convert a user into an admin by assigning them an appropriate role. See this wiki for help to assign roles.
Manage Profiles - A profile determines the security configuration and network access rights of a device.
Send Password Recovery Email - Reset the password of users who have admin privileges. The password allows them to login to the EM console.
Change Password - Generate new password for a user.
Delete User - Terminate selected user accounts.
Import User - Bulk add new users by importing them from a comma separated values (CSV) file.
- See this wiki if you need help to import users from a .csv file
Export - Save a copy of the current user list as a comma separated values (.csv) file.
- The exported .csv is available at 'Dashboard' > 'Reports'
Reset 2FA Token - Force users to configure new two-factor authentication codes.
Run Procedure - Execute stand-alone instruction scripts and patches on all Windows devices belonging to a user.
Manage users and their devices
- Click 'Users' > 'User List'
- Click on the name of a user
The user details screen opens:
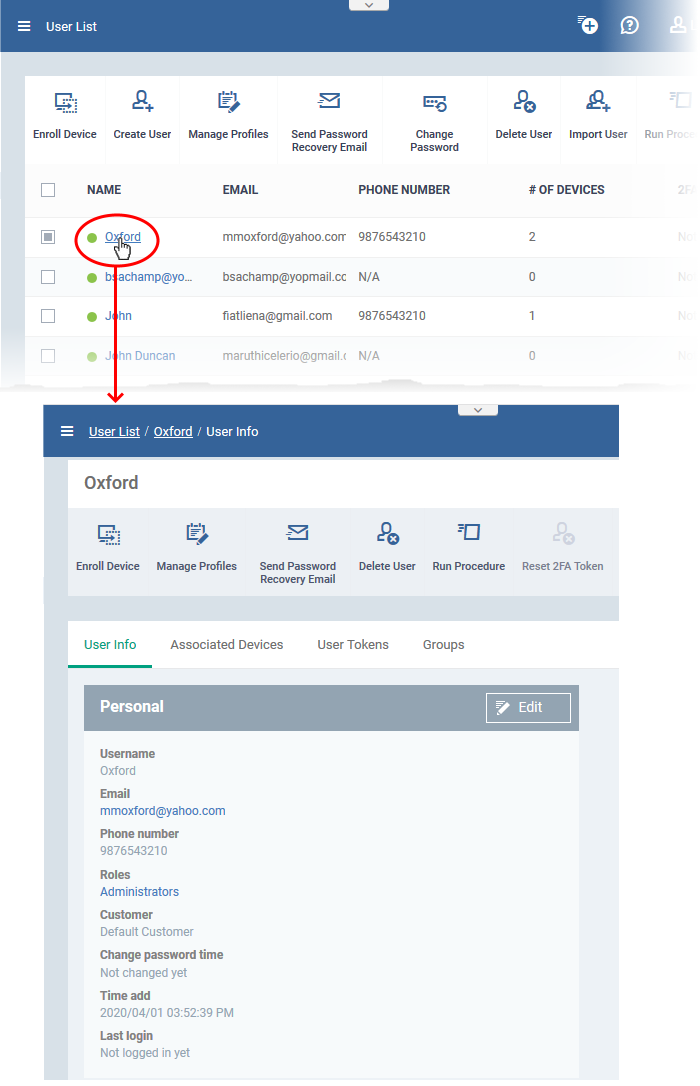
The details screen has four tabs:
- User Info – View and edit user contact details and their Endpoint Manager role.
- Associated Devices - Shows devices owned by the user.
- User Tokens - Shows the device enrollment tokens generated for the user.
- Groups - Shows the user groups of which the user is a member. You can add the user to new groups or remove the from groups.
View and update user information
- Click 'Users' > 'User List'
- Click the name of a user
- Click the 'User Info' tab , if not already open.
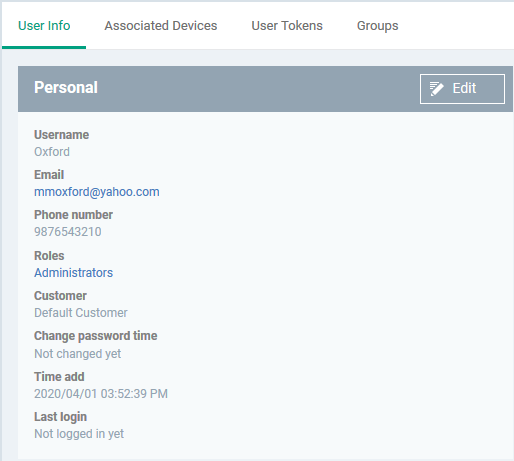
- The tab shows user contact details, the role of the user, and more
- Click the 'Edit' button to update their details

- Update the username, email and phone number as required.
- Click the role name to change their role if required. See this wiki to read more about roles.
- Click 'Save' at the top for your changes to take effect
View devices associated with a user
- Click 'Users' > 'User List'
- Click the name of a user
- Click the 'Associated Devices' link
This tab shows all devices enrolled for the user:
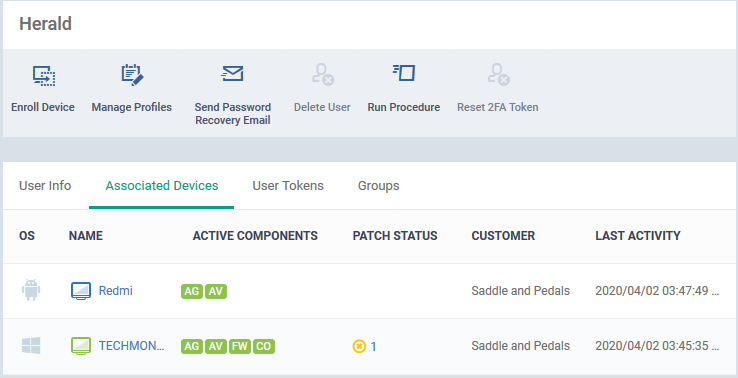
OS - The operating system of the device.
Name - The label of the device as assigned by the user or local admin.
- If no name exists, the model number is used as the device name.
- Click the name of a device to view its details. See 'View summary information' if you need more info on the details screen.
Active Components - The endpoint security modules running on the device. Possible components are 'Agent' (AG), 'Antivirus' (AV), 'Firewall' (FW) and 'Containment' (CO). See this page for a more detailed explanation of the icons in this table.
Patch Status - How many OS patches and updates are ready to install on the endpoint. Patch status is only available for Windows devices.
- Click the number to open the 'Patch Management' tab of the 'Device Details' interface. You can initiate installation of the missing patches.
- See this wiki to read more about managing patches on individual devices.
Customer - The customer organization to which the device is registered.
Last Activity - The date and time at which the device last communicated with the EM server.
View user device enrollment tokens
- Endpoint Manager generates a unique token for each user when you enroll a device for them.
- This token is used by the client on the device to verify the enrollment request.
- A single token can be used to enroll multiple devices for the same user. A token is valid for 720 days.
- The user tokens screen lists all tokens generated for the user. You can use these tokens to manually enroll devices for the user.
View user tokens
- Click 'Users' > 'User List'
- Click the name of a user
- Click the 'User Tokens' link
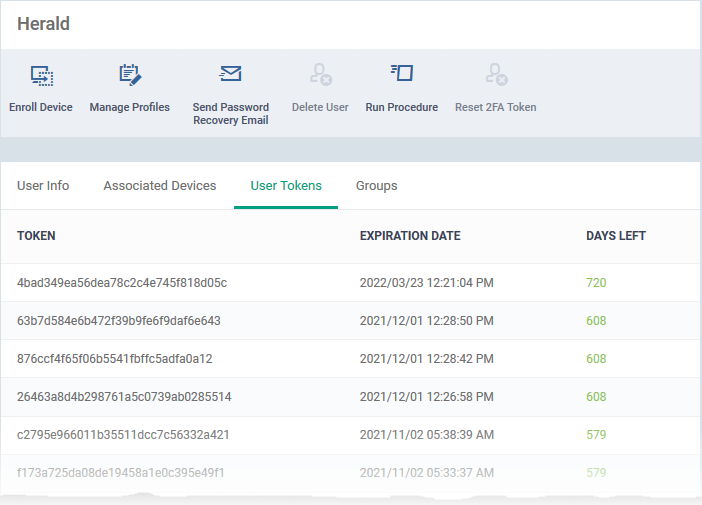
Token - The unique serial number of the token.
Expiration Date - Date till which the token is valid. Users can enroll devices using the same token until expiry.
Days left - How many days remain until the token expires.
View and manage a user's group membership
- Click 'Users' > 'User List'
- Click the name of a user
- Click the 'Groups' tab to view all groups to which the user belongs:
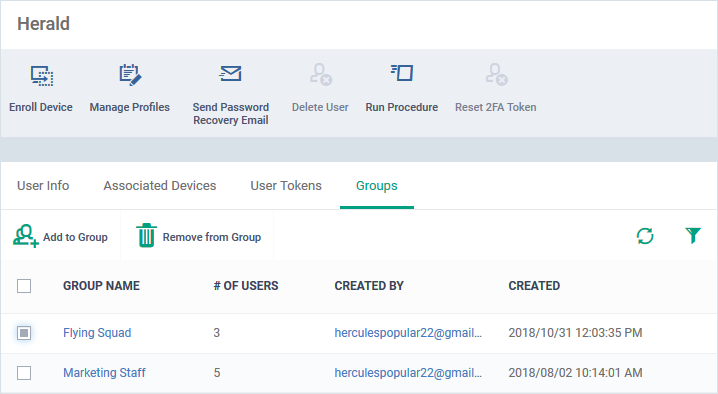
- Group Name - The group label. Click the group name to view and edit group details, manage configuration profiles and more.
- Number of Users - The total count of users in the group.
- Created By - The admin who added the group.
- Created - Date and time the group was added.
Add the user to a new group
- Click 'Add to group'
- Start typing the name of the group to which you want to add the user and select from the suggestions:
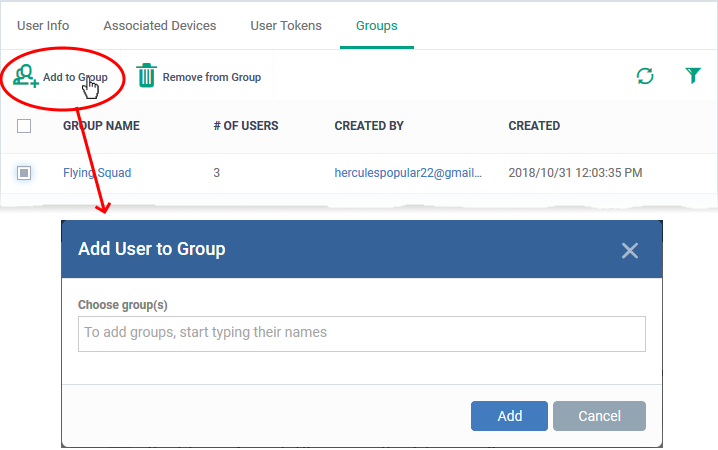
The user is added to the group. All group profiles are applied to the user’s devices.
Remove the user from a group
- Select the group from the list and click 'Remove from Group'
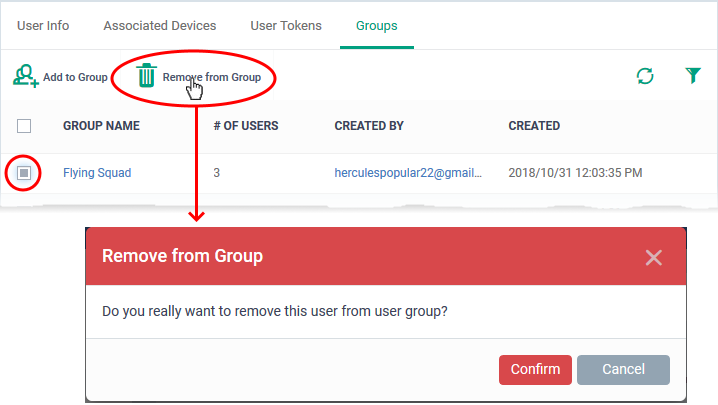
- Click 'Confirm' to remove the user's membership from the group.
Any group configuration profiles are automatically removed from the user’s devices.
Apply profiles to user devices
Profiles assigned to a user apply to all devices owned by the user.
You can apply multiple profiles for different operating systems to a user. Endpoint Manager will apply the appropriate profile to a device depending on its OS.
See this wiki for help to apply profiles to a user.
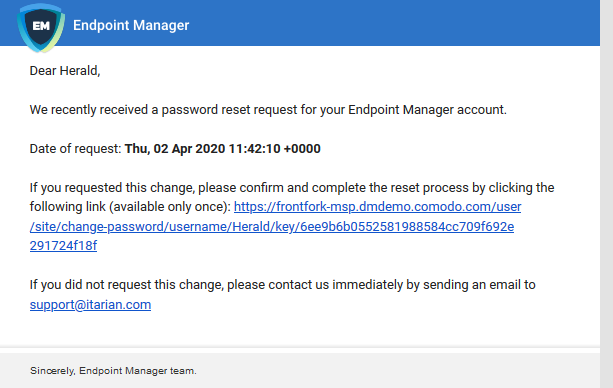
Send a password recovery mail to a user
Users with admin roles can login to the Endpoint Manager console. An account activation mail is sent to such users when they are first given the admin role. The mail lets them create a password to login to Endpoint Manager. You can send them a password reset mail if, for example, they have forgotten their password.
- Click 'Users' > 'User List'
- Select the user for whom you want to send password reset email
- Click 'Send Password Recovery Email'
Note - you can only send reset mails to users that were directly added to Endpoint Manager. This option is not available for users added via the ITarian portal.
The email contains a link which lets the user change their password:
Reset password for a user
You can manually set a new password for a user instead of letting them reset it for themselves.
- Click 'Users' > 'User List'
- Select the user for whom you want to set a new password
- Click 'Change Password':
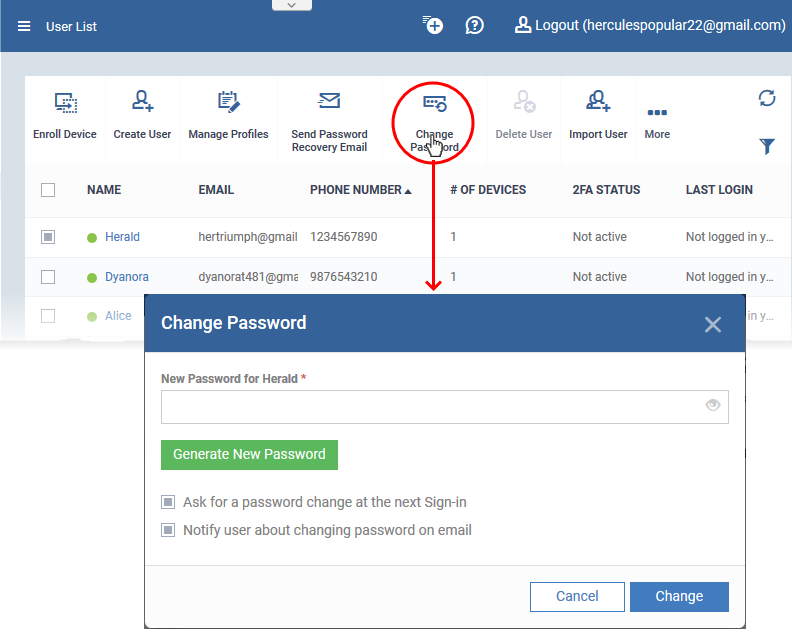
- Type a new password for the user in the box provided. Alternatively, click 'Generate New Password' to have Endpoint Manager create a random password.
- Ask for a password change at the next Sign-in - After logging in with the new password you provide, users will be forced to change their password again. This improves privacy by ensuing only the user knows their own password.
- Notify user about changing password on email - Will send an email to users that informs them their password has been reset.
Click 'Change'.
Reset two-factor authentication token for a user
- You can force admin users to reset their two-factor authentication (2FA) on their next login.
- Note: This action does not reset 2FA on ITarian logins. It only affects 2FA for admins who were created in Endpoint Manager itself.
Reset two factor authentication
- Click 'Users' > 'User List'
- Select the user for whom you want reset two-factor authentication
- Click 'Reset 2FA Token'
- Alternatively, click 'Users' > 'User List' > click on a username > 'Reset 2FA Token'.
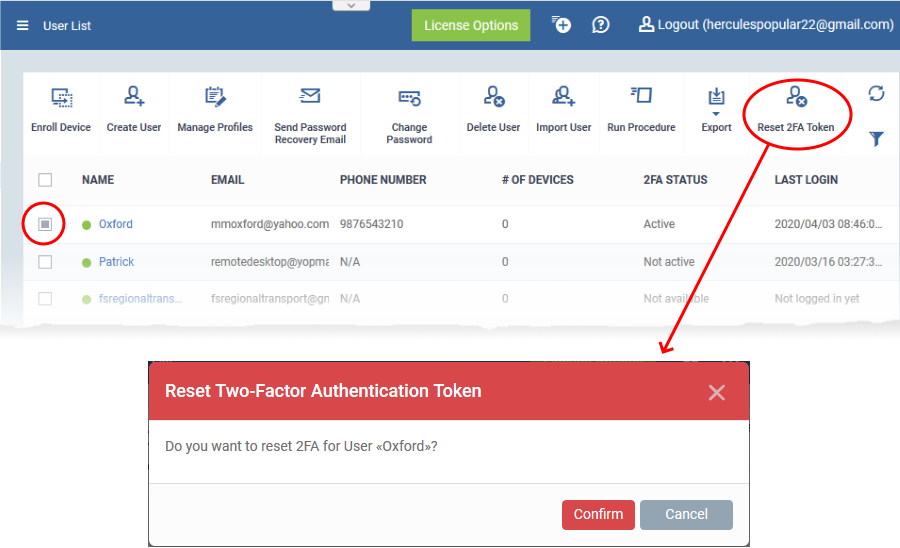
- Click 'Confirm'
- The admin will go through the 2FA setup process after their next login.
Run procedure on user devices
Procedures are standalone instruction scripts and patches for Windows devices.
There are various ways you can execute procedures on devices. See this wiki for more in-depth info on procedures.
- Click ‘Users’ > ‘User List’
- Select the target users then click ‘Run Procedure’
- Alternatively, click on a user’s name then click ‘Run Procedure’ in their details screen.
- Next, choose the script you want to run and other options:
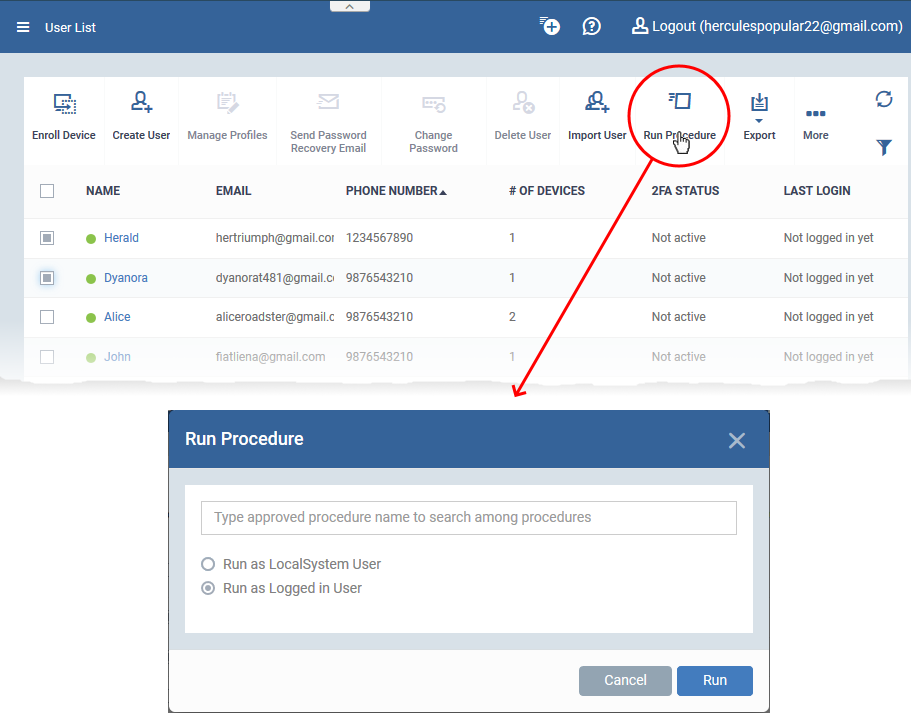
- Procedure Name - Type the name of the procedure that you want to add (make sure you have approved the procedure).
- Run as Local System User / Run as Logged in user - Choose the user account under which the procedure should run. This option is not available for patch procedures.
- Send the resulting logs by email - Script procedures only.
- Send to current user - Procedure results are sent to the admin who is currently logged into Endpoint Manager.
- Send to the following email addresses - Add email addresses to whom procedure results should be sent.
Click ‘Run’
Endpoint Manager runs the procedure on the users’ devices.
You can also view the results of the procedure in 'Device Details' > 'Logs'.
See this wiki if you want to read more about logs.
Further reading:
How to create new user accounts and user groups in Endpoint Manager
How to add staff and assign or reassign them to roles
How to create a new role with custom permissions and assign it to users
How to enroll devices using the on-boarding wizard